Advanced VR Mechanics With Unity and the HTC Vive – Part 2
Learn how to create a powerful, flexible, and reusable interaction system for your HTC Vive games in Unity with part 2 of this tutorial series! By Eric Van de Kerckhove.
Creating A Virtual Backpack
In order to know if the player is holding certain objects with the controllers, you’ll need a controller manager which references both controllers.
Create a new C# script in the Scripts/RWVR folder and name it RWVR_ControllerManager. Open it in a code editor.
Remove the Start() and Update() methods and add these variables:
public static RWVR_ControllerManager Instance; // 1

public RWVR_InteractionController leftController; // 2
public RWVR_InteractionController rightController; // 3
Here’s what the above variables are for:
- A
public staticreference to this script so it can be called from all other scripts. - Reference to the left controller.
- A reference to the right controller.
Add the following method below the variables:
private void Awake()
{
    Instance = this;
}
This saves a reference to this script in the Instance variable.
Now add this method below Awake():
public bool AnyControllerIsInteractingWith<T>() // 1
{
    if (leftController.InteractionObject && leftController.InteractionObject.GetComponent<T>() != null) // 2
    {
        return true;
    }

    if (rightController.InteractionObject && rightController.InteractionObject.GetComponent<T>() != null) // 3
    {
        return true;
    }

    return false; // 4
}
This helper method checks if any of the controllers have a certain component attached to them:
- A generic method that accepts any type.
- If the left controller is interacting with an object and it has the requested component type attached, return true.
- If the right controller is interacting with an object and it has the requested component type attached, return true.
- If neither controller has the requested component attached, return false.
Save this script and return to the editor.
The final script is for the backpack itself.
Create a new C# script in the Scripts \ RWVR folder and name it RWVR_SpecialObjectSpawner.
Open it in your favorite code editor and replace this line:
public class RWVR_SpecialObjectSpawner : MonoBehaviour
With this:
public class RWVR_SpecialObjectSpawner : RWVR_InteractionObject
This makes the backpack inherit from RWVR_InteractionObject.
Now remove both the Start() and Update() methods and add the following variables in their place:
public GameObject arrowPrefab; // 1
public List<GameObject> randomPrefabs = new List<GameObject>(); // 2
These are the GameObjects which will be spawned out of the backpack.
- A reference to the RealArrow prefab.
- List of GameObjects to choose from when something is pulled out of the backpack.
Add the following method:
private void SpawnObjectInHand(GameObject prefab, RWVR_InteractionController controller) // 1
{
    GameObject spawnedObject = Instantiate(prefab, controller.snapColliderOrigin.position, controller.transform.rotation); // 2
    controller.SwitchInteractionObjectTo(spawnedObject.GetComponent<RWVR_InteractionObject>()); // 3
    OnTriggerWasReleased(controller); // 4
}
This method attaches an object to the player’s controller, as if they grabbed it from behind their back.
- Accept two parameters:
prefabis the GameObject that will be spawned, whilecontrolleris the controller to which it will attach to. - Spawn a new GameObject with the same position and rotation as the controller and store a reference to it in
spawnedObject. - Switch the controller’s active
InteractionObjectto the object that was just spawned. - “Release” the backpack to give full focus to the spawned object.
The next method decides what kind of object should be spawned when the player pressed the trigger button over the backpack.
Add the following method below SpawnObjectInHand():
public override void OnTriggerWasPressed(RWVR_InteractionController controller) // 1
{
    base.OnTriggerWasPressed(controller); // 2

    if (RWVR_ControllerManager.Instance.AnyControllerIsInteractingWith<Bow>()) // 3
    {
        SpawnObjectInHand(arrowPrefab, controller);
    }
    else // 4
    {
        SpawnObjectInHand(randomPrefabs[UnityEngine.Random.Range(0, randomPrefabs.Count)], controller);
    }
}
Here’s what each part does:
- Overrides the base
OnTriggerWasPressed()method. - Calls the base
OnTriggerWasPressed()method. - If any of the controllers are holding a bow, spawns an arrow.
- If not, spawns a random GameObject from the
randomPrefabslist.
Save this script and return to the editor.
Create a new Cube in the Hierarchy, name it BackPack and drag it onto [CameraRig]\ Camera (head) to parent it to the player’s head.
Set its position and scale to (X:0, Y:-0.25, Z:-0.45) and (X:0.6, Y:0.5, Z:0.5) respectively.
The backpack is now positioned right behind and under the player’s head.
Set the Box Collider‘s Is Trigger to true. this object doesn’t need to collide with anything.
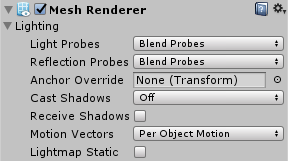
Set Cast Shadows to Off and disable Receive Shadows on the Mesh Renderer component.
Now add a RWVR_Special Object Spawner component and drag a RealArrow from the Prefabs folder onto the Arrow Prefab field.
Finally, drag a Book and a Die prefab from the same folder to the Random Prefabs list.
Now add a new empty GameObject, name it ControllerManager and add a RWVR_Controller Manager component to it.
Expand [CameraRig] and drag Controller (left) to the Left Controller slot and Controller (right) to the Right Controller slot.
Now save the scene and test out the backpack. Try grabbing behind your back and see what stuff you’ll pull out!
That concludes this tutorial! You now have a fully functional bow and arrow and an interaction system you can expand with ease!
Where To Go From Here?
You can download the finished project here.
In this tutorial you’ve learned how to create the following features and updates for your HTC Vive game:
- Expand upon the interaction system.
- Make a functional bow and arrow.
- Create a virtual backpack.

If you’re interested in learning more about creating killer games with Unity, check out our book, Unity Games By Tutorials.
In this book, you create four complete games from scratch:
- A twin-stick shooter
- A first-person shooter
- A tower defense game (with VR support!)
- A 2D platformer
By the end of this book, you’ll be ready to make your own games for Windows, macOS, iOS, and more!
This book is for complete beginners to Unity, as well as for those who’d like to bring their Unity skills to a professional level. The book assumes you have some prior programming experience (in a language of your choice).
If you have any comments or suggestions, please join the discussion below!