Porting Your iOS App to macOS
Learn how to port iOS apps to macOS. If you’re developing apps for iOS, you already have skills that you can use to write apps for macOS! By Andy Pereira.
If you’re developing apps for iOS, you already have a particular set of skills that you can use to write apps for another platform – macOS!
If you’re like most developers, you don’t want to have to write your app twice just to ship your app on a new platform, as this can take too much time and money. But with a little effort, you can learn how to port iOS apps to macOS, reusing a good portion of your existing iOS app, and only rewriting the portions that are platform-specific.
In this tutorial, you’ll learn how to create an Xcode project that is home to both iOS and macOS, how to refactor your code for reuse on both platforms, and when it is appropriate to write platform specific code.
To get the most out of this tutorial you should be familiar with NSTableView. If you need to refresh your knowledge we have an introduction for you.
Getting Started
For this tutorial, you’ll need to download the starter project here.
The sample project is a version of the BeerTracker app used in previous tutorials. It allows you to keep a record of beers you’ve tried, along with notes, ratings, and images of the beers. Build and run the app to get a feel for how it works.
![]()
Since the app is only available on iOS, the first step to porting the app for macOS is to create a new target. A target simply is a set of instructions telling Xcode how to build your application. Currently, you only have an iOS target, which contains all the information needed to build your app for an iPhone.
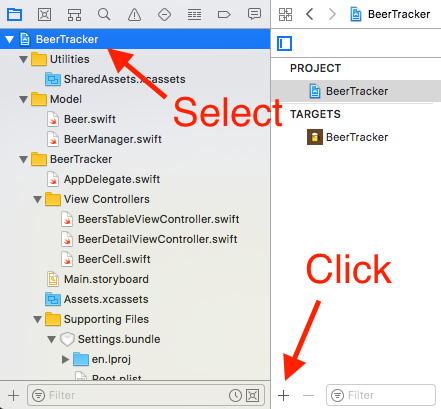
Select the BeerTracker project at the top of the Project Navigator. At the bottom of the Project and Targets list, click the + button.
This will present a window for you to add a new target to your project. At the top of the window, you’ll see tabs representing the different categories of platforms supported. Select macOS, then scroll down to Application and choose Cocoa App. Name the new target BeerTracker-mac.

Adding the Assets
In the starter app you downloaded, you’ll find a folder named BeerTracker Mac Icons. You’ll need to add the App Icons to AppIcon in Assets.xcassets found under the BeerTracker-mac group. Also add beerMug.pdf to Assets.xcassets. Select beerMug, open the Attributes Inspector and change the Scales to Single Scale. This ensures you don’t need to use different scaled images for this asset.

When you’re done, your assets should look like this:
![]()
In the top left of the Xcode window, select the BeerTracker-mac scheme in the scheme pop-up. Build and run, and you’ll see an empty window. Before you can start adding the user interface, you’ll need to make sure your code doesn’t have any conflicts between UIKit, the framework used on iOS, and AppKit, the framework used by macOS.
![]()
Separation of Powers
The Foundation framework allows your app to share quite a bit of code, as it is universal to both platforms. However, your UI cannot be universal. In fact, Apple recommends that multi-platform applications should not attempt to share UI code, as your secondary platform will begin to take on the appearance of your initial application’s UI.
iOS has some fairly strict Human Interface Guidelines that ensure your users are able to read and select elements on their touchscreen devices. However, macOS has different requirements. Laptops and desktops have a mouse pointer to click and select, allowing elements on the screen to be much smaller than would be possible on a phone.
Having identified the UI as needing to be different on both platforms, it is also important to understand what other components of your code can be reused, and which ones need to be rewritten. Keep in mind that there isn’t necessarily a definitive right or wrong answer in most of these cases, and you will need to decide what works best for your app. Always remember that the more code shared, the less code you need to test and debug.
Generally, you’ll be able to share models and model controllers. Open Beer.swift, and open the Utilities drawer in Xcode, and select the File Inspector. Since both targets will use this model, under Target Membership, check BeerTracker-mac leaving BeerTracker still checked. Do the same thing for BeerManager.swift, and SharedAssets.xcassets under the Utilities group.

If you try to build and run, you will get a build error. This is because Beer.swift is importing UIKit. The model is using some platform specific logic to load and save images of beers.
Replace the import line at the top of the file with the following:
import Foundation
If you try to build and run, you’ll see the app no longer compiles due to UIImage being part of the now removed UIKit. While the model portion of this file is shareable between both targets, the platform specific logic will need to be separated out. In Beer.swift, delete the entire extension marked Image Saving. After the import statement, add the following protocol:
protocol BeerImage {
  associatedtype Image
  func beerImage() -> Image?
  func saveImage(_ image: Image)
}
Since each target will still need access to the beer’s image, and to be able to save images, this protocol provides a contract that can be used across the two targets to accomplish this.
Models
Create a new file by going to File/New/File…, select Swift File, and name it Beer_iOS.swift. Ensure that only the BeerTracker target is checked. After that, create another new file named Beer_mac.swift, this time selecting BeerTracker-mac as the target.
Open Beer_iOS.swift, delete the file’s contents, and add the following:
import UIKit

// MARK: - Image Saving
extension Beer: BeerImage {
  // 1.
  typealias Image = UIImage

  // 2.
  func beerImage() -> Image? {
    guard let imagePath = imagePath,
      let path = NSSearchPathForDirectoriesInDomains(.documentDirectory, .userDomainMask, true).first else {
        return #imageLiteral(resourceName: "beerMugPlaceholder")
    }

    // 3.
    let pathName = (path as NSString).appendingPathComponent("BeerTracker/\(imagePath)")
    guard let image = Image(contentsOfFile: pathName) else { return #imageLiteral(resourceName: "beerMugPlaceholder") }
    return image
  }

  // 4.
  func saveImage(_ image: Image) {
    guard let imgData = UIImageJPEGRepresentation(image, 0.5),
      let path = NSSearchPathForDirectoriesInDomains(.documentDirectory, .userDomainMask, true).first else {
        return
    }

    let appPath = (path as NSString).appendingPathComponent("/BeerTracker")
    let fileName = "\(UUID().uuidString).jpg"
    let pathName = (appPath as NSString).appendingPathComponent(fileName)
    var isDirectory: ObjCBool = false
    if !FileManager.default.fileExists(atPath: appPath, isDirectory: &isDirectory) {
      do {
        try FileManager.default.createDirectory(atPath: pathName, withIntermediateDirectories: true, attributes: nil)
      } catch {
        print("Failed to create directory: \(error)")
      }
    }
    if (try? imgData.write(to: URL(fileURLWithPath: pathName), options: [.atomic])) != nil {
      imagePath = fileName
    }
  }
}
Here’s what’s happening:
- The BeerImage protocol requires the implementing class to define an associated type. Think of this as a placeholder name for the type of object you really want to use, based on your object’s needs. Since this file is for iOS, you’re using UIImage.
- Implement the first protocol method. Here, the Image type represents UIImage.
- Another example of how the type alias can be used when initializing an image.
- Implement the second protocol method to save an image.
Switch your scheme to BeerTracker, then build and run. The application should behave as before.
Now that your iOS target is working, you’re ready to add macOS-specific code. Open Beer_mac.swift, delete all the contents, and add the following code:
import AppKit

// MARK: - Image Saving
extension Beer: BeerImage {
  // 1.
  typealias Image = NSImage

  func beerImage() -> Image? {
    // 2.
    guard let imagePath = imagePath,
      let path = NSSearchPathForDirectoriesInDomains(.applicationSupportDirectory, .userDomainMask, true).first else {
        return #imageLiteral(resourceName: "beerMugPlaceholder")
    }
    let pathName = (path as NSString).appendingPathComponent(imagePath)
    guard let image = Image(contentsOfFile: pathName) else { return #imageLiteral(resourceName: "beerMugPlaceholder") }
    return image
  }

  func saveImage(_ image: Image) {
    // 3.
    guard let imgData = image.tiffRepresentation,
      let path = NSSearchPathForDirectoriesInDomains(.applicationSupportDirectory, .userDomainMask, true).first else {
        return
    }

    let fileName = "/BeerTracker/\(UUID().uuidString).jpg"
    let pathName = (path as NSString).appendingPathComponent(fileName)
    if (try? imgData.write(to: URL(fileURLWithPath: pathName), options: [.atomic])) != nil {
      imagePath = fileName
    }
  }
}
The above code is nearly identical to the previous code, with just a few changes:
- Here, instead of using UIImage, you’re using the AppKit specific class NSImage.
- On iOS, it’s common to save files in the Documents directory. You usually don’t have to worry about cluttering up this directory, since it is specific to the app and hidden from the user. On macOS, however, you won’t want to not mess up the user’s Documents, so you save the app’s files to the Application Support directory.
- Since NSImage doesn’t have the same method for getting image data as UIImage, you’re using the supported
tiffRepresentation.
Switch your target to BeerTracker_mac, then build and run. Your app now compiles for both platforms, while maintaining a standard set of functionality from your model.