Introduction to Shaders in Unity
Ever wondered about shaders in Unity? In this tutorial, you’ll learn what shaders are, how to display vertex colors and how to animate within shaders. By Joseph Hocking.
Sign up/Sign in
With a free Kodeco account you can download source code, track your progress, bookmark, personalise your learner profile and more!
Create accountAlready a member of Kodeco? Sign in
Sign up/Sign in
With a free Kodeco account you can download source code, track your progress, bookmark, personalise your learner profile and more!
Create accountAlready a member of Kodeco? Sign in
Contents
Introduction to Shaders in Unity
25 mins
- What Are Shaders?
- Understanding Types of Shaders
- Writing a Custom Shader
- Looking at the Default Template for a Custom Shader
- Properties
- The SubShader block
- The CGPROGRAM block
- MainTex property variable
- Inputs and property variables
- The main shader function
- FallBack shader
- Adding Vertex Color to a Surface Shader
- Creating a Custom Shader for Vertex Color
- Animating the Water Texture
- Creating an Unlit Shader
- Where to Go From Here?
Unity provides a lot of help to game developers, and that includes offering Shaders to make complex VFX and animations easier. You can get pretty far just tinkering with the standard Shaders that come with Unity. However, you can enhance the visuals in your projects by writing custom Shaders.
In this tutorial, you’ll learn:
- What Shaders are.
- How to display vertex colors.
- How to animate within Shaders.
To practice, you’ll be polishing the graphics of a desert island scene using custom Shaders. Download the project files by clicking on the Download Materials button at the top or bottom of this tutorial. The sample project provides models and textures so that you can concentrate on the Shaders.
The sample project uses Unity 2019.3, although everything in this tutorial should work in older versions as well.
What Are Shaders?
Computer graphics, especially 3D graphics, use many different kinds of information to construct the visuals: meshes, textures, lights and so on. That information passes to the graphics hardware, which then processes the image and displays it onto the screen.
Rendering is what programmers call the process of generating an image, and Shaders are short programs that render graphics data. That is, a Shader is a program that takes meshes, textures etc. as the input and generates an image as the output.
Understanding Types of Shaders
Technically, an individual Shader doesn’t output an entire image, nor do they always do rendering. Rather, there are different types of Shaders that do different things.
The main type is a Pixel Shader, named for the obvious reason that it outputs a pixel. Another common term is Fragment Shader, since each pixel is a fragment of the full image.
Fragment Shaders output a single pixel’s color, which it calculates based on that pixel’s position on a polygon. The program runs over and over, mostly in parallel, to generate all the pixels of all the polygons processed by that Shader. Indeed, being able to process more pixels simultaneously is a major part of how video cards accelerate graphics.
There are also Vertex Shaders, which you use to compute the position of vertices in the image. While the input data is in three dimensions, the computer needs to determine where the vertices appear in two dimensions before it can render the pixels.
You can achieve some interesting visual effects by manipulating the data output by Vertex Shaders, but you won’t cover that in this tutorial.
Compute Shaders don’t actually render anything, but are simply programs that run on video hardware. These Shaders are a recent innovation – indeed, older video hardware may not even support them.
As with Fragment and Vertex Shaders, a Compute Shader is a short program that the graphics card runs in a massively-parallel fashion. Unlike the other Shaders, Compute Shaders don’t output anything visual. Instead, they take advantage of the parallel processing in video cards to do things like cryptocurrency mining. You won’t work with Compute Shaders in this tutorial.
Unity introduces yet another kind of Shader, a Surface Shader. These are Shaders that do lighting calculations for you, and you only need to write code – remember, a Shader is a program – to handle other surface properties, like color and texture.
Surface Shaders are really Fragment and Vertex Shaders under the hood, but Unity generates code to handle lighting. This is handy since lighting calculations are both very complicated and frequently standardized between many different Shaders.
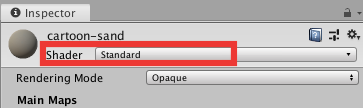
Finally, the graphics data tells the video card which Shader to use through materials. When you inspect a material, you’ll notice a menu at the top. That menu selects which Shader to assign to that material. Thus, when the graphics hardware renders a polygon, it runs the Shader of that polygon’s material.
Alright, enough explanation. It’s time to write some Shaders!
Writing a Custom Shader
If you haven’t already, open the begin project then open RW/Scenes/SampleScene. You’ll see a pre-constructed desert island scene, complete with positioned models that have materials assigned to them.
The existing scene doesn’t look terrible, but you can improve it in at least two ways: The island has hard, square edges, and the water is completely static.
You can solve both issues with custom Shaders. Before addressing those issues, however, you need to understand how to create Shaders.
To start with, create a Surface Shader asset in the Shaders folder by right-clicking and selecting Create ▸ Shader ▸ Standard Surface Shader. Name it MyFirstShader.
Go to the Materials folder, select cartoon-sand and click the Shader drop-down at the top of the Inspector. Select Custom ▸ MyFirstShader to switch the material to that Shader.
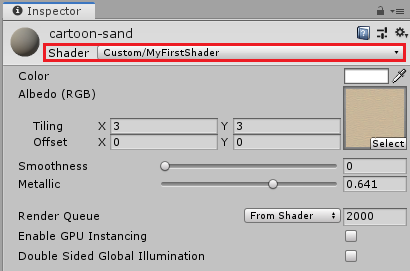
Nothing much will change in the scene yet because you haven’t changed any of the default Shader code. Nevertheless, the sand material on the island now uses your custom Shader rather than the standard Shader built into Unity.
Looking at the Default Template for a Custom Shader
Double-click the Shader asset to open it in your code editor, and examine the code.
The shader is made up of various sections inside the main Shader
block of code.
All the code is inside a Shader block with curly brackets, with the name Custom/MyFirstShader. This simply tells Unity what to show when browsing a material’s Shader menu. Looking at the different sections…
Properties
Properties {
_Color ("Color", Color) = (1,1,1,1)
_MainTex ("Albedo (RGB)", 2D) = "white" {}
_Glossiness ("Smoothness", Range(0,1)) = 0.5
_Metallic ("Metallic", Range(0,1)) = 0.0
}
The Properties
block at the top is where you declare the various user-defined properties. These are the values you can edit in the inspector when you select a material.
Going over a single line in detail: First, you see the variable name used within the code. Next, inside parentheses, you define the name you’ll display in the inspector. Also inside the parentheses, you declare what type the property is: a color, a 2D texture or a number range. Finally, after the =
, you give the property a default value.
The SubShader block
SubShader {
Tags { "RenderType"="Opaque" }
LOD 200
The Subshader
code block is where the majority of the Shader code goes. The first two lines in this block declare identifying tags recognized by Unity and set a value used by Unity’s Level-of-Detail (LOD) system.
In this case, the identifying tags declare that the Shader is not see-through. Technically, there can be multiple Subshader blocks, but you won’t get into that level of complexity in this tutorial.
The CGPROGRAM block
CGPROGRAM
// Physically-based standard lighting model,
// and enable shadows on all light types
#pragma surface surf Standard fullforwardshadows
// Use Shader model 3.0 target to get nicer looking lighting
#pragma target 3.0
These lines declare several important aspects of the code to follow. First, they indicate the following code uses the Cg language. There are several different programming languages for writing Shaders. Everything up to this point was using Unity’s language, ShaderLab.
Meanwhile, #pragma
directives set up configuration values. Going over the first one in detail: surface
tells the Shader compiler that this is a Surface Shader. Again, remember that other types include Fragment and Vertex Shaders.
surf
is the name of the main shading function below. Standard
declares the lighting model you want – other lighting models include Lambert and Blinn-Phong, but the Standard physically-based lighting is the best-looking. fullforwardshadows
activates dynamic shadows for this Shader.
MainTex property variable
sampler2D _MainTex;
This declares a variable corresponding to one of the properties. While it seems a tad redundant, you must declare the variable here for the Cg code to use that property.
These variables can be one of several types including sampler2D
for a texture image, and fixed
/half
/float
for numbers. Those three are numbers of increasing precision, and you should use the least precision that works.
Number values can have a suffix number to make a vector. For example, fixed4
indicates four numbers. You access values in the vector with either .xyzw or .rgba properties.
For example, c.rgb
in the Shader code extracts the first three numbers from the fixed4
called c
.
You must declare all the properties as variables in the Cg code. You can see the other property names a bit later in the tutorial. Why Unity’s template code has them written apart from each other, as opposed to one unified list, is a mystery, but it also doesn’t really matter.
Inputs and property variables
struct Input {
float2 uv_MainTex;
};
half _Glossiness;
half _Metallic;
fixed4 _Color;
// Add instancing support for this Shader. You need to check
// 'Enable Instancing' on materials that use the Shader.
// See https://docs.unity3d.com/Manual/GPUInstancing.html for
// more information about instancing.
// #pragma instancing_options assumeuniformscaling
UNITY_INSTANCING_BUFFER_START(Props)
// put more per-instance properties here
UNITY_INSTANCING_BUFFER_END(Props)
This code block declares a data struct called Input
and lists the values in it. The only input values in the template code are the UV coordinates of the main texture, but there are several input values that Shaders can access. The graphics data will pass the input values you declare here to the Shader.
The main shader function
void surf (Input IN, inout SurfaceOutputStandard o) {
// Albedo comes from a texture tinted by color
fixed4 c = tex2D (_MainTex, IN.uv_MainTex) * _Color;
o.Albedo = c.rgb;
// Metallic and smoothness come from slider variables
o.Metallic = _Metallic;
o.Smoothness = _Glossiness;
o.Alpha = c.a;
}
ENDCG
}
surf
is the main shading function, which you declare in the #pragma
line above. The first parameter is the Input
struct, while the other parameter is the output that the function writes to.
You’ll notice that the output structure has parameters like .Metallic
and .Smoothness
that you set using the Shader’s properties.
The one line in surf
that isn’t a straight assignment of an input number to an output value is fixed4 c = tex2D (_MainTex, IN.uv_MainTex) * _Color;
.
Unity provides tex2D
to look up the color in a texture at a given coordinate. When writing a Fragment Shader, you need to explicitly include Unity’s Shader library, but Surface Shaders include the library automatically.
FallBack shader
FallBack "Diffuse"
}
After the Cg code, you declare a fallback Shader, although it isn’t required. This directs Unity to use the fallback Shader if the graphics hardware can’t run any custom Subshaders, typically because it’s an older graphics card that doesn’t support the Shader’s features.
All right, now that you understand the structure of Shader code, it’s time to address the visual issues identified at the beginning of this section.
Adding Vertex Color to a Surface Shader
The first issue you wanted to fix in the scene was that the island has hard, square edges.
You can see the edges of the mesh quite clearly right now, but real beaches appear to fade out to the color of the water.
There are many ways to achieve this look in a game, but one simple approach uses vertex color.
To understand what vertex colors are, realize that a “vertex” is simply a bundle of data. This data always includes the position of the vertex, but you can also include additional options.
Texture coordinates are a common addition, with the coordinates (identified with the letters UV, instead of XY) providing numbers that you use when working with textures. Well, color is another option, providing numbers that you use when calculating the Shader’s color output.
For example, if you assign a vertex to red, then the polygon using that vertex will have a red tint. Furthermore, if the vertices of a polygon have different colors, then those colors get interpolated across the polygon’s face.
This island mesh already has vertex colors assigned, but you can’t see them because Unity’s standard Shader does not handle vertex colors.
Specifically, vertices under the water have a darker tint, while the rest of the island’s vertices are white. These colors would create a pleasing gradient along the edge of the beach if they were visible, so your next task is to write a custom Shader that handles vertex color.
Creating a Custom Shader for Vertex Color
Create a new Surface Shader and name it LitVertexColor. Set the cartoon-sand material to use this Shader, and then open the Shader asset to edit the code.
You only need to make two small additions for vertex color. First, add the following code to the Input
struct:
struct Input {
float2 uv_MainTex;
float4 vcolor : COLOR; // vertex color
};
Next, incorporate vcolor
into the color calculation that happens in surf
:
fixed4 c = tex2D(_MainTex, IN.uv_MainTex) * _Color * IN.vcolor;
And that’s it! Save the Shader and return to the Unity scene. Once the Shader compiles, you’ll see the edges of the island blend under the water.
Animating the Water Texture
Now the sand looks a lot more appealing! Meanwhile, the other issue you identified was that the water is completely static.
You can change this with another custom Shader, although you don’t need lighting this time. Remember that Surface Shaders handle the lighting for you, so you won’t create a Surface Shader this time.
Creating an Unlit Shader
Instead, create an Unlit Shader through the right-click menu: Create ▸ Shader ▸ Unlit Shader.
Name the new Shader asset CartoonWater and open it in your code editor.
First thing’s first, update the name of the shader right at the very top.
Shader "Custom/CartoonWater"
The default name for this Shader is "Unlit/CartoonWater"
. Changing that name to "Custom/CartoonWater"
makes it easier to find your custom Shaders in the menu.
Next, add some additional properties for your water shader. The new Properties
block should look like this:
Properties
{
_MainTex ("Texture", 2D) = "white" {}
_Opacity ("Opacity", Range(0,1)) = 0.5
_AnimSpeedX ("Anim Speed (X)", Range(0,4)) = 1.3
_AnimSpeedY ("Anim Speed (Y)", Range(0,4)) = 2.7
_AnimScale ("Anim Scale", Range(0,1)) = 0.03
_AnimTiling ("Anim Tiling", Range(0,20)) = 8
}
The default Unlit Shader only had a single texture property _MainTex
, so you added more properties to control both the opacity of the water and how the surface texture animates.
Update the Tags section next and just after the LOD 100
line, add some new options:
Tags { "RenderType"="Transparent" "Queue"="Transparent" }
LOD 100
ZWrite Off
Blend SrcAlpha OneMinusSrcAlpha
The default tags expected an opaque material, so you added and adjusted some flags to support transparency. In particular, note that turning ZWrite
off means the water won’t obscure other objects in the depth buffer, while you set Blend
to use alpha values.
Now observe the CGPROGRAM
section with its set of pragma
directives.
You worked with a Surface Shader previously, but now you’re dealing with straight Vertex and Fragment Shaders. Thus, whereas the #pragma
directive declared the Surface Shading function before, this time the #pragma
directives declare Vertex and Fragment Shading functions.
Also note the #include
statement. Unity provides a library of useful functions here (which this line imports for you to use in the shader). They do useful things like sample the texture and keep track of time.
Surface Shaders get these libraries automatically when you generate their code, but you need to include them explicitly for Vertex and Fragment Shaders.
Now take a look at the included structures:
struct appdata
{
float4 vertex : POSITION;
float2 uv : TEXCOORD0;
};
struct v2f
{
float2 uv : TEXCOORD0;
UNITY_FOG_COORDS(1)
float4 vertex : SV_POSITION;
};
There are two input structures this time, instead of just one input structure for a Surface Shader. You input the first struct to the Vertex Shader, which outputs the second struct. That output from the Vertex Shader then goes to the input of the Fragment Shader.
Just below the sampler2D _MainTex;
line in the main Cg code, add the following new properties:
float4 _MainTex_ST;
half _Opacity;
float _AnimSpeedX;
float _AnimSpeedY;
float _AnimScale;
float _AnimTiling;
Just as in the previous Surface Shader, you must declare all the properties as variables in the Cg code. You’ll use these properties to modify the texture and animate it in the main shader function.
Now, in the main frag function of the Shader, right at the top (above the // sample the texture
code comment, add:
// distort the UVs
i.uv.x += sin((i.uv.x + i.uv.y) * _AnimTiling + _Time.y * _AnimSpeedX) * _AnimScale;
i.uv.y += cos((i.uv.x - i.uv.y) * _AnimTiling + _Time.y * _AnimSpeedY) * _AnimScale;
These two lines of code are the meat of the animated water effect. This code offsets the UV coordinates it receives, with the amount of offset changing over time.
The result is an undulating animation of the texture. Meanwhile, both lines of code do essentially the same thing but in different directions. You’ll understand both after breaking down one line in detail.
First, the code calls a trigonometry function, either sine or cosine, so that the value will range on a repeating wave. _AnimTiling
scales the number passed in. As the name implies, _AnimTiling
controls the tiling of the effect – in this case, by affecting the frequency of the sine wave.
Next, you add the time to the number passed in, causing the returned value to move along the sine wave over time. The library code from earlier includes a variable that tracks the time.
_Time
is a vector of four numbers, with the four values being the time scaled by various amounts for convenience. That’s why the code uses _Time.y
and not simply _Time
; y
is the second number in the vector.
Finally, you multiply the entire thing by _AnimScale
, a property that controls how strong the effect is. Greater scale means more undulation.
Lastly, just above the return col;
line of code in the frag
function, add:
col.a = _Opacity;
Here, the code simply sets the alpha value to the _Opacity
property. Make sure to do this after sampling the texture; otherwise, the texture would overwrite the alpha value.
Now you’ve written your Shader, you can assign it to the cartoon-water material.
By default, the water’s surface won’t animate in the Scene view, but it will animate in the Game view when you press Play.
Where to Go From Here?
Download the completed project files by clicking on the Download Materials button at the top or bottom of this tutorial.
You now know the basics of how to write custom Shaders in Unity! There’s a lot more to learn of course, and a good resource to peruse is Unity’s Shader manual.
Remember that handy shader function include you used earlier? Well, if you’re curious as to what helper functions are available with that include, you can check them out over here.
Seeing as though you’re interested in learning about shaders with Unity, check out our other tutorial on Unity’s Shader Graph here.
I hope you enjoyed this tutorial! If you have any questions, comments or suggestions, feel free to leave them in the comments below or to visit our forums.
All videos. All books.
One low price.
A Kodeco subscription is the best way to learn and master mobile development — plans start at just $19.99/month! Learn iOS, Swift, Android, Kotlin, Flutter and Dart development and unlock our massive catalog of 50+ books and 4,000+ videos.
Learn more