How to Make a Game Like Jetpack Joyride in Unity 2D – Part 1
Learn how to create a game like Jetpack Joyride in Unity 2D in this three part tutorial series. By Mark Placzek.

With the release of Unity 2017.3, much has been refined or completely changed since Kirill Muzykov’s superb Jetpack Joyride tutorial. Now is definitely the perfect time to revisit this tutorial using Unity’s beautifully matured 2D feature set and their revamped UI system. Let’s get started!
Jetpack Joyride was released by Halfbrick Studios in 2011. It’s a very easy game to understand. Steal a jetpack, and fly away with it. Collect the low hanging coins and avoid the lasers!
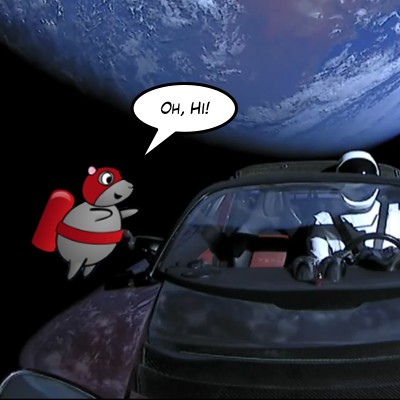
In essence, it’s a fun twist on an endless runner that works well with touch screens: Touch the screen to fly up; release the screen to drop back down. Avoid the obstacles to stay alive as long as you can. Notably, my kids know the game well and were super excited that I was writing an update for this tutorial:

In this game, you will be steering a mouse through a very long house, collecting coins and avoiding lasers in a similar fashion. Granted, not everyone hangs coins from their walls, but I’m guessing a few of you have one or two high-wattage lasers hanging about!
This is the first part of a three part series. In this tutorial, you’ll learn how to:
- Work with physics in Unity.
- Use sorting layers to organize your sprites.
- Use colliders to define your world limits. Your mouse will be pleased to not be blasted into orbit with a long click!
Thank you to Space X for their wonderful public domain images.
Thank you to Space X for their wonderful public domain images.
In Part 2, you’re going to move the mouse forward through randomly generated rooms simulating an endless level. You’ll also add a fun animation to make the mouse run when it is grounded.
In Part 3, you will add lasers, coins, sound effects, music and even parallax scrolling. By the end of the series, you will have a fully functional game — albeit with a lower mice population, for sure.
Getting Started
To get started, you’ll need some art, sound effects and music for the game. Download the materials using the link at the top or bottom of this tutorial. You will also need Unity 2017.3 or newer installed on your machine.
- Game art created by Vicki Wenderlich for the original How to Make a Game Like Jetpack Joyride using LevelHelper, SpriteHelper tutorials.
- Sounds from freesound.org website:
- Soft wood kick by jorickhoofd
- Retro Coin Collect by DrMinky
- zoup.wav by themfish
- Rocket Flight Loop by qubodup
- Music track called ‘Whiskey on the Mississippi’ created by Kevin MacLeod (incompetech.com).
- Soft wood kick by jorickhoofd
- Retro Coin Collect by DrMinky
- zoup.wav by themfish
- Rocket Flight Loop by qubodup
- Music track called ‘Whiskey on the Mississippi’ created by Kevin MacLeod (incompetech.com).
- Game art created by Vicki Wenderlich for the original How to Make a Game Like Jetpack Joyride using LevelHelper, SpriteHelper tutorials.
- Sounds from freesound.org website:
- Soft wood kick by jorickhoofd
- Retro Coin Collect by DrMinky
- zoup.wav by themfish
- Rocket Flight Loop by qubodup
- Music track called ‘Whiskey on the Mississippi’ created by Kevin MacLeod (incompetech.com).
If you are new to Unity, check out our Intro to Unity tutorial to get you started.
Creating and Configuring the Project
Open Unity and select New project from the Project window, or click the New button on the top right if you already have a few projects in your navigator.

Note: If you’ve already created a few Unity 2D projects, feel free to use the RocketMouse Part 1 Starter Project in the materials. I suggest you only skip as far as Configuring the Game View to make sure your project matches the screenshots in the tutorial.
Note: If you’ve already created a few Unity 2D projects, feel free to use the RocketMouse Part 1 Starter Project in the materials. I suggest you only skip as far as Configuring the Game View to make sure your project matches the screenshots in the tutorial.
Type RocketMouse in the Project name field and set the location to where you would like the project saved. The ellipsis button at the end of the field will allow you to navigate to a directory of your choosing. Once you’ve chosen a location, click Select folder to set the Location. Select the 2D radio button and click Create Project.

Unless you downloaded the Starter Project, create a folder named RW in the Project view using Assets▸ ▸ Create ▸ Folder, or use the Create dropdown at the top left of the Project view. You will save all subsequent folders and files you create within this directory. This will keep them separate from assets you import.
Create another new folder named Scenes within the RW directory in the Project view. Then open the Save Scene dialog by selecting File ▸ Save Scene or using the ⌘S (Ctrl+S on Windows) shortcut. Navigate to the Scenes folder you just created, name the scene RocketMouse.unity and click Save.

Configuring the Game View
Switch to the Game view and set the size to a fixed resolution of 1136×640. If you don’t have this resolution option in the list, create it and name it iPhone Landscape.

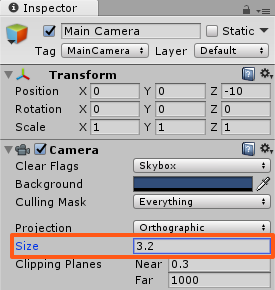
Select the Main Camera in the Hierarchy. In the Inspector, inside the Camera component, set the Size to 3.2.
Save the scene. There are no big changes since the project creation, but you’ve done several very important configuration steps.