Veggie Saber – Introduction to Unity Development with the Oculus Quest
In this tutorial, you’ll learn how to develop and deploy a game for Oculus Quest in Unity by developing Veggie Saber, a Saber VR game featuring tasty veggies! By Matt Larson.
Launched in 2019, the Oculus Quest provides a polished, standalone VR experience. It has two crisp 1600×1440 displays, a pair of Oculus Touch controllers and, best of all – no cords! It’s time to develop for untethered VR!

In this tutorial, you’ll implement “Veggie Saber”, a Saber VR game featuring tasty veggies. This tutorial guides you through creating this quick game in Unity with the Oculus SDK and the Unity XR API.
Getting Started
Before you dive into this tutorial, make sure you have the following:
- An Oculus Quest headset.
- A USB to USB-C cable, used for data transfer.
- Unity 2019.2 or newer.
- Android Studio.
- Android Platform Tools.
Download the starter project by clicking the Download Materials button at the top or bottom of this tutorial. Unzip the file and open the starter folder in Unity. It has all the assets you’ll need to build Veggie Saber.
The starter project has three important things:
- Models and materials for the vegetables, the lightsaber and the virtual hands.
- Oculus, OpenVR, TextMesh Pro and XR Legacy Input Helpers packages.
- Preconfigured project settings for VR rendering.
Building Your Virtual Body
In virtual reality, you’re represented by your headset and your hand controllers. The first thing you need to do to make a good game is to convert the headset’s movement to the virtual world.
Tracking the Player’s Head Movements
Start by adding an empty GameObject called Player Rig, which will hold GameObjects representing the player’s head and hands.
Rename Main Camera to Head and move it under Player Rig. This GameObject will represent your headset. Set its Position to X:0.0, Y:1.75, Z:0.0.
Select the Camera component inside the Head GameObject and change Clipping Planes to 0.02. This will enable you to see objects much closer to your eyes. Next, switch the Background Type to Solid Color and set the Background to a solid black.

Add a Tracked Pose Driver component to Head. Click on the Tracked Pose Driver component and set the ‘Device’ field as Generic XR Device, then set Pose Source as Head. Disable Use Relative Transform.
This will now move the Head GameObject to have six degrees of freedom in its movement, tracking your real-world head position.

Setting Up the Right Hand
Now, to set up the hands, create an empty GameObject under Player Rig and name it Hand R. Again, add the Tracked Pose Driver, but now set the ‘Device’ as Generic XR Controller and the ‘Pose Source’ as Right Controller. Again, Disable Use Relative Transform.
Drag and drop the RW/Prefabs/Hand model as a child of the Hand R GameObject. This adds a model hand, which will be the visual part of your VR hand.
Select the Hand GameObject, and set the Rotation to X:0.0, Y:0.0, Z:-90.0 to orient the model. In the Animator component, set the Controller to Assets/RW/Animations/Hand to provide animations for the hands.
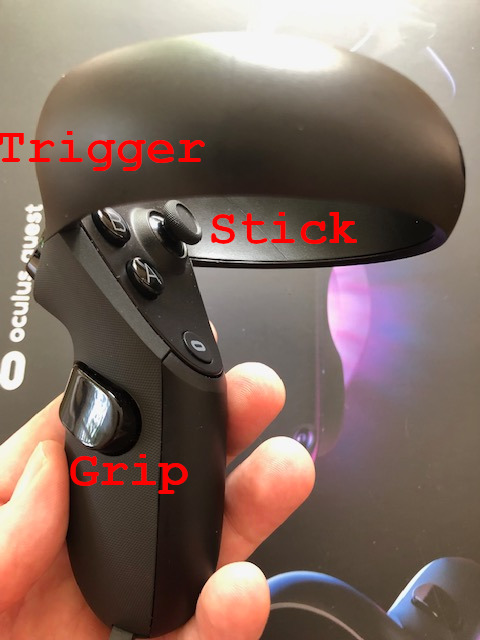
OculusHandAnimation.cs, in RW/Scripts, animates your interaction with controllers. Open it and take a quick look at what it does:
public XRNode HandType;
public Animator HandAnimator;

private void Update()
{
	bool grip = false;
	bool trigger = false;
	bool primaryAxisTouch = false;
	bool primaryTouch = false;
	bool secondaryTouch = false;
	float triggerDown = 0;

	//1. Collect controller data
	InputDevice hand = InputDevices.GetDeviceAtXRNode(handType);
	hand.TryGetFeatureValue(CommonUsages.gripButton, out grip);
	hand.TryGetFeatureValue(CommonUsages.triggerButton, out trigger);
	hand.TryGetFeatureValue(CommonUsages.primary2DAxisTouch, out primaryAxisTouch);
	hand.TryGetFeatureValue(CommonUsages.primaryTouch, out primaryTouch);
	hand.TryGetFeatureValue(CommonUsages.secondaryTouch, out secondaryTouch);
	hand.TryGetFeatureValue(CommonUsages.trigger, out triggerDown);

	bool thumbDown = primaryAxisTouch || primaryTouch || secondaryTouch;

	//2. Trigger down
	float triggerTotal = 0f;
	if (trigger)
	{
		triggerTotal = 0.1f;
	}
	if (triggerDown > 0.1f)
	{
		triggerTotal = triggerDown;
	}

	//3. Set animations
	HandAnimator.SetBool(“GrabbingGrip”, grip);
	HandAnimator.SetBool(“ThumbUp”, !thumbDown);
	HandAnimator.SetFloat(“TriggerDown”, triggerTotal);
}
Here, this code:
- Accesses controller data so that you know its current state.
- Gives a minimum cutoff of 0.1f for the trigger; this prevents touchy activation of the trigger button.
- Using data obtained, sets animations for the virtual hand.
Next, add a Oculus Hand Animation component to Hand R. Set the field Hand Type to Right Hand and drag and drop the Hand GameObject into Hand Animator. This will put Animator inside Hand to trigger animations.

Duplicating the Process for the Left Hand
For the left hand, all you need to do is duplicate Hand R by right-clicking inside Inspector and clicking on duplicate, then changing some variables.
First, change its name to Hand L. In the Tracked Pose Driver component, switch Pose Source to Left Controller. Then, in the Oculus Hand Animation component, switch the Hand Type to Left Hand.

At this point, both hands look exactly the same, but this is easy to fix. Find the child GameObject Hand L/Hand and set the transform ‘Scale Y’ to -1. This mirrors the model and makes it left-handed.
Now, you’ll set the transforms of the Hand R and Hand L to position the hands slightly apart. Set the Hand R Transform’s Position to be X:0.1, Y:1.0, Z:0.0. Set the Hand L Transform’s Position to be X:-0.1, Y:1.0, Z:0.0.
Congratulations, you now have visual representations of the hands and head for any VR game. The hand models have animated fingers that respond to the controller input for grab and trigger inputs giving the player more physical presence in the VR game.
Positioning Objects Relative to Your Floor
VR headsets start in two different modes: Stationary or RoomScale. Now, you’ll set the mode to RoomScale at start so that both desktop VR headsets and the Quest put objects relative to the same floor height.
Edit RW/Scripts/PlayerRigSetup.cs and set the tracking type at the start by adding this code:
void Start()
{
    bool success = XRDevice.SetTrackingSpaceType(TrackingSpaceType.RoomScale);
}
To try it out, add a Player Rig Setup component to PlayerRig. If you play the scene in the Unity Editor with a PC VR headset, you can now see the following animations:

Save your Scene as VeggieSaber and continue to the next section.
Grabbing Objects
It’s time to grab your lightsabers!
Start by opening the stubbed script, RW/Scripts/GrabItem.cs. Add the following to Update:
void Update()
{
    bool gripDown = false;
    InputDevice hand = InputDevices.GetDeviceAtXRNode(handType);
    hand.TryGetFeatureValue(CommonUsages.gripButton, out gripDown);

    // 1.
    if (gripDown)
    {
        // 2.
        Collider[] overlaps = Physics.OverlapSphere(transform.position, 0.2f);

        foreach (Collider c in overlaps)
        {
            GameObject other = c.gameObject;

	    // 3.
            if (other.GetComponent<Grabbable>())
            {
                if (other.gameObject.transform.parent == null)
                {
                    other.transform.SetParent(transform);
                }
            }
        }
    }
}
The script behaves as follows:
- If the player presses the grip button, it will try to grab a colliding object.
- It uses an overlap sphere to find any overlapping colliders within a short 0.2 meter snap range.
- You can attach any GameObject with a Grabbable script to the hands.
- Grabbing works by setting the hand as the parent transform for the object, linking the hands to the saber movements.
Select both Hand R and Hand L inside the Player Rig. Next, add a Sphere Collider component with Radius of 0.1, then add the GrabItem component that was just completed. Now, set the Hand Type to be either Left Hand or Right Hand for each individual Hand R or Hand L GameObject.

Next, you just need something to grab, so drag the RW/Prefabs/SaberRed and RW/Prefabs/SaberBlue prefabs into the scene. Select both of these GameObjects, then add a BoxCollider and RW/Scripts/Grabbable.cs as components. Grabbable is an empty MonoBehaviour script that turns its GameObject to grabbable with Grab Item components.
Select SaberBlue and set its position to X:-0.25, Y:1.0, Z:0.25; likewise, set SaberRed‘s position as X:0.25, Y:1.0, Z:0.25. The scene should like like this:

Now, if you have a VR headset for your PC, you can test the hand animations by grabbing sabers and swinging them around.
