Kubernetes Tutorial for Swift on the Server
In this tutorial, you’ll learn how to use Kubernetes to deploy a Kitura server that’s resilient, with crash recovery and replicas. You’ll start by using the kubectl CLI, then use Helm to combine it all into one command. By David Okun.
Enabling Kubernetes in Docker
Once your installation has finished, open the Docker whale menu in the top toolbar of your Mac, and select Preferences. In the Kubernetes tab, check Enable Kubernetes, then click Apply:
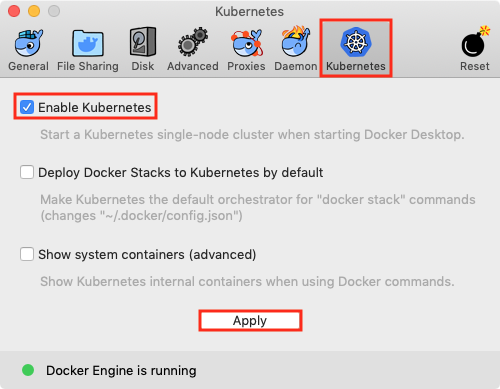
You might have to restart Docker for this change to take effect. If you do, open Preferences again, and make sure the bottom of the window says that both Docker and Kubernetes are running.

To double-check that Docker is installed, open Terminal, and enter docker version — you should see output like this:
Client: Docker Engine - Community
 Version:           18.09.2
 API version:       1.39
 Go version:        go1.10.8
 Git commit:        6247962
 Built:             Sun Feb 10 04:12:39 2019
 OS/Arch:           darwin/amd64
 Experimental:      false

Server: Docker Engine - Community
 Engine:
  Version:          18.09.2
  API version:      1.39 (minimum version 1.12)
  Go version:       go1.10.6
  Git commit:       6247962
  Built:            Sun Feb 10 04:13:06 2019
  OS/Arch:          linux/amd64
  Experimental:     false
Additionally, to ensure Kubernetes is running, enter kubectl get all, and you should see that one service is running:
NAME                 TYPE        CLUSTER-IP   EXTERNAL-IP   PORT(S)   AGE
service/kubernetes   ClusterIP   10.96.0.1    <none>        443/TCP   16h
Creating Your RazeKube
You’ve set the stage — now it’s time to create your RazeKube API. First, you’ll install the Kitura CLI!
Installing the Kitura CLI
kitura --version in Terminal. If you see a version number, you can skip to the next section: Running RazeKube.
The easiest way to install the Kitura CLI (command-line interface) is via Homebrew. Follow the instructions to install Homebrew, then enter the following commands, one at a time, to install the Kitura CLI:
brew tap ibm-swift/kitura
brew install kitura
By installing the Kitura CLI, you get the ability to generate starter projects from the command line, but you also get the built-in capability to build and run your app into a Docker container with kitura build and kitura run! This will come in handy later.
Running RazeKube
Now you’ll build and run the starter app, before diving into Kubernetes.
Navigate to your starter project root directory in Terminal. To check, enter the command ls, and ensure you see Package.swift in the resulting output.
Enter swift build to ensure that everything builds OK, then enter swift run. Your output should be similar to the following:
[2019
-07-10T15:26:56.591-05:00] [WARNING] [ConfigurationManager.swift:394 load(url:deserializerName:)] Unable to load data from URL /Users/davidokunibm/RayWenderlich/rw-cloud-native/final/RazeKube/config/mappings.json
[Wed Jul 10 15:26:56 2019] com.ibm.diagnostics.healthcenter.loader INFO: Swift Application Metrics
[2019-07-10T15:26:56.642-05:00] [INFO] [Metrics.swift:52 initializeMetrics(router:)] Initialized metrics.
[2019-07-10T15:26:56.648-05:00] [INFO] [HTTPServer.swift:237 listen(_:)] Listening on port 8080
Click Allow if you see this dialogue asking if you want your appto accept incoming network connections:

Now, in a web browser, open localhost:8080 — you should see this home page:

Lastly, check to make sure your all-knowing Kube is still … all-knowing: Navigate to localhost:8080/kubed?number=5 in your web browser. You should see the following result:
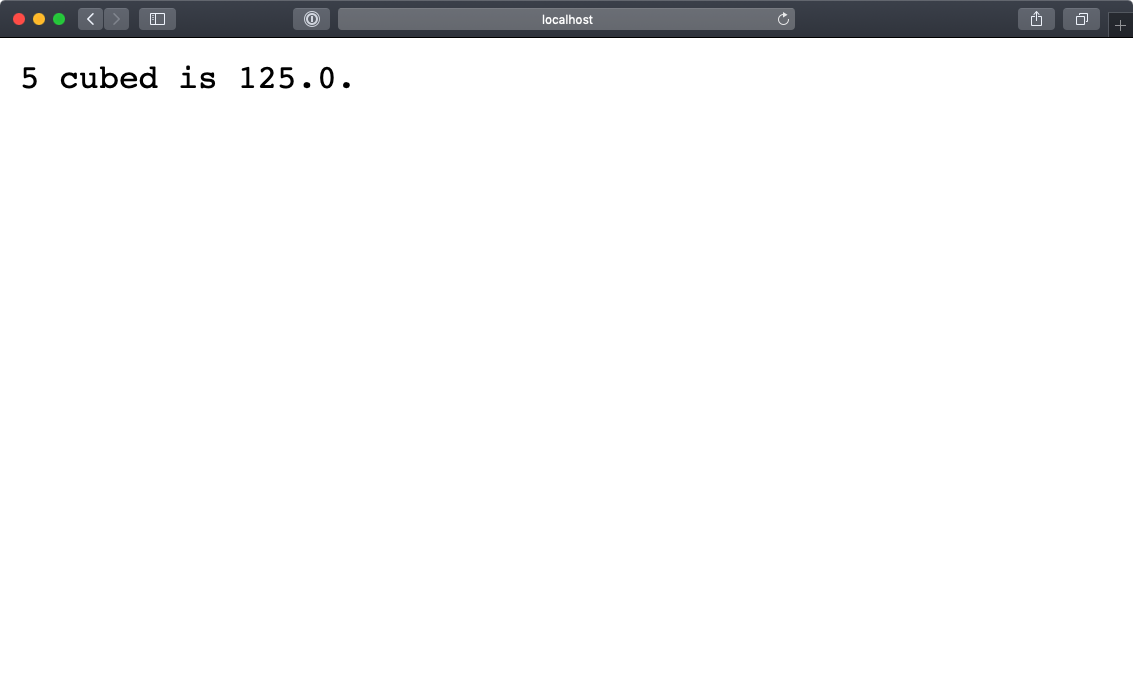
If you see this, good work! Your starter project works as you want it to. Now, you’re going to deliberately sabotage the Kube. Don’t worry — the all-powerful Kube will forgive you and show you the light eventually.
Crashing Your RazeKube
Or, to ensure the xed command opens Xcode 10, enter this command:
RazeKube.xcodeproj.
Or, to ensure the xed command opens Xcode 10, enter this command:
sudo xcode-select -s /Applications/Xcode.app/Contents/Developer
sudo xcode-select -s /Applications/Xcode.app/Contents/Developer
In Terminal, press Control-C to stop the server, then enter these commands:
swift package generate-xcodeproj
xed .
In Xcode, open Sources/Application/Routes/KubeRoutes.swift. This is a good time to take a look at the sheer power of the Kube by examining the kubeHandler function!
After you catch your breath, add the following code to the end of initializeKubedRoutes(app:):
app.router.get("/uhoh", handler: fatalHandler)
Here, you are declaring that any GET requests made to the /uhoh path should be handled by the function fatalHandler.
To take care of the error message, add the following function at the bottom of this file:
func fatalHandler(request: RouterRequest, response: RouterResponse,
    next: () -> Void) {
  fatalError()
}
Save your file. Close Xcode: Although you could build and run this in Xcode if you wanted to, for the rest of this tutorial, you’ll be working almost exclusively in Terminal and a web browser!
In Terminal, enter these two commands:
swift build
swift run
Open a web browser, and confirm that localhost:8080 loads your home page. Now for the fun part — navigate to localhost:8080/uhoh in your browser. Yikes! Your Terminal process should freakout and tell you something similar to the following:
Fatal error: file /Users/davidokunibm/RayWenderlich/rw-cloud-native/final/RazeKube/Sources/Application/Routes/KubeRoutes.swift, line 52
[1]    42560 illegal hardware instruction  swift run
And your web browser doesn’t look any better:

For all the work that Apple has done to make Swift a safe language that doesn’t crash often, it’s important to remember that crashes still do happen, and as a developer, you have to mitigate them. This is where Kubernetes can help by auto-restarting your app!
Kubernetes and the State Machine
The heart of Kubernetes is the concept of managing state, and how that state is defined. Therefore, it’s OK to think of the core of Kubernetes as one big database — you wouldn’t be wrong!
That database is managed by something called etcd. This is, in-and-of-itself, a tool that’s also backed by the Cloud Native Computing Foundation. Operating Kubernetes is a matter of simply dictating state to etcd through the use of a command line interface called kubectl. You can use .yaml or .json files to dictate state for an app, or you can embed specific instructions inside a command via kubectl. You’re going to do a little bit of both.
Here’s what a YAML file might look like to describe your deployment of RazeKube:
apiVersion: apps/v1
kind: Deployment
metadata:
  name: razekube
  labels:
    app: razekube
    version: "1.0.0"
containers:
- name: razekube-swift-run
  image: razekube-swift-run
  ports:
  - name: http-server
    containerPort: 8080
Notice the specification for containers towards the bottom — this means that you’re going to have to create a container image for your app first!