Getting Started With the BLoC Pattern
See how to use the popular BLoC pattern to build your Flutter app architecture and manage the flow of data through your widgets using Dart streams. By Sardor Islomov.
Creating Your First BLoC
Before creating any BLoCs for screens, you’ll build a base class for all BLoCs in the project. Create a directory named bloc in the lib folder. This will be the home for all your BLoC classes.
Create a file in that directory called bloc.dart and add the following:
abstract class Bloc {
  void dispose();
}
All your BLoC classes will conform to this interface. The interface doesn’t do much except force you to add a dispose method. But there’s one small caveat to keep in mind with streams: You have to close them when you don’t need them anymore or they can cause a memory leak. The dispose method is where the app will check for this.
The first BLoC manages the user’s queries and displays the list of articles.
In the bloc directory, create a file, article_list_bloc.dart, and add the following code:
class ArticleListBloc implements Bloc {
  // 1
  final _client = RWClient();
  // 2
  final _searchQueryController = StreamController<String?>();
  // 3
  Sink<String?> get searchQuery => _searchQueryController.sink;
  // 4
  late Stream<List<Article>?> articlesStream;

  ArticleListBloc() {
    // 5
    articlesStream = _searchQueryController.stream
        .asyncMap((query) => _client.fetchArticles(query));
  }

  // 6
  @override
  void dispose() {
    _searchQueryController.close();
  }
}
Keep in mind that you create separate BLoCs for each screen. ArticleListScreen uses ArticleListBloc.
The code in ArticleListBloc does the following:
- This line creates instance of
RWClientto communicate with raywenderlich.com based on HTTP protocol. - The code gives a private
StreamControllerdeclaration. It will manage the input sink for this BLoC.StreamControllers use generics to tell the type system what kind of object the stream will emit. -
Sink<String?>is a public sink interface for your input controller_searchQueryController. You’ll use this sink to send events to the BLoC. -
articlesStreamstream acts as a bridge betweenArticleListScreenandArticleListBloc. Basically, the BLoC will stream a list of articles onto the screen. You’ll seelatesyntax here. It means you have to initialize the variable in the future before you first use it. Thelatekeyword helps you avoid making these variables as null type.Note: Learn more about it and other features of null safety in this sound null safety tutorial. - This code processes the input queries sink and build an output stream with a list of articles.
asyncMaplistens to search queries and uses theRWClientclass from the starter project to fetch articles from the API. It pushes an output event toarticlesStreamwhenfetchArticlescompletes with some result. - Finally, in the cleanup method, you close
StreamController. If you don’t do this, the IDE complains that theStreamControlleris leaking.
When importing the base class using Option+Return (Alt+Enter), select the second option: Import library package:article_finder/bloc/bloc.dart.

Import all required packages using Option+Return(Alt+Enter) to solve all the errors.
If you build and run the app, nothing happens.
That’s because you haven’t integrated ArticleListBloc with the ArticleListScreen widget. Next, you’ll integrate the BLoC with the widget tree.
Injecting BLoCs Into the Widget Tree
Now that you have BLoC set up, you need a way to inject it into Flutter’s widget tree. It’s become a Flutter convention to call these types of widgets providers. A provider is a widget that stores data and, well, “provides” it to all its children.
Normally, this would be a job for InheritedWidget. But you need to dispose of BLoCs. The StatefulWidget provides the same service. The syntax is more complex, but the result is the same.
Create a file named bloc_provider.dart in the bloc directory and add the following:
// 1
class BlocProvider<T extends Bloc> extends StatefulWidget {
  final Widget child;
  final T bloc;

  BlocProvider({
    Key? key,
    required this.bloc,
    required this.child,
  }) : super(key: key);

  // 2
  static T of<T extends Bloc>(BuildContext context) {
    final BlocProvider<T> provider = context.findAncestorWidgetOfExactType()!;
    return provider.bloc;
  }

  @override
  State createState() => _BlocProviderState();
}

class _BlocProviderState extends State<BlocProvider> {
  // 3
  @override
  Widget build(BuildContext context) => widget.child;

  // 4
  @override
  void dispose() {
    widget.bloc.dispose();
    super.dispose();
  }
}
In the code above:
-
BlocProvideris a generic class. The generic typeTis scoped to be an object that implements theBlocinterface. This means the provider can store only BLoC objects. - The
ofmethod allows widgets to retrieve theBlocProviderfrom a descendant in the widget tree with the current build context. This is a common pattern in Flutter. - The widget’s
buildmethod is a passthrough to the widget’s child. This widget won’t render anything. - Finally, the only reason the provider inherits from
StatefulWidgetis to get access to thedisposemethod. When this widget is removed from the tree, Flutter calls the dispose method, which in turn closes the stream.
Wiring Up the Article List Screen
Now that you have your BLoC layer completed for finding articles, it’s time to put the layer to use.
First, in main.dart, place an Article List BLoC above the material app to store the app’s state. Put your cursor over the MaterialApp and press Option+Return (Alt+Enter on a PC). The IDE will bring up the Flutter widget menu. Select Wrap with a new widget.
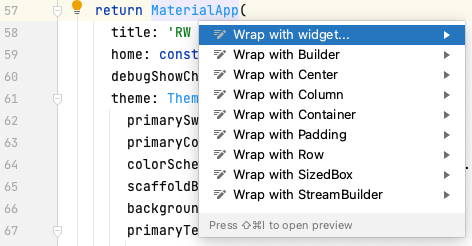
Wrap that with a BlocProvider of type ArticleListBloc and create an ArticleListBloc in the bloc property.
...
return BlocProvider(
      bloc: ArticleListBloc(),
      child: MaterialApp(
...
Adding widgets above the material app is a great way to add data that needs to be accessed from multiple screens.
Next, replace the build method in article_list_screen.dart to use the ArticleListBloc.
@override
Widget build(BuildContext context) {
  // 1
  final bloc = BlocProvider.of<ArticleListBloc>(context);
  return Scaffold(
    appBar: AppBar(title: const Text('Articles')),
    body: Column(
      children: [
        Padding(
          padding: const EdgeInsets.all(16),
          child: TextField(
            decoration: const InputDecoration(
              border: OutlineInputBorder(),
              hintText: 'Search ...',
            ),
            // 2
            onChanged: bloc.searchQuery.add,
          ),
        ),
        Expanded(
          // 3
          child:_buildResults(bloc),
        )
      ],
    ),
  );
}
Here’s a breakdown:
- First, the app instantiates a new
ArticleListBlocat the top of the build method. Here,BlocProviderhelps to find the required BLoC from the widget tree. - It updates
TextField‘sonChangedto submit the text toArticleListBloc.bloc.searchQuery.addis avoid add(T)function of theSinkclass. This kicks off the chain of callingRWClientand then emits the found articles to the stream. - It passes the BLoC to the
_buildResultsmethod.
Now, update the _buildResults method to add a stream builder and show the results in a list. You can use the ‘Wrap with StreamBuilder’ command to update the code faster.
Widget _buildResults(ArticleListBloc bloc) {
  // 1
  return StreamBuilder<List<Article>?>(
    stream: bloc.articlesStream,
    builder: (context, snapshot) {
      // 2
      final results = snapshot.data;
      if (results == null) {
        return const Center(child: Text('Loading ...'));
      } else if (results.isEmpty) {
        return const Center(child: Text('No Results'));
      }
      // 3
      return _buildSearchResults(results);
    },
  );
}

Widget _buildSearchResults(List<Article> results) {
  return Container();
}
StreamBuilders are the secret sauce to make the BLoC pattern tasty. These widgets listen for events from the stream. The widgets execute builder closure and update the widget tree when they receive new events. You don’t need to call setState() in this tutorial because of StreamBuilder and the BLoC pattern.
In the code above:
-
StreamBuilderdefines thestreamproperty usingArtliceListBlocto understand where to get the article list. - Initially, the stream has no data, which is normal. If there isn’t any data in your stream, the app displays the Loading… message. If there’s an empty list in your stream, the app displays the No Results message.
- It passes the search results into the regular method.
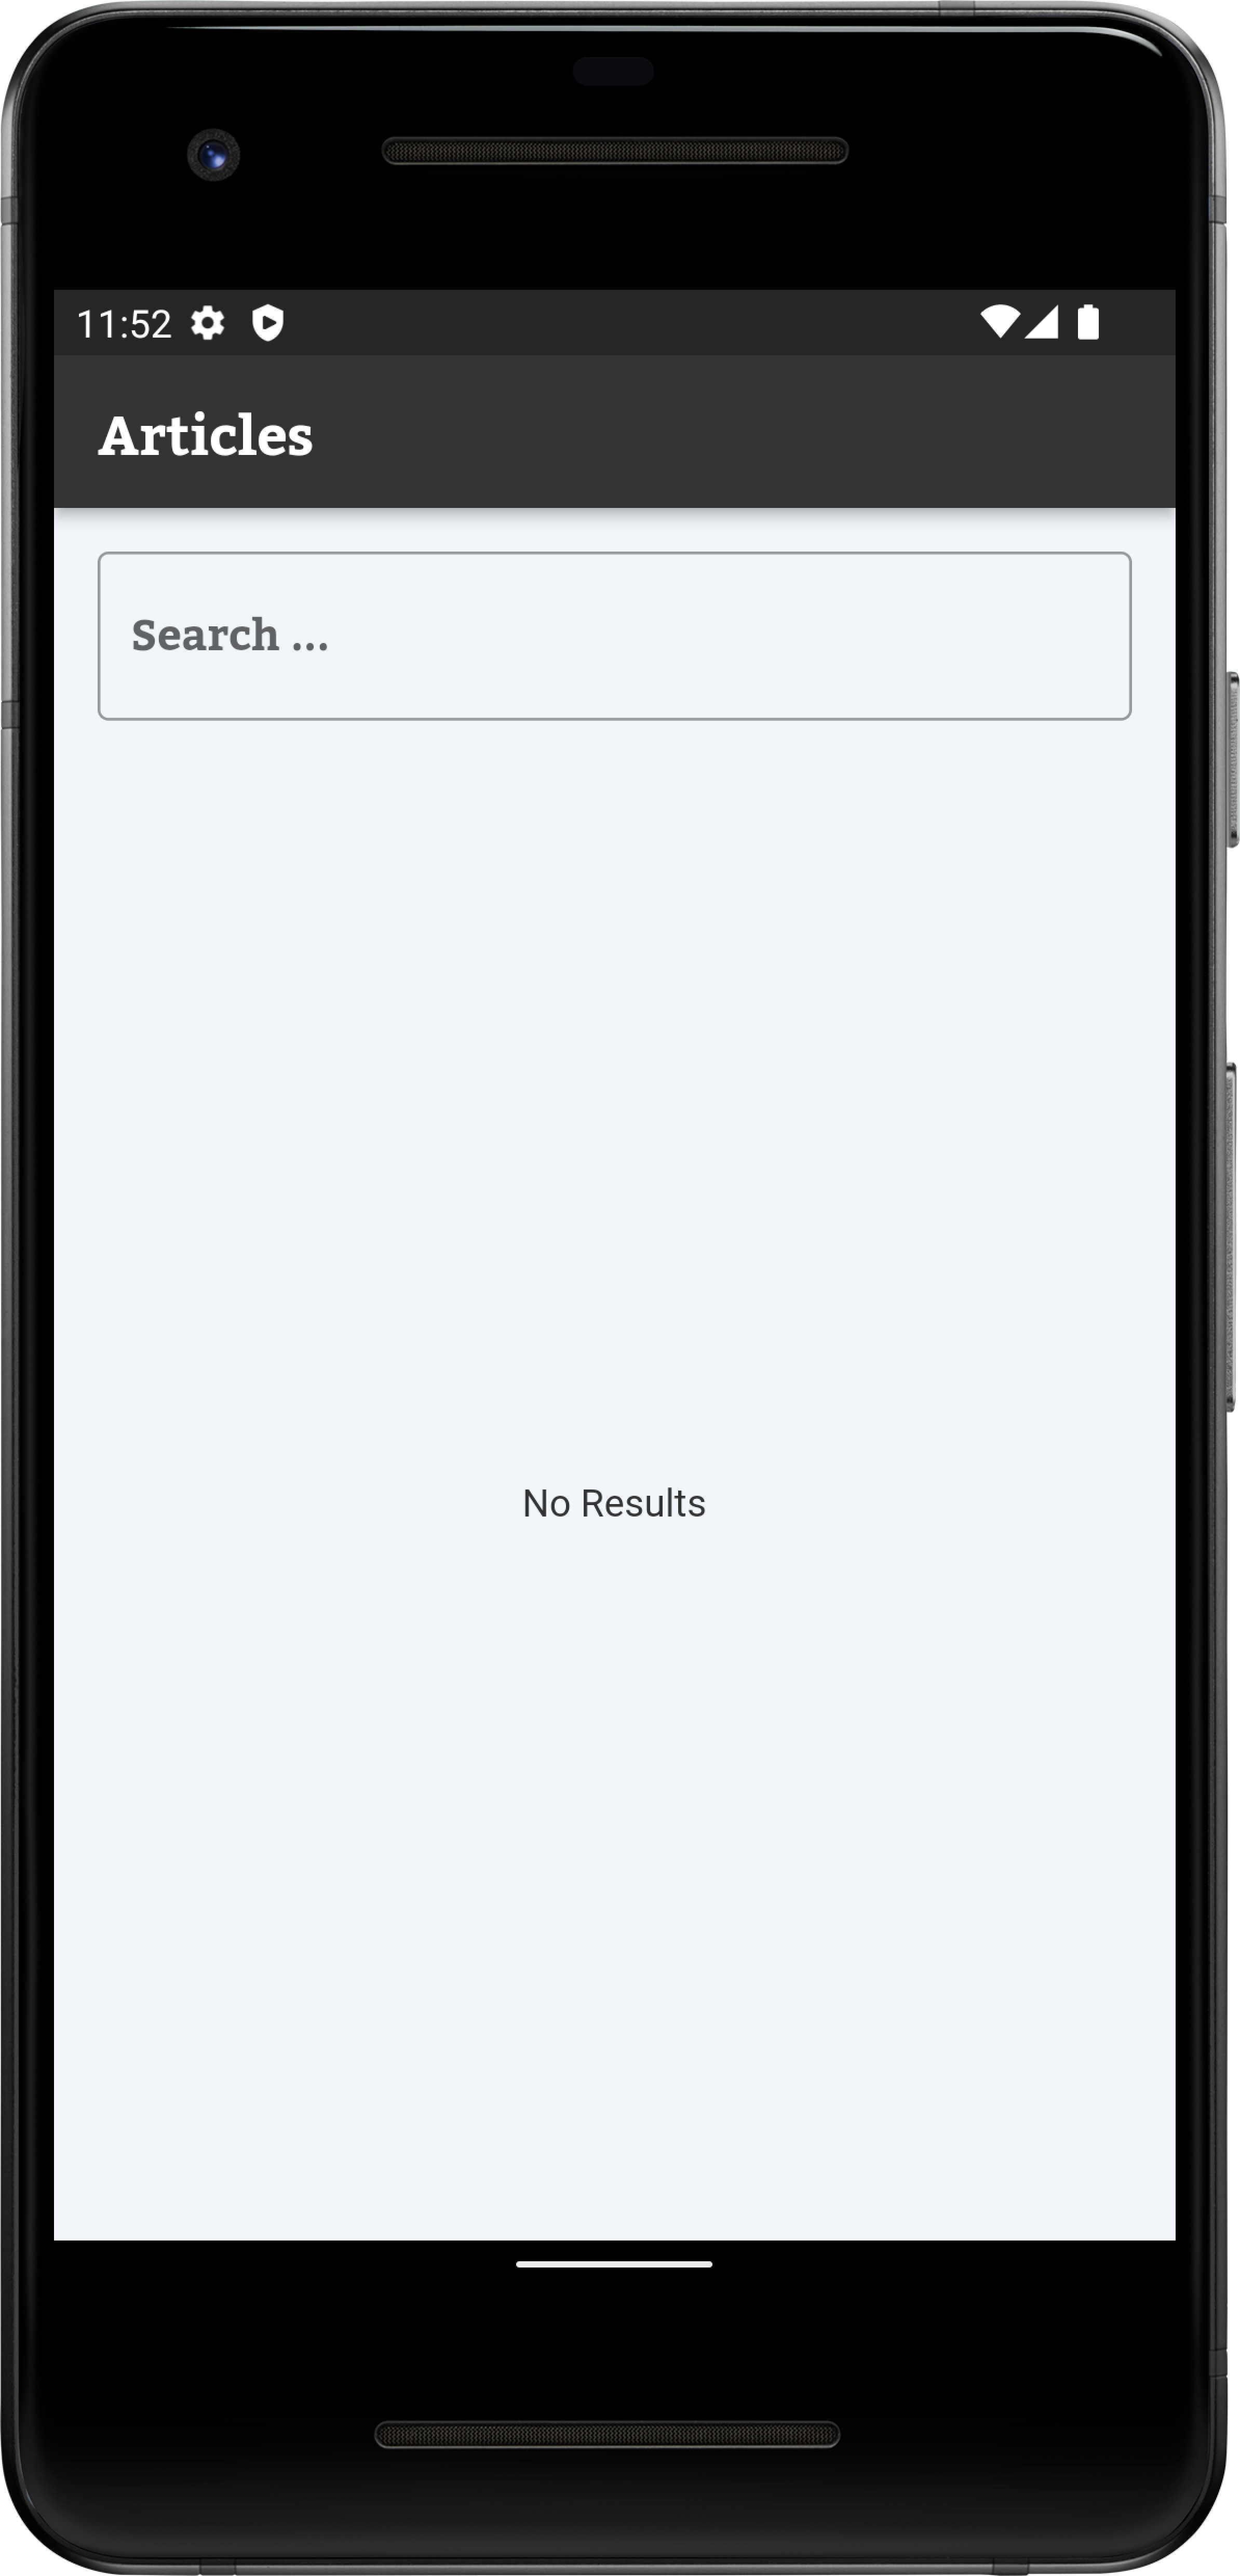
Build and run the app to see new states. When you run the app, you see the Loading … message. When you enter random keywords into the search field, you see a No Results message. Otherwise, there will be a blank screen.
Replace _buildSearchResults(List<Article> results) with the following code:
Widget _buildSearchResults(List<Article> results) {
  return ListView.builder(
    itemCount: results.length,
    itemBuilder: (context, index) {
      final article = results[index];
      return InkWell(
        child: Padding(
          padding: const EdgeInsets.symmetric(horizontal: 16),
          // 1
          child: ArticleListItem(article: article),
        ),
        // 2
        onTap: () {
          // TODO: Later will be implemented
        },
      );
    },
  );
}
In the code above:
-
ArticleListItemis an already defined widget that shows details of articles in the list. - The
onTapclosure redirects the user to an article’s details page.
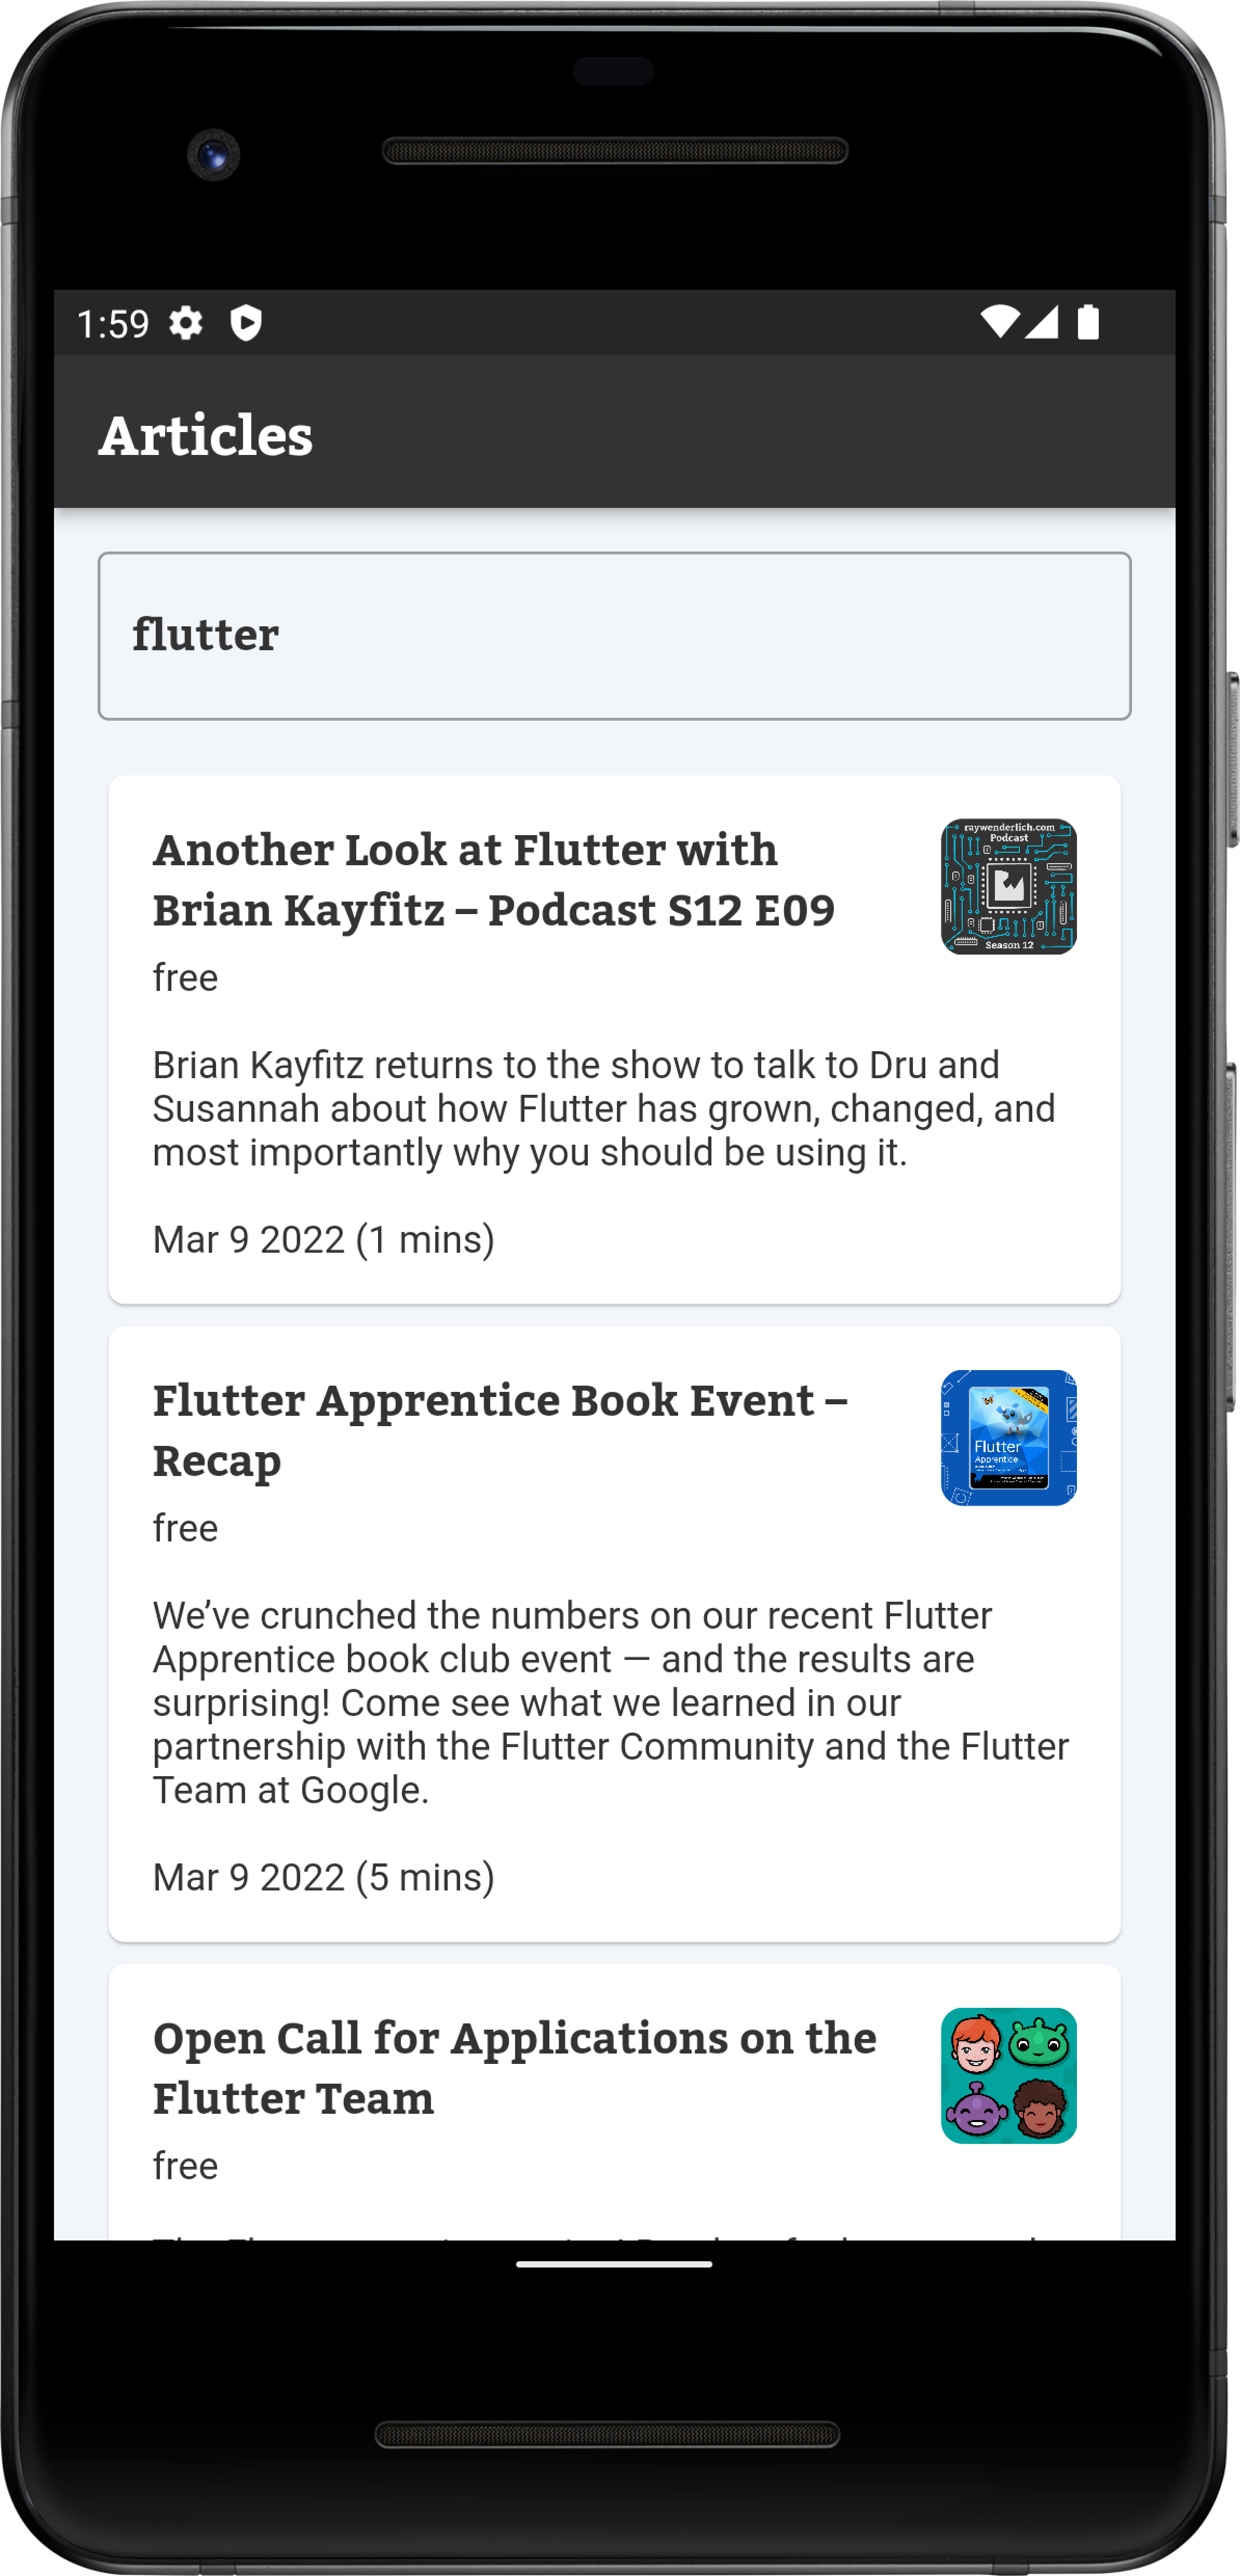
Build and run. Enter some keywords in the search field. The app should now get article results from RWClient and show them in a list.
Nice! That’s real progress.