Building Dart APIs with Google Cloud Run
Learn how to build backend applications using Dart and Google Cloud Run. By Alhassan Kamil.
Sign up/Sign in
With a free Kodeco account you can download source code, track your progress, bookmark, personalise your learner profile and more!
Create accountAlready a member of Kodeco? Sign in
Sign up/Sign in
With a free Kodeco account you can download source code, track your progress, bookmark, personalise your learner profile and more!
Create accountAlready a member of Kodeco? Sign in
Sign up/Sign in
With a free Kodeco account you can download source code, track your progress, bookmark, personalise your learner profile and more!
Create accountAlready a member of Kodeco? Sign in
Contents
Building Dart APIs with Google Cloud Run
30 mins
- Getting Started
- Running Your First Dart API Server
- Setting up a Google Cloud Project
- Creating the Project
- Creating a Service Account
- Setting up Billing
- An Overview of REST APIs
- Developing the API Endpoints
- Designing Endpoints
- Implementing the UserRoutes Endpoints
- Adding the NoteRoutes Endpoints
- Creating the AppRoutes Endpoints
- Testing the Routes
- Writing Controller Logic
- UserController
- NoteController
- Adding Middleware
- Response Headers Middleware
- Authentication Middleware
- Deploying Your Dart API on Google Cloud Run
- Installing Google Cloud CLI
- Configuring the Dockerfile
- Deploying to Cloud Run
- Accessing Your Dart REST API
- Where to Go From Here
As a Flutter developer, you have a robust framework for developing cross-platform, front-end apps. How cool would it be if you could reuse your knowledge in Dart to create backend applications?
Well, you can! In this tutorial you’re going to build MNote, a note management API that any Flutter app can consume. In the process, you’ll learn how to:
- Develop and run servers in Dart using the shelf and shelf_router packages.
- Intercept and manipulate HTTP requests and responses using middleware.
- Create a Docker image for your project.
- Deploy a Dart API on Google Cloud Run.
Getting Started
Download the project by clicking the Download Materials button at the top or bottom of this tutorial and extract it to a suitable location. This tutorial uses VS Code, but you can use any text editor/IDE.
Open the starter project; its structure should look like this:
In summary:
- bin/mnote.dart is the entrypoint that bootstraps and serves the application.
- lib/controllers/note_controller.dart contains logic for managing notes.
- lib/controllers/user_controller.dart holds user authentication logic.
- lib/helpers: Utility functions (helper.dart) and middleware (middleware.dart) are here.
- lib/models: Contains model files.
- lib/routes/app_routes.dart holds top-level app routes definitions.
- lib/routes/note_routes.dart defines note routes.
- lib/routes/user_routes.dart has definitions for user routes.
Since you now understand the project structure, you’re ready to run it.
Running Your First Dart API Server
While at the root of the starter project, open a new terminal or PowerShell window. Next, run the following to download packages:
dart pub get
Then, start the server using:
dart run
The above command runs bin/mnote.dart, which bootstraps and starts the server. Once the server is running, you’ll see an output like the one below:
That means your server is listening for connections.
Open a new terminal window and enter:
curl http://localhost:8080
curl.exe
instead of curl
on Windows. Install cURL if you get an error that it’s not installed.
Click Enter and you should see an output similar to the one below:
Congratulations on successfully running your first Dart server!
Let’s see how the output came about.
Since bin/mnote.dart is basically your server, you may want to take a little look into what’s in there to produce such result. Don’t hesitate, open it and have a look at main()
:
// 1
final app = Router();
app.get('/', (Request request) {
final aboutApp = {
'name': 'MNote',
'version': 'v1.0.0',
'description': 'A minimal note management API to take and save notes'
};
return Response.ok(jsonEncode(aboutApp));
});
// 2
final handler = const Pipeline().addMiddleware(logRequests()).addHandler(app);
// 3
final mServer = await server.serve(handler, InternetAddress.anyIPv4, 8080);
// 4
print('Server started at http://${mServer.address.host}:${mServer.port}');
There you have it! :]
This is what each part does:
- Creates a Router. A router ensures that requests entering the application get mapped to functions (correctly called handlers) that can process them. In the case above, it routes any HTTP GET requests on the path
/
to the second handler argument which basically returns a JSON response. - Constructs a Pipeline handler that adds a logging middleware and registers the router.
- Creates a server with the
handler
that listens for requests from all available addresses on port 8080. - Lastly, prints that the server is listening on the given address-port combination.
Great, you now have a basic server. But this can’t authenticate users and manage notes. In the later sections, you’ll solve that. For now, let’s set up a Google Cloud project.
Setting up a Google Cloud Project
You’ll deploy MNote on Google Cloud Run, a service which is part of the Google Cloud Platform (GCP). So you need to have an active Google Cloud account with billing enabled to proceed.
Creating the Project
You’ll use Cloud Firestore to store notes and user information. As a result, you have to create a Firebase project as that automatically creates a Google Cloud project.
So, navigate to https://console.firebase.google.com and click Create a project:
Next, enter MNote into Project name, accept the terms and click Continue:
The next page asks you to enable Google Analytics, disable it and click Create project:
After a few seconds, the project should be ready. Click Continue:
The project’s Overview page opens. Click the Web button under Get started by adding Firebase to your app:
Enter “MNote” into App nickname and click Register app:
Next, click Continue to console:
Back in the console, click Cloud Firestore under Choose a product to add to your app:
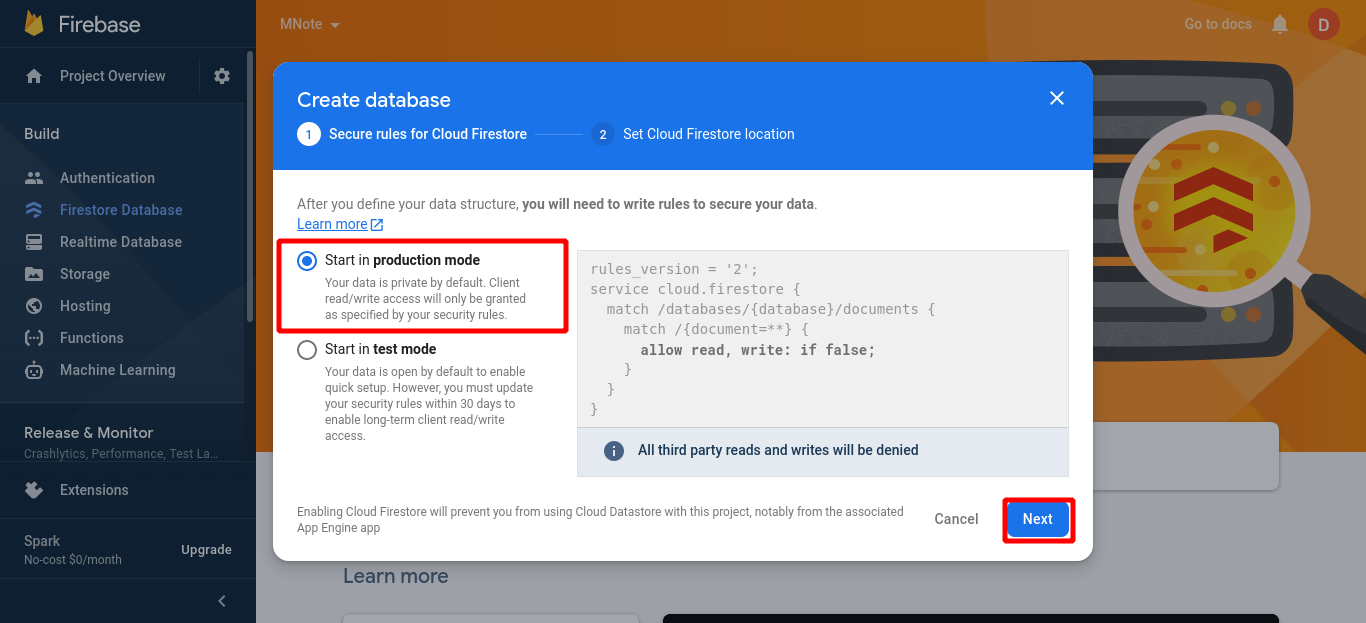
Now click Create database, select Start in production mode and click Next:
Finaly, set the database location and click Enable:
Now the project is ready to use Cloud Firestore. But you’ll need to create a service account to access it in your code.
Creating a Service Account
A service account allows automated access to Google APIs data in place of an API user. So, while in Firebase console, go ahead and click ⚙️ besides Project Overview at the top of the sidebar, then click Project settings:
The Project settings page opens. Select the Service accounts tab and click Generate new private key:
Click Generate key on the Generate new private key dialog to generate and download the service account JSON file:
Open the downloaded file in a text editor.
In bin/mnote.dart, add a getCredentials()
function above main()
with the following code:
import 'package:googleapis_auth/auth_io.dart';
ServiceAccountCredentials getCredentials() {
return ServiceAccountCredentials.fromJson({
'private_key_id': '<key ID from service account file>',
'private_key': '<Your project\'s service account private key>',
'client_email': '[something@].gserviceaccount.com',
'client_id': '<ID from service account file>',
'type': 'service_account'
});
}
Replace the following in the function:
-
with the corresponding private_key_id value from the service account file you downloaded. -
with the private_key value. - [something@].gserviceaccount.com with the client_email value.
- And
with the client_id value.
Lastly, replace the value of projectId
in lib/helpers/helper.dart with the project_id value from the service account file:
static const projectId = 'mnote-c7379';
Now you can use Cloud Firestore in your code. Set up billing for the project to finish up.
Setting up Billing
Navigate to https://console.cloud.google.com/billing/linkedaccount?project=mnote-c7379 after replacing mnote-c7379 with project_id from the service account JSON file. Then, click LINK A BILLING ACCOUNT,
Then select your billing account and click SET ACCOUNT (in case you haven’t created your billing already. You can do so by following Create a new Cloud Billing account):
Finally, you’ll be redirected to the billing account overview page:
The setup is done; now it’s time to grasp REST APIs before we dive into coding.
An Overview of REST APIs
REST APIs follow the constraints originally defined by Roy Fielding in his dissertation Architectural Styles and the Design of Network-based Software Architectures . The diagram below illustrates a REST API in it’s simple form:
In the REST API architecture, a client (browser, phone, etc.) sends an HTTP request to an API server requesting data in the server using HTTP methods. The server responds with either the requested data or failure as an HTTP response.
This request-response cycle happens through standard endpoints known as uniform resource locators (URLs) that provide access points for various resources on the server and how to retrieve them.
The following section defines these endpoints that you’ll use in this tutorial.
Developing the API Endpoints
All of your API endpoints reside in the lib/routes folder.
Designing Endpoints
You’ll implement eight endpoints, which include:
- GET /v1: For getting the app information.
- POST /v1/users/login: For logging in users.
- POST /v1/users/register: For registering users.
- GET /v1/notes: Retrieves all notes.
-
GET /v1/notes/
: Retrieves the note with ID equal to . - POST /v1/notes: Saves a note into the system.
-
DELETE /v1/notes/
: Deletes the note with ID . - * /v1: Processes any request that doesn’t match any of the above endpoints.
Next, you’ll write code to implement the API endpoints above in the proceeding sections.
Implementing the UserRoutes Endpoints
The first endpoints you want to implement are the user authentication endpoints. These routes to the user controller authenticate and verify that a user exists in the system before giving them access to manage notes.
Open lib/routes/user_routes.dart and import the following:
import 'package:shelf/shelf.dart';
import '../controllers/user_controller.dart';
Then, find router()
and replace it’s contents with the following code:
// 1
final router = Router();
// 2
router.post(
'/register', (Request request) => UserController(api).register(request));
// 3
router.post('/login', (Request request) => UserController(api).login(request));
// 4
return router;
Here is an explanation for each line above:
- Creates a new shelf_router
Router
object. - Routes HTTP POST requests on the
/register
endpoint toregister()
in lib/controllers/user_controller.dart, passing the requiredFirestoreApi api
and therequest
object to the constructor andregister()
respectively. - Similar to point #2, but using the
/login
endpoint andlogin()
instead. - Returns the router object from getter.
router
object is self-explanatory and is not explained in subsequent code.
Adding the NoteRoutes Endpoints
Now, you need to create the note management routes. Open lib/routes/note_routes.dart and import the necessary files:
import 'package:shelf/shelf.dart';
import '../controllers/note_controller.dart';
Between the router
variable definition and return
statement enter the code below:
// 1
router.get('/', (Request request) => NoteController(api).index());
// 2
router.post('/', (Request request) => NoteController(api).store(request));
// 3
router.get(
'/<id>', (Request request, String id) => NoteController(api).show(id));
// 4
router.delete(
'/<id>;', (Request request, String id) => NoteController(api).destroy(id));
The only new things here are lines #3 and #4. To sum up:
- Defines the route for querying all notes.
- Defines the route for storing a given note into the database.
- Is the route for retrieving the note with ID
. - Specifies an HTTP DELETE route for deleting a note with ID
.
Creating the AppRoutes Endpoints
You’re left with the last set of routes; app-level routes. To add them, open lib/routes/app_routes.dart and import the following:
import 'dart:convert';
import 'package:shelf/shelf.dart';
import 'note_routes.dart';
import 'user_routes.dart';
Then replace router()
body with the code below:
final router = Router();
// 1
router.get('/', (Request request) {
final aboutApp = {
'name': 'MNote',
'version': 'v1.0.0',
'description': 'A minimal note management API to take and save notes'
};
return Response.ok(jsonEncode(aboutApp));
});
// 2
router.mount('/users', UserRoutes(api: api).router);
router.mount('/notes', NoteRoutes(api: api).router);
// 3
router.all(
'/<ignore|.*>',
(Request r) =>
Response.notFound(jsonEncode({'message': 'Route not defined'})));
return router;
All you did was:
- Define the home route. You already came across this.
- Mount the users and notes routes you created earlier. Using
mount
allows you to prefix all routes within a particular router. Meaning, all the routes you defined in therouter()
getters in lib/routes/user_routes.dart and lib/routes/note_routes.dart will have the prefix /users and /notes respectively. - Any other route that doesn’t match the previous routes will return the given JSON message.
The endpoints have been implemented. But, you’ll get an error if you restart the server. As you still need to modify bin/mnote.dart, so import the following at the top:
import 'package:googleapis/firestore/v1.dart';
import 'package:mnote/routes/app_routes.dart';
import 'package:mnote/helpers/helper.dart';
Then change main()
to contain:
// 1
final credentials = getCredentials();
final client =
await clientViaServiceAccount(credentials, [FirestoreApi.datastoreScope]);
try {
// 2
final firestoreApi = FirestoreApi(client);
final app = Router();
// 3
app.mount('/v1', AppRoutes(firestoreApi).router);
final handler = const Pipeline().addMiddleware(logRequests()).addHandler(app);
final mServer = await server.serve(handler, InternetAddress.anyIPv4, 8080);
print('Server started at http://${mServer.address.host}:${mServer.port}');
} on Exception {
// 4
Helper.error();
}
This is what the above code does:
- Calls
getCredentials()
to get the service account credentials. Then creates a new HTTP client usingclientViaServiceAccount()
from the googleapis package. - Passes the client when creating the
firestoreApi
object, allowing you to execute Cloud Firestore operations using your project’s service account details. - Mounts the
router()
you created inAppRoutes
on a/v1
prefix, allowing you to version your routes. - Returns a
503 Internal Server Error
if an exception was thrown with the help ofHelper.error()
.
Testing the Routes
Restart the server by pressing Control + C and running dart run
. Now enter curl http://localhost:8080/v1
to confirm that your server now uses the new routes:
You can play around with all the routes. For example, the user login endpoint:
curl -X POST http://localhost:8080/v1/users/login
And the note deletion endpoint:
curl -X DELETE http://localhost:8080/v1/notes/asddhVIhwpoee
So far, everything works well, except that the APIs process no data. You’ll use controllers to solve this and allow users to log in and manage notes.
Writing Controller Logic
A controller, borrowed from the MVC pattern, is a class that sits between the client and the resource server (the database, in this case) and controls what data the client can access and what format it’s in for the client to understand.
You’ll implement two controllers: UserController
and NoteController
. UserController
holds authentication logic while NoteController
contains the logic for managing notes.
UserController
You’ll use register()
and login()
in lib/controllers/user_controller.dart to authenticate users. These have been defined, so you just need to modify them going forward.
Import these in lib/controllers/user_controller.dart:
import 'dart:convert';
import 'package:collection/collection.dart';
import '../helpers/helper.dart';
import '../models/user.dart';
Next, change register()
so it contains the following:
// 1
final req = await request.readAsString();
// 2
if (request.isEmpty || !validate(req)) {
return Response.forbidden(jsonEncode({'message': 'Bad request'}));
}
// 3
final mJson = jsonDecode(req) as Map<String, dynamic>;
final apiKey = Helper.randomChars(40);
final id = Helper.randomChars(15);
final user = User(
id: id,
email: (mJson['email'] ?? '') as String,
password: Helper.hash(mJson['password'] as String),
apiKey: apiKey);
try {
// 4
Helper.push(firestoreApi,
path: 'users/$id',
fields: user
.toMap()
.map((key, value) => MapEntry(key, Value(stringValue: value))));
return Response.ok(user.toJson());
} on Exception {
// 5
return Helper.error();
}
This is what your code is doing:
- Reading the request body into
req
as a string. - Returning a
403 Forbidden
response if the request is empty, has no body or eitheremail
orpassword
are missing from the request body. - If the request passes validation, it generates an
apiKey
andid
, then uses it with a hash of the user’s password to create a user. - Saving the user against their ID to the users collection on Cloud Firestore, wrapping this code in a
try
block to capture any exceptions thrown, and returning a200 OK
response if everything goes well. - Returning a
503 Internal Server Error
response if an exception was thrown, signalling an unsuccessful resource creation.
Notice that you called validate()
in register()
, which hasn’t been implemented yet. Modify it’s stub to contain the code below:
final json = jsonDecode(req) as Map;
return req.trim().isNotEmpty &&
json['email'] != null &&
(json['email'] as String).trim().isNotEmpty &&
json['password'] != null &&
(json['password'] as String).trim().isNotEmpty;
All validate()
does is to validate that req
contains both email
and password
.
Finish up UserController
by modifying login()
to have the following code:
final req = await request.readAsString();
if (request.isEmpty || !validate(req)) {
return Response.forbidden(jsonEncode({'message': 'Bad request'}));
}
final mJson = jsonDecode(req) as Map<String, dynamic>;
// 1
final docs = await Helper.getDocs(firestoreApi, 'users');
if ((docs.documents ?? []).isEmpty) {
return Response.notFound(jsonEncode({'message': 'User not found'}));
}
// 2
final user = docs.documents!.firstWhereOrNull((e) =>
e.fields?['email']?.stringValue == mJson['email'] &&
e.fields?['password']?.stringValue ==
Helper.hash(mJson['password'] as String));
if (user == null) {
return Response.forbidden(
jsonEncode({'message': 'Invalid email and/or password'}));
}
return Response.ok(jsonEncode(
{'apiKey': docs.documents!.first.fields?['apiKey']?.stringValue}));
The code above:
- Fetches all users from Cloud Firestore using
Helper.getDocs()
. This utility function takes aFirestoreApi
instance and the collection ID to fetch from, users in the case above. - Finds a user with the email-password combination, returning a
200 OK
response if they exists or403 Forbidden
if they don’t.
Restart the server and see that authentication works.
Register a user:
curl -X POST -d '{"email": "newuser@example.com", "password": "pass1234"}' http://localhost:8080/v1/users/register
Then log the user in:
curl -X POST -d '{"email": "newuser@example.com", "password": "pass1234"}' http://localhost:8080/v1/users/login
NoteController
The NoteController
manages notes. For now, it contains stubs for store()
, index()
, show()
and destroy()
, which you’ll change in this section.
Firstly, you need to import the following:
import 'dart:convert';
import '../helpers/helper.dart';
import '../models/note.dart';
Then, modify store()
to contain the following code:
// 1
final req = await request.readAsString();
final id = Helper.randomChars(15);
final isEmpty = request.isEmpty || req.trim().isEmpty;
if (isEmpty) {
return Response.forbidden(jsonEncode({'message': 'Bad request'}));
}
// 2
final json = jsonDecode(req) as Map<String, dynamic>;
final title = (json['title'] ?? '') as String;
final description = (json['description'] ?? '') as String;
if (title.isEmpty || description.isEmpty) {
return Response.forbidden(
jsonEncode({'message': 'All fields are required'}));
}
// 3
final note = Note(title: title, description: description, id: id);
try {
await Helper.push(firestoreApi,
path: 'notes/$id',
fields: note
.toMap()
.map((key, value) => MapEntry(key, Value(stringValue: value))));
return Response.ok(note.toJson());
} on Exception {
// 4
return Helper.error();
}
This is what your code is doing:
- Checking the request and returning a
403 Forbidden
response if it’s empty. - Decoding the request and returning another
403 Forbidden
response if eithertitle
ordescription
is empty. - Creating a new note, saving it into the notes collection and returning
200 OK
success response containing the note. - Returning a
503 Internal Server Error
if the note was unable to save.
The next task is to retrieve all notes in index()
. So alter it’s body with the following code:
try {
final docList = await Helper.getDocs(firestoreApi, 'notes');
final notes = docList.documents
?.map((e) =>
e.fields?.map((key, value) => MapEntry(key, value.stringValue)))
.toList();
return Response.ok(jsonEncode(notes ?? <String>[]));
} on Exception {
return Helper.error();
}
The code above retrieves all notes from the database and returns them as a response. If there was an exception, an error response is, instead, returned.
Moving forward, change the body of show()
to also match the code below:
try {
final doc = await firestoreApi.projects.databases.documents
.get('${Helper.doc}/notes/$id');
final notes =
doc.fields?.map((key, value) => MapEntry(key, value.stringValue));
return Response.ok(jsonEncode(notes));
} on Exception {
return Helper.error();
}
This retrieves the note by it’s ID and returns a 200 OK
response containing the note or a 503 Internal Server Error
response if there’s an error.
Lastly, you’d want to delete notes. You can do that in destroy()
like this:
try {
await firestoreApi.projects.databases.documents
.delete('${Helper.doc}/notes/$id');
return Response.ok(jsonEncode({'message': 'Delete successful'}));
} on Exception {
return Helper.error();
}
The code is similar to that of show()
, except you used delete()
instead of get()
and returned a message instead of a note.
This completes the note controller logic, so you can now manage notes. All API endpoints should now also work.
Restart the server and try to save a note:
curl -X POST -d '{"title": "Monday Journeys","description": "Accra to Tamale"}' http://localhost:8080/v1/notes/
You should get a response like below:
Explore the other endpoints to see the responses:
- Get all notes
curl http://localhost:8080/v1/notes
. - Get the note with ID WVVehUGGr56RkXy:
curl http://localhost:8080/v1/notes/WVVehUGGr56RkXy
. - Delete note with ID WVVehUGGr56RkXy:
curl -X DELETE http://localhost:8080/v1/notes/WVVehUGGr56RkXy
.
As of now, anyone can use the API to access notes. This isn’t a good security practice. So you need to make the notes accessible to only authenticated users. You’ll use middleware to do that.
Adding Middleware
The project uses two types of middleware: ensureResponsesHaveHeaders()
and authenticate()
. The first middleware adds headers to every response while the second performs authentication. You already have stubs for these middleware in lib/helpers/middleware.dart. So, you only need to make modifications.
Response Headers Middleware
In lib/helpers/middleware.dart, import the following:
import 'dart:convert';
import 'helper.dart';
Now, replace the body of ensureResponsesHaveHeaders()
with the code below:
return createMiddleware(responseHandler: (response) {
return response.change(headers: {
'Content-Type': 'application/json',
'Cache-Control': 'max-age=604800',
});
});
You have created a middleware that changes all responses to have the Content-Type and Cache-Control headers using shelf‘s createMiddleware
function.
Content-Type indicates the media type of the resource (i.e application/json
: JSON format) while Cache-Control controls how clients cache responses (i.e 7 days maximum, here).
Restart the server; check and confirm that the response headers don’t contain these headers:
curl http://localhost:8080/v1/notes -I
Now, register ensureResponsesHaveHeaders()
in bin/mnote.dart by changing handler
to the following:
final handler = const Pipeline()
.addMiddleware(ensureResponsesHaveHeaders())
.addMiddleware(logRequests())
.addHandler(app);
Remember to import lib/helpers/middleware.dart:
import 'package:mnote/helpers/middleware.dart';
Restart the server and list headers again:
curl http://localhost:8080/v1/notes -I
Notice that the headers are now in the response.
Authentication Middleware
Lastly, on middleware, modify authenticate()
to contain the following:
return createMiddleware(requestHandler: (request) async {
// 1
if (request.requestedUri.path == '/v1/' ||
request.requestedUri.path == '/v1' ||
request.requestedUri.path.contains('v1/users/login') ||
request.requestedUri.path.contains('v1/users/register')) {
return null;
}
// 2
var token = request.headers['Authorization'];
if (token == null || token.trim().isEmpty) {
return Response.forbidden(jsonEncode({'message': 'Unauthenticated'}));
}
// 3
if (token.contains('Bearer')) {
token = token.substring(6).trim();
}
try {
// 4
final docs = await Helper.getDocs(api, 'users');
final tokenValid = (docs.documents ?? []).isNotEmpty &&
docs.documents!.any(
(e) => e.fields!.values.any((el) => el.stringValue == token));
if (!tokenValid) {
return Response.forbidden(
jsonEncode({'message': 'Invalid API token: ${token}'}));
}
return null;
} on Exception {
// 5
return Helper.error();
}
});
This is what that code is doing:
- Checking whether the currently requested URL is home, login or registration pages. If it’s, halting authentication by returning
null
. This is because these endpoints don’t require authentication. - Extracting the user’s API token from the
Authorization
header, returning a403 Forbidden
response if there is no token in the header. - If the token is Bearer token, strip the bearer out.
- Getting all users from the database and checking whether the user with the API token exists. If no such user exists, return a
403 Forbidden
response. Otherwise, it allows the request to proceed. - If there was an exception, respond with a
503 Internal Server Error
.
Now, change the handler
in bin/mnote.dart to contain the authenticate()
middleware:
final handler = const Pipeline()
.addMiddleware(ensureResponsesHaveHeaders())
.addMiddleware(authenticate(firestoreApi))
.addMiddleware(logRequests())
.addHandler(app);
Restart your server and try to send a request to an endpoint that requires authentication:
curl http://localhost:8080/v1/notes
You should receive the response below:
But if you change the request to contain the Authorization
header with a valid API key:
curl -H "Authorization: Bearer kRdSd2kTq7oh44xEMMsSEh2EfzcSeLAT2ERlX1y7XX" http://localhost:8080/v1/notes
You get all notes in the system:
Congratulations! The app is complete.
Why not take a break and celebrate your victory before moving on? :] You deserve it.
Deploying Your Dart API on Google Cloud Run
Google Cloud Run is a fully-managed, serverless platform that allows you to deploy autoscaling containerized microservices on Google Cloud Platform (GCP).
To deploy the app on Cloud Run, you need to install Google Cloud CLI (gcloud).
Installing Google Cloud CLI
Installation instructions vary depending on your operating system. Use the following links to install the gcloud CLI:
- Install on Windows
- Installation instructions for macOS
- Installation on Linux systems
- Ubuntu/Debian and Fedora/Red Hat/CentOS
While gcloud CLI is installing, you can proceed to configure the project using a Dockerfile to deploy it as a Docker container.
Configuring the Dockerfile
A Dockerfile contains all command-line instructions you’d specify for Docker to assemble your Docker image. This file will reside at the root of the project.
Now, go ahead and create the file Dockerfile. Open it and add the following:
# 1
FROM dart:stable AS mnote_build
# 2
ENV PORT=8080
WORKDIR /app
COPY pubspec.* ./
RUN dart pub get
# 3
COPY . .
RUN dart pub get --offline
RUN dart compile exe bin/mnote.dart -o bin/mnote
# 4
FROM scratch
COPY --from=mnote_build /runtime/ /
COPY --from=mnote_build /app/bin/mnote /app/bin/
# 5
EXPOSE $PORT
CMD ["/app/bin/mnote"]
This is what the instructions in the Dockerfile mean:
- Firstly, you use the latest stable version of the official Dart image as a starting point for this build. Also, you named this build stage
mnote_build
so you can reference the image later. - Secondly, you defined an environment variable
PORT
. Then, you make /app the working directory for this build, making executions of all subsequent Docker instructions relative to this directory. The nextCOPY
instruction will copy allpubspec
[pubspec.yaml, pubspec.lock, etc] files to this directory. Then, you rundart pub get
to get packages. - Next, you copy all source code files from the current build context to the working directory. You run
dart pub get --offline
to get packages again — this time, making the packages available for offline use. You then compile the code into an executable and output it to bin/mnote. - Then, you start a new build stage using the scratch base image. In this stage, you copy the previously compiled runtime libraries and configuration files mnote_build generated in it’s /runtime/ directory to this new build context. Finally, you copy the mnote executable that was compiled from the mnote_build build stage to the /app/bin/ directory of the current build context.
- Lastly, you expose port
8080
for the container to listen at runtime. Then you run the server.
Now’s the time to check the gcloud installation status. Ensure that Google Cloud is installed before continuing.
Deploying to Cloud Run
Before you deploy, delete the service account file, remove getCredentials()
in bin/mnote.dart and replace clientViaServiceAccount()
with the following:
final client = await clientViaApplicationDefaultCredentials(
scopes: [FirestoreApi.datastoreScope],
);
clientViaApplicationDefaultCredentials()
enables access to your project’s resources through Application Default Credentials. Therefore, it removes the need for service account credentials.
Next, initialize gcloud and follow the instructions to configure it:
gcloud init --project mnote-c7379
Then, run the following while at the root of the project:
gcloud run deploy --source .
This deploys the project on Cloud Run. Running the command brings a series of prompts. Use the following to respond to them:
- For Service name, enter mnote.
- When prompted to specify a region, select the one nearest to your users.
- For any other prompt requesting for [y/N], press y.
Accessing Your Dart REST API
After deployment, gcloud displays a Service URL on the command line. Use that URL to send requests to the server. For example, to register a user:
curl -X POST -d '{"email": "newuser@example.com", "password": "pass1234"}' https://mnote-l5z2wfy3ia-ew.a.run.app/v1/users/register
Replace https://mnote-l5z2wfy3ia-ew.a.run.app
with the service URL gcloud displayed.
Where to Go From Here
You can download the complete project using the Download Materials button at the top or bottom of this tutorial.
You developed a good REST API using Dart in this tutorial. But you can improve it further by adding more features and security.
For further reading on Dart backend app development, you might want to try these:
- https://www.youtube.com/watch?v=v7FhaV9e3yY
- shelf, shelf_router, and other shelf-related packages
- httpserver
Do you have any questions, suggestions or improvements you made? Let us know in the comments section below.
All videos. All books.
One low price.
A Kodeco subscription is the best way to learn and master mobile development — plans start at just $19.99/month! Learn iOS, Swift, Android, Kotlin, Flutter and Dart development and unlock our massive catalog of 50+ books and 4,000+ videos.
Learn more