Platform-Specific Code With Flutter Method Channel: Getting Started
Learn how to communicate with some platform-specific code with Flutter method channels and extend the functionality of the Flutter application. By Wilberforce Uwadiegwu.
Sign up/Sign in
With a free Kodeco account you can download source code, track your progress, bookmark, personalise your learner profile and more!
Create accountAlready a member of Kodeco? Sign in
Sign up/Sign in
With a free Kodeco account you can download source code, track your progress, bookmark, personalise your learner profile and more!
Create accountAlready a member of Kodeco? Sign in
Sign up/Sign in
With a free Kodeco account you can download source code, track your progress, bookmark, personalise your learner profile and more!
Create accountAlready a member of Kodeco? Sign in
Contents
Platform-Specific Code With Flutter Method Channel: Getting Started
30 mins
- Getting Started
- Understanding the Method Channel
- Setting up Method Channel on iOS With Swift
- Understanding PhotoKit
- Requesting Permissions on iOS
- Fetching all Photos From iOS
- Reading Image Data From iOS
- Setting up the Method Channel on Flutter
- Building a Custom Image Provider in Flutter
- Rendering Images From the Host Device
- Rendering Selected Images
- Setting up Method Channel on Android with Kotlin
- Understanding Android’s Media API
- Requesting User Permissions on Android
- Fetching all Images From Android
- Reading Image Bytes on Android
- Consuming Method Calls From Host Platforms in Flutter
- Where to Go From Here?
The concept of cross-platform messaging was introduced in an earlier tuorial. That tutorial briefly highlighted the difference between the Event Channel and Method Channel. It went into detail on how to stream data from the host platform to your Dart code. This tutorial focuses on cross-platform messaging with the Method Channel. Here, you’ll build Photos Keyboard, an app that replicates the behavior of Slack’s image picker. You’ll learn how to:
- Invoke methods on host platforms and listen for method calls.
- Query images from the user’s photo library.
- Build a custom image provider.
Getting Started
Download the project by clicking Download Materials at the top or bottom of this tutorial. Unzip the file and open the starter folder with the latest version of Android Studio or Visual Studio Code. The project has two directories: common and widgets. The common directory contains code used in multiple files, and the widget directory houses widget files.
Open pubspec.yaml and click the Pub get tab that appears in your IDE. Open lib/main.dart and run the project to see this on your target emulator or device:
This tutorial is divided into three main sections.
- The first section walks you through setting up Method Channel on iOS, listening for method calls, querying the OS for photos and returning the results to Flutter.
- In the second section, you’ll complete the UI to render the images and invoke methods on the host platform.
- Finally, using Kotlin on Android, the last section guides you in setting up and listening for method calls on the Method Channel, retrieving images from the gallery and sending the decoded image bytes back to Flutter for rendering.
Understanding the Method Channel
The Method Channel stems from binary messaging and the platform channel. The previously mentioned tutorial on Event Channel provided an overview of these APIs and explained how the Method Channel and Event Channel are types of platform channels. Here’s an illustration of the Platform Channel stack:

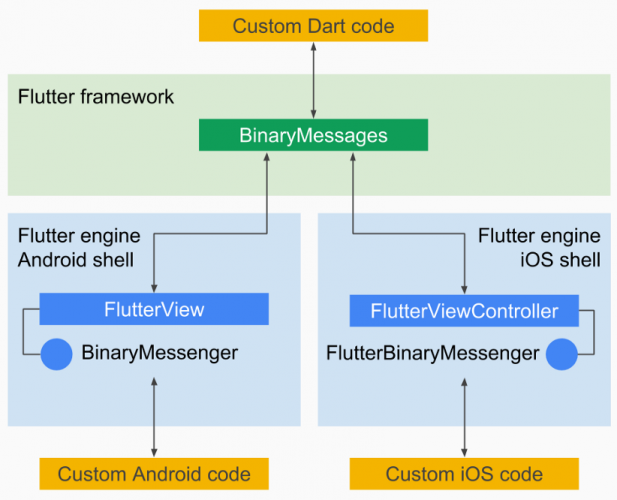
The stack of Platform Channel
The Method Channel, unlike the Event Channel, supports a bidirectional invocation of methods. An interesting thing to keep in mind here is that the method invocation isn’t technically an “invocation”, as the API doesn’t call the function for you. As you’ll see later, when the method is received, you can check the method invoked and call the function yourself. Mikkel Ravn wrote a detailed article on Platform Channels and the design tradeoffs.
Setting up Method Channel on iOS With Swift
To receive method calls on iOS, you need the channel’s name and a closure. The name is like an ID for the channel and must be the same for iOS, Flutter and Android. The Flutter Platform Engine calls the closure when you invoke a method on the Method Channel from the Dart side. In this closure, you retrieve the name and parameters of the invoked method and consume it.
Start by opening Runner.xcworkspace in the starter/ios directory with Xcode. Then, declare the following variables above application()
inside the AppDelegate
class in AppDelegate.swift:
// 1
private var flutterResult: FlutterResult? = nil
// 2
private var fetchLimit: Int = 0
// 3
private var fetchResult: PHFetchResult<PHAsset>? = nil
The use case for the variables above is as follows:
- Handles communication back to Flutter.
- Maximum number of photos to fetch.
- Reference to the photo query result.
Still in AppDelegate.swift, add this import statement below the other import statements:
import Photos
Next, add the following code above GeneratedPluginRegistrant.register(with: self)
inside application()
:
let controller = (window?.rootViewController as! FlutterViewController)
// 1
let methodChannel =
FlutterMethodChannel(name: "com.raywenderlich.photos_keyboard", binaryMessenger: controller.binaryMessenger)
// 2
methodChannel
.setMethodCallHandler({ [weak self](call: FlutterMethodCall, result: @escaping FlutterResult) -> Void in
switch call.method {
case "getPhotos":
// 3
self?.fetchLimit = call.arguments as! Int
self?.flutterResult = result
self?.getPhotos()
default:
// 4
result(FlutterMethodNotImplemented)
}
})
Here’s what the code above does:
- Initializes the channel with the name
com.raywenderlich.photos_keyboard
. - Listens for incoming function calls.
- Loosely translated, this means “call
getPhotos()
when Dart side invokesgetPhotos
“. - Handles unknown methods.
Understanding PhotoKit
PhotoKit comprises APIs that sit between your app and local and iCloud media. These APIs essentially control access to media in the Photos app, dictating how your app reads and writes from them. Throughout this tutorial, you’ll interact with some of these APIs, like PHPhotoLibrary
, PHAsset
and PHImageManager
.
Requesting Permissions on iOS
On iOS, sensitive user data like the photos library is walled behind protected APIs like PhotoKit. You add a key-value pair to Info.plist to declare your app’s intention of accessing that data. The key is the ID for that data and the value is the reason your app needs the data.
Now, open Info.plist. Hover on the rows of keys on the left, and click any of the + icons that appear. Start typing “Privacy” and select Privacy – Photo Library Usage Description from the drop-down. Then, paste “Photos Keyboard needs access to photos to make them available for selection” for the value column for that same row.
Next, request permission from the user when Flutter calls getPhotos
. Write this function below application()
:
private func getPhotos() {
PHPhotoLibrary.requestAuthorization { (status) in
if (status == .authorized) {
} else {
let error =
FlutterError
.init(code: "0", message: "Not authorized", details: status)
self.flutterResult?(error)
}
}
}
PHPhotoLibrary.requestAuthorization()
displays a permission prompt to the user and status
is the the reponse of the user.
Fetching all Photos From iOS
Now that you have the user’s blessing to access their photos, read the photos and return the result to Flutter. Add the following code inside the if
branch of the previous statement:
let options = PHFetchOptions()
options.fetchLimit = self.fetchLimit
options.sortDescriptors =
[NSSortDescriptor(key: "creationDate", ascending: false)]
self.fetchResult = PHAsset.fetchAssets(with: .image, options: options)
var results: [String] = []
self.fetchResult?.enumerateObjects { asset, count, stop in
results.append(asset.localIdentifier)
}
self.flutterResult?(results)
This fetches the images, sorting them by creation date, and picks out the IDs of the results.
Reading Image Data From iOS
For better performance, read the image data on demand, i.e., when Flutter actually needs to display that particular image. To read an image, you need the ID along with the width and height of the image widget. Start by getting the PHAsset
of the corresponding ID from fetchResult
with a linear search and read the image data from the asset.
Write this function below getPhotos()
:
private func fetchImage(args: Dictionary<String, Any>?, result: @escaping FlutterResult) {
// 1
let id = args?["id"] as! String
let width = args?["width"] as! Double
let height = args?["height"] as! Double
// 2
self.fetchResult?.enumerateObjects { (asset: PHAsset, count: Int, stop: UnsafeMutablePointer<ObjCBool>) in
if (asset.localIdentifier == id) {
// 3
stop.pointee = true
// 4
self.requestImage(width: width, height: height, asset: asset) { data in
// 5
result(data)
}
return
}
}
}
In this code, you:
- Get the method arguments.
- Get the matching
PHAsset
fromfetchResult
. - Stop the search, since a match has been found.
- Read the image data from
PHAsset
.requestImage
will be declared later. - Return the image data to Flutter.
Both the method argument and result handler were passed directly to fetchImage()
to avoid concurrency issues since Flutter will fire off image requests as the user scrolls across the grid of images.
Having retrieved PHAsset
, the next step is to fetch the image data. So, write this function below fetchImage()
:
private func requestImage(width: Double, height: Double, asset: PHAsset, onComplete: @escaping (Data) -> Void) {
let size = CGSize.init(width: width, height: height)
let option = PHImageRequestOptions()
option.isSynchronous = true
PHImageManager
.default()
.requestImage(for: asset, targetSize: size, contentMode: .default, options: option) { image, _ in
guard let image = image,
let data = image.jpegData(compressionQuality: 1.0) else { return }
onComplete(data)
}
}
The instructions above fetched the image data and then called the onComplete
closure with the data.
The final step for this session is to add another case to the method handler, like so:
case "fetchImage":
self?.fetchImage(args: call.arguments as? Dictionary<String, Any>, result: result)
Run the project with Xcode or your Flutter IDE, and you should notice that nothing has changed visually:
That’s all for the iOS side. Good job!
Setting up the Method Channel on Flutter
Start this session by going back to Android Studio or VSCode and opening constants.dart inside the common directory. Then, add this import statement above the MyStrings
class:
import 'package:flutter/services.dart';
Next, declare the method channel below the MyStrings
class:
const methodChannel = MethodChannel('com.raywenderlich.photos_keyboard');
Notice that the channel’s name is the same as the one you used earlier in Swift.
Head to home.dart in the widgets directory and write this function below onImageTap()
:
void getAllPhotos() async {
// 1
gridHeight = getKeyboardHeight();
// 2
final results = await methodChannel.invokeMethod<List>('getPhotos', 1000);
if (results != null && results.isNotEmpty) {
setState(() {
images = results.cast<String>();
// 3
showGrid = images.isNotEmpty;
// 4
focus.unfocus();
});
}
}
Here’s what this code does:
- Gets the height of the soft keyboard. This height is used as the height of the images grid widget.
- Calls the method. The method name is
getPhotos
and the argument is1000
. Recall that earlier you used this size to decide the number of images to fetch in Swift.invokeMethod()
wasawait
ed on because it returns aFuture
. Since you expect a list of objects, you specifyList
as the type forinvokeMethod()
. - Shows the images grid only if the host platform returns images.
- Dismisses the soft keyboard.
To put a closure on this step, add the following logic to the empty togglePhotos()
below build()
:
if (showGrid) {
setState(() {
showGrid = false;
focus.requestFocus();
});
} else {
getAllPhotos();
}
Note that BottomContainer
calls togglePhotos()
when the user taps the gallery icon.
Building a Custom Image Provider in Flutter
Flutter supports loading images from various sources, none of which fit the current use case. So, how do you render the images? The answer to this question lies partly in the implementation of FileImage, an ImageProvider used for decoding images from filehandles. You’ll implement something similar, but instead of reading the bytes from a file, you’ll use the method channel to read the bytes from the host platform.
Start by creating adaptive_image.dart inside the common directory. Then, declare an AdaptiveImage
class, which sublasses ImageProvider
:
class AdaptiveImage extends ImageProvider<AdaptiveImage> {
final String id;
final double width;
final double height;
AdaptiveImage({required this.id, required this.width, required this.height});
@override
ImageStreamCompleter load(AdaptiveImage key, DecoderCallback decode) {
// TODO: implement load
throw UnimplementedError();
}
@override
Future<AdaptiveImage> obtainKey(ImageConfiguration configuration) {
return SynchronousFuture<AdaptiveImage>(this);
}
}
This is the skeleton of this class, but here’s a breakdown:
-
load()
uses the variables of the class to load the appropriate image from the host platform. -
obtainKey
generates a key object. The key object describes the properties of the image to load. Since there’s no asynchronous task being done in this function,SynchronousFuture
is simply returned.SynchronousFuture
is aFuture
that completes immmediately.
Now, add the following import
statements:
import 'dart:typed_data';
import 'dart:ui';
import 'package:flutter/foundation.dart';
import 'package:flutter/material.dart';
import 'constants.dart';
Subsequently, declare a function below obtainKey()
, like so:
Future<Codec> _loadAsync(AdaptiveImage key, DecoderCallback decode) async {
assert(key == this);
// 1
final bytes = await methodChannel.invokeMethod<Uint8List>(
'fetchImage', {'id': id, 'width': width, 'height': height});
// 2
if (bytes == null || bytes.lengthInBytes == 0) {
PaintingBinding.instance!.imageCache!.evict(key);
throw StateError("Image for $id couldn't be loaded");
}
return decode(bytes);
}
In this code, you:
- Request the image bytes from the host platform.
- Remove the image key from cache if the request fails.
Since you’re using the class as the key for the image, you need to implement a proper equality relation. To do this, override both the equality operator and hashCode
. Write this code below _loadAsync()
:
@override
bool operator ==(Object other) =>
identical(this, other) ||
other is AdaptiveImage &&
runtimeType == other.runtimeType &&
id == other.id &&
width == other.width &&
height == other.height;
@override
int get hashCode => id.hashCode ^ width.hashCode ^ height.hashCode;
This means that given two AdaptiveImage
objects, they’re both equal if they’re the same object and their id
, width
and height
properties are equal.
Although not required, you can also override toString()
for debugging purpose. So, add this function below the hashCode
override:
@override
String toString() {
return '${objectRuntimeType(this, 'AdaptiveImage')}('
'"$id", width: $width, height: $height)';
}
The final step is to implement load()
. Just like ImageFile
, you’ll return an instance of MultiFrameImageStreamCompleter
, like so:
return MultiFrameImageStreamCompleter(
codec: _loadAsync(key, decode),
scale: 1.0,
debugLabel: id,
informationCollector: () sync* {
yield ErrorDescription('Id: $id');
});
MultiFrameImageStreamCompleter
is responsible for converting the bytes to a format that the Image widget can display. You can read more about it in Flutter’s documentation.
Run the project, and you shouldn’t see any changes yet.
Congrats! You’ve successfully implemented a custom image provider.
Rendering Images From the Host Device
Having implemented a custom ImageProvider
, the next step is using it to load the images.
Kick off this section by opening images_grid.dart in the widgets directory. The build tree currently consists of a horizontal scroll widget containing a column of icons. You’ll add a SliverGrid
to this horizontal scroll widget. But first, you need to determine the logical pixel of each of the images.
Add this declaration just above the return
statement in build()
:
final imageSize = MediaQuery.of(context).size.width * 0.6;
This means the width
and height
of each of the images will be 60% of the device width.
Next, import AdaptiveImage
into images_grid.dart, like so:
import '../common/adaptive_image.dart';
Below the ImagesGridWidget
class, declare another class named _ImageWidget
, like so:
class _ImageWidget extends StatelessWidget {
final String id;
final VoidCallback onTap;
final double size;
const _ImageWidget({
Key? key,
required this.onTap,
required this.id,
required this.size,
}) : super(key: key);
@override
Widget build(BuildContext context) {
}
}
This class will contain the build instructions for individual image widgets. Add the following code inside its build()
:
return Stack(
children: [
Positioned.fill(
child: Image(
key: ValueKey(id),
fit: BoxFit.cover,
image: AdaptiveImage(
id: id,
width: size,
height: size,
),
),
),
Positioned.fill(
child: Material(
color: Colors.transparent,
child: InkWell(onTap: onTap),
),
)
],
);
The build instructions above will display the image using the AdaptiveImage you wrote earlier.
Next, replace the TODO
text in the build()
of ImagesGridWidget
with this:
SliverGrid.count(
crossAxisCount: 2,
crossAxisSpacing: 5,
mainAxisSpacing: 5,
children: images.map((e) {
return _ImageWidget(
onTap: () => onImageTap(e),
id: e,
size: imageSize,
);
}).toList(),
),
The instructions above should be familiar; you’re basically mapping the images
to _ImageWidget
.
Now, run the app, tap the gallery icon and you should see something similar to this:
Rendering Selected Images
The final stage for this section allows the user to add and remove images in the input area.
Open images_list.dart in the widgets directory. Then, add this import statement:
import '../common/adaptive_image.dart';
You’ll pass a ListView
as the child of the SizedBox
in build()
later, but first, declare the class for the single image widget below ImagesListWidget
, like so:
class _ImageWidget extends StatelessWidget {
final String id;
final VoidCallback onRemoved;
final double size;
const _ImageWidget({
Key? key,
required this.onRemoved,
required this.id,
required this.size,
}) : super(key: key);
@override
Widget build(BuildContext context) {
final isIos = Theme.of(context).platform == TargetPlatform.iOS;
final imageSize = size - 15;
return Padding(
padding: const EdgeInsets.only(left: 5, right: 10),
child: SizedBox(
height: size,
width: size,
child: Stack(
clipBehavior: Clip.none,
children: [
],
),
),
);
}
}
The Stack
widget will have two widgets: the image widget and the cancel icon on top of it. So, pass the following widgets as the children to the Stack
widget in build()
of _ImageWidget
:
Positioned(
top: 15,
child: ClipRRect(
borderRadius: BorderRadius.circular(8),
child: Image(
width: imageSize,
height: imageSize,
fit: BoxFit.cover,
image: AdaptiveImage(
id: id,
width: imageSize,
height: imageSize,
),
),
),
),
Positioned(
top: -10,
right: -10,
child: IconButton(
onPressed: onRemoved,
icon: Icon(
isIos ? CupertinoIcons.multiply_circle_fill : Icons.cancel,
),
),
)
You’re using negative offsets for the top
and right
arguments of the cancel icon to ensure it’s positioned at the edge of the item widget.
Next, supply the child
argument to the SizedBox
in the build()
of ImagesListWidget
:
child: ListView.builder(
controller: controller,
scrollDirection: Axis.horizontal,
itemCount: images.length,
padding: const EdgeInsets.symmetric(horizontal: 10),
itemBuilder: (c, i) {
final id = images.elementAt(i);
return _ImageWidget(
key: ValueKey(id),
onRemoved: () => onRemoved(id),
id: id,
size: itemSize,
);
},
),
Subsequently, open home.dart and update both onImageRemoved()
and onImageTap()
to:
void onImageRemoved(String id) {
setState(() => selectedImages.remove(id));
}
void onImageTap(String id) {
setState(() => selectedImages.add(id));
WidgetsBinding.instance?.addPostFrameCallback((_) {
final pos = selectedImagesController.position.maxScrollExtent;
selectedImagesController.jumpTo(pos);
});
}
One of these functions is called when the state of selectedImages
needs to mutate. After updating selectedImages
, onImageTap()
scrolls the ListView
to the end to ensure the just-added image is visible.
Now, run on iOS, and you should have a similar experience:
Setting up Method Channel on Android with Kotlin
In this section, you’ll replicate the Method Channel setup flow you already did on iOS.
Start by opening the android directory in the starter project with Android Studio. Then, open MainActivity.kt, and add the following fields:
class MainActivity : FlutterFragmentActivity() {
private var methodResult: MethodChannel.Result? = null
private var queryLimit: Int = 0
}
Also, add these import statements to the import section:
import android.Manifest
import android.content.ContentResolver
import android.content.ContentUris
import android.content.pm.PackageManager
import android.database.Cursor
import android.net.Uri
import android.os.Build
import android.os.Bundle
import android.provider.MediaStore
import androidx.activity.result.contract.ActivityResultContracts
import androidx.core.content.ContextCompat
import androidx.lifecycle.lifecycleScope
import com.bumptech.glide.Glide
import io.flutter.embedding.engine.FlutterEngine
import io.flutter.plugin.common.MethodChannel
import kotlinx.coroutines.Dispatchers
import kotlinx.coroutines.launch
Next, override configureFlutterEngine()
, set up the Method Channel and listen for method calls. Write this function below the fields you just declared:
override fun configureFlutterEngine(flutterEngine: FlutterEngine) {
super.configureFlutterEngine(flutterEngine)
val messenger = flutterEngine.dartExecutor.binaryMessenger
MethodChannel(messenger, "com.raywenderlich.photos_keyboard")
.setMethodCallHandler { call, result ->
when (call.method) {
"getPhotos" -> {
methodResult = result
queryLimit = call.arguments()
getPhotos()
}
"fetchImage" -> fetchImage(call.arguments(), result)
else -> result.notImplemented()
}
}
}
Finally, add these dummy functions below the override above:
private fun getPhotos() {
TODO("Not yet implemented")
}
private fun fetchImage(args: Map<String, Any>, result: MethodChannel.Result) {
TODO("Not yet implemented")
}
Understanding Android’s Media API
Access to local media on Android is policed by the MediaStore API. Android stores data pertaining to each kind of media — image, video, audio, etc. — in an SQLite database, and you make SQL-like queries to retrieve the data. So, throughout this section, you’ll work with the MediaStore
API to query the images on the device and read the image data.
Requesting User Permissions on Android
Android has two major sets of permissions: runtime permissions and install-time permissions. The latter set, such as internet access, is implicitly granted to your app at install time. The former controls access to more sensitive data, and the user needs to grant it explicitly. Reading the images from an Android device is an example of such permission.
Open AndroidManifest.xml in the manifests directory, and add this declaration above the internet permission declaration:
<uses-permission android:name="android.permission.READ_EXTERNAL_STORAGE"/>
With this, you’re declaring that your app will read the external storage sometime in its lifecycle.
Back in MainActivity
, declare an activity result launcher field below the previous functions:
private val permissionLauncher =
registerForActivityResult(ActivityResultContracts.RequestPermission()) { granted ->
if (granted) {
getPhotos()
} else {
methodResult?.error("0", "Permission denied", "")
}
}
The lambda function is called after the permission dialog closes, and granted
is the result of the permission.
Next, use this permissionLauncher
to request permission. So, declare a function above this field:
private fun hasStoragePermission(): Boolean {
// 1
val permission = Manifest.permission.READ_EXTERNAL_STORAGE
// 2
val state = ContextCompat.checkSelfPermission(this, permission)
if (state == PackageManager.PERMISSION_GRANTED) return true
// 3
permissionLauncher.launch(permission)
return false
}
In this code:
- This is the identifier for the permission you want to request.
- This checks if your app already has the permission and returns
true
if so. - If your app doesn’t have the permission, it requests permission.
Fetching all Images From Android
Still in MainActivity
, declare another function that will execute the query and return the resultant cursor:
private fun getCursor(limit: Int): Cursor? {
//1
val uri = MediaStore.Images.Media.EXTERNAL_CONTENT_URI
val projection = arrayOf(MediaStore.Images.Media._ID)
//2
return if (Build.VERSION.SDK_INT < Build.VERSION_CODES.R) {
val sort = "${MediaStore.Images.ImageColumns.DATE_MODIFIED} DESC LIMIT $limit"
contentResolver.query(uri, projection, null, null, sort)
} else {
//3
val args = Bundle().apply {
putInt(ContentResolver.QUERY_ARG_LIMIT, limit)
putStringArray(
ContentResolver.QUERY_ARG_SORT_COLUMNS,
arrayOf(MediaStore.Images.ImageColumns.DATE_MODIFIED)
)
putInt(
ContentResolver.QUERY_ARG_SORT_DIRECTION,
ContentResolver.QUERY_SORT_DIRECTION_DESCENDING
)
}
contentResolver.query(uri, projection, args, null)
}
}
Here's what the code above does:
- Declares the
uri
andprojection
to get image id column from external storage. - Executes the query API for devices having SDK versions of Android earlier than Android 11.
- Executes the query API for devices having an SDK version of Android 11 or higher.
Finally, replace the dummy code in getPhotos()
with:
if (queryLimit == 0 || !hasStoragePermission()) return
lifecycleScope.launch(Dispatchers.IO) {
val ids = mutableListOf<String>()
val cursor = getCursor(queryLimit)
cursor?.use {
while (cursor.moveToNext()) {
val columnIndex = cursor.getColumnIndexOrThrow(MediaStore.Images.Media._ID)
val long = cursor.getLong(columnIndex)
ids.add(long.toString())
}
}
methodResult?.success(ids)
}
While Coroutines was used to execute the query on a background thread, the cursor was iterated over to get the id
of each image.
Reading Image Bytes on Android
To read the image bytes for a given id
, you'll first get the Uri
for the image. Then, you'll request the bytes with Glide, an Android image-loading library.
Write the getImageBytes
function above getCursor()
:
private fun getImageBytes(uri: Uri?, width: Int, height: Int, onComplete: (ByteArray) -> Unit) {
lifecycleScope.launch(Dispatchers.IO) {
try {
val r = Glide.with(this@MainActivity)
.`as`(ByteArray::class.java)
.load(uri)
.submit(width, height).get()
onComplete(r)
} catch (t: Throwable) {
onComplete(byteArrayOf())
}
}
}
The instructions above load the image with the uri
and invoke onComplete()
with the resultant bytes.
Finally, replace the dummy code in fetchImage()
:
// 1
val id = (args["id"] as String).toLong()
val width = (args["width"] as Double).toInt()
val height = (args["height"] as Double).toInt()
// 2
val uri = ContentUris.withAppendedId(MediaStore.Images.Media.EXTERNAL_CONTENT_URI, id)
getImageBytes(uri, width, height) {
result.success(it)
}
Here's what this code does:
- Reads the image properties from the arguments passed from the Dart end.
- Generates a Uri with the ID and loads the image for that Uri.
Run the Flutter project on Android, and you should have a similar experience:
Consuming Method Calls From Host Platforms in Flutter
Host platforms can invoke a method on Flutter, and Flutter can listen for incoming method invocations and parse the method names and arguments, just like you did for Swift and Kotlin above. This is another way in which the Event Channel differs from the Method Channel, because the events in the Event Channel are unidirectional.
Android can send the method call to Flutter like this:
val param = mapOf(Pair("param1", "value1"), Pair("param2", "value2"))
methodChannel.invokeMethod("doSomething", param)
Swift on iOS can send it like this:
var param = ["param1": "value1", "param2": "value2"]
methodChannel.invokeMethod("doSomething", arguments: param)
In both examples above, invokeMethod()
supports a third argument, which is the result Flutter returns.
methodChannel.setMethodCallHandler((call) async {
switch (call.method) {
case 'doSomething':
return doSomething(call.arguments);
default:
throw PlatformException(code: '1', message: 'Not Implemented');
}
});
Congrats on completing this tutorial!
Where to Go From Here?
The completed project contains the full code used in this tutorial. It's named final in the zipped file you downloaded earlier. You can still download it by clicking Download Materials at the top or bottom of this tutorial.
In this tutorial, you learned how to communicate between Flutter and the host platform via the Method Channel. To improve your knowledge, you can also implement the camera and video features. When the user taps the camera icon, call up the host platform to capture an image and return it to Flutter. The same goes for the video icon, but capture and return video data instead.
Check out the official doc on Writing custom platform-specific code and video on Packages and Plugins to learn how to develop a plugin that uses platform channel to talk to the pressure sensor on Android and iOS devices. And of course, if you have any questions or comments, please join the forum discussion below!