How To Make a Game Like Doodle Jump with Corona Tutorial Part 2
This is a blog post by iOS Tutorial Team member Jacob Gundersen, an indie game developer who runs the Indie Ambitions blog. Check out his latest app – Factor Samurai! In this tutorial series, you’ll learn how to use the Corona game engine to create a neat game like Doodle Jump. In the previous tutorial, […] By Jake Gundersen.
Sign up/Sign in
With a free Kodeco account you can download source code, track your progress, bookmark, personalise your learner profile and more!
Create accountAlready a member of Kodeco? Sign in
Sign up/Sign in
With a free Kodeco account you can download source code, track your progress, bookmark, personalise your learner profile and more!
Create accountAlready a member of Kodeco? Sign in
Contents
How To Make a Game Like Doodle Jump with Corona Tutorial Part 2
35 mins
This is a blog post by iOS Tutorial Team member Jacob Gundersen, an indie game developer who runs the Indie Ambitions blog. Check out his latest app – Factor Samurai!
Create a game like Doodle Jump with Corona!
In this tutorial series, you’ll learn how to use the Corona game engine to create a neat game like Doodle Jump.
In the previous tutorial, you learned how to use LevelHelper with Corona. We created a jumping character, different kinds of clouds, and gave him some arms.
In this second and final part of the tutorial series, we’re going to:
- Give our hero the ability to shoot arrows
- Create monsters and give them paths to follow
- Make the level move as our player jumps upwards
- Add even more epic win! :]
If you don’t have it already, here’s the example project where we left it off last time.
So fire up Level Helper and your text editor, and get ready to fire some arrows! :]
Fire It Up!
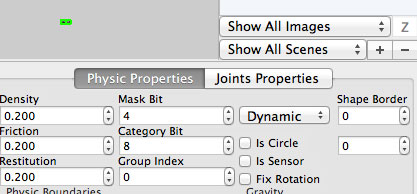
If you’ve been creating your own level with LevelHelper, open it up and drag the arrow sprite onto the gray area outside the level. Give the ‘arrow’ sprite the following attributes.
We’re now going to add a function to the player object that shoots an arrow. This code should go in the newPlayer() function, after the p:addEventListener(“collision”, p) line. Here’s the code:
	function p:shootArrow(x, y)

		local target = {}

		target.x = x
		target.y = -localGroup.y + y

		arrow = loader:newObjectWithUniqueName("arrow", physics)
		loader:startAnimationWithUniqueNameOnSprite("shoot",frontarm)
		localGroup:insert(arrow)

		arrow.x = self.x
		arrow.y = self.y

		distanceY = target.y - self.y
		distanceX = target.x - self.x
		arrow:setLinearVelocity(distanceX * 6, distanceY * 6)

		local firedAngle = angleBetween(self, target)

		arrow:rotate(firedAngle)
		self:rotateArms(firedAngle)

	end
Once again we are scoping the shootArrow function within the p object. Our first line creates a table named target. In Lua, the data container is called a table. Tables are hybrid array/dictionary objects. Tables can have keys or indexes added to them. We are creating a target table so we can create our calculated destination (it will be a touch).
We will be passing in the touch coordinates from the screen when we call this function. The x coordinate will be fine, but the y coordinate will need to be translated to localGroup coordinates in order to be compared to the position of the player to calculate the angle for both the rotation of the arms and for the physics call in order to apply a force to the arrow.
We next instantiate a new copy of the arrow object with the newObjectWithUniqueName call. Our single arrow in LevelHelper is already in the level (outside of the world boundaries), but what we are doing here is creating a copy of that arrow. This call doesn’t automatically add the arrow to our localGroup display group, so we need to do that.
If we didn’t add it to the localGroup all the positioning code for the arrow will be relative to the screen or ‘stage’ (what corona calls the master parent display group that all instantiated objects are automatically added to). This would make it hard to position the arrow.
The startAnimationWithUniqueNameOnSprite is the call we use to finally use the animation we created in LevelHelper. This will cycle through the four frames of the bow to look like we are drawing and releasing the bowstring.
Next we place the arrow at the center of the player, this is the starting position of the arrow.
The next three lines calculate the distance between the x and y coordinates of the player and the touch. These values are reduced and used to set the linear velocity of the arrow. This means that a close touch applies less force to the arrow than a far touch.
The angleBetween function is a helper function that calculates the angle between two points in our game. You should place the following code at the very end of the file:
function angleBetween ( srcObj, dstObj )
    local xDist = dstObj.x-srcObj.x ; local yDist = dstObj.y-srcObj.y
    local angleBetween = math.deg( math.atan( yDist/xDist ) )
    if ( srcObj.x < dstObj.x ) then angleBetween = angleBetween+90 else angleBetween = angleBetween-90 end
    return angleBetween - 90
end
Rotating the Bow to Shoot
The rotate method on the arrow is a built in function that sets the rotation of the sprite. The next method is one we'll define next. It rotates the arms and bow so they match up with shooting angle. That code should be placed in before the p:shootArrow function:
	function p:rotateArms(angle)
		if angle < -90 then
			frontarm.xScale = -1
			backarm.xScale = -1
			self.xScale = -1
			backarm.rotation = angle + 180
			frontarm.rotation = angle + 180
		else
			frontarm.xScale = 1
			backarm.xScale = 1
			self.xScale = 1
			backarm.rotation = angle
			frontarm.rotation = angle
		end
	end
This function should be easy to understand. We're flipping the player, frontarm, and backarm and rotating the arms so they point in the shooting direction.
Finally, we need to create a collision function for the arrow. This code should reside within the shootArrow function:
		local function arrowCollision(self, event)
			object = event.other
			loader:removeSpriteWithUniqueName(object.uniqueName)
		end

		arrow.collision = arrowCollision
		arrow:addEventListener("collision", arrow)
This should look familiar. The call to removeSpriteWithUniqueName call to the loader object is LevelHelper code that will delete and clean up after the object that the arrow collides with. We set the arrow mask bit to 4 in LevelHelper, so the only thing that the arrow can collide with is a monster.
The LevelHelper remove functions are preferable for any sprite instantiated in our initial call to instantiateObjectsInGroup. If we remove sprites (using removeSelf()) that were created in that initial call, we will have errors later on when we try to clean up everything in the level at the end of the game.
One last thing we need to do, the arrows need to remove themselves once they fly off screen. We'll do this with an enterFrame function on the arrow object. This code should also appear inside the shootArrow function:
		function arrow:enterFrame(event)
			if localGroup ~= nil then
				yStart = -localGroup.y
				if self.y > yStart + 480 or
					self.y < yStart or
					self.x < 0 or
					self.x > 320 then
						Runtime:removeEventListener("enterFrame", self)
						self:removeSelf()
				end
			end
		end

		Runtime:addEventListener("enterFrame", arrow)
That first line checks to see if localGroup still exists. In the case that we've been killed or fallen, an arrow may still exist. However, the localGroup may have been removed. In this case we'd throw an error. This first if statement avoids that problem.
Next, we set yStart to the negative of the localGroup.y position. We set that to negative because the arrows position is relative to the localGroup. So the y position of localGroup gets us to the position of the level relative to the screen and the negative of this value tells us how far down from the very top of the level the arrow is.
If you find that any of this positioning code is confusing, I recommend playing with it a little. A great way to do this is with the print() function. If you add the following line of code to the enterFrame function will print the y position of the level (localGroup) and the arrow:
print(localGroup.y, self.y)
Watch these values in the Corona Terminal window as the arrows are shot. This should give you an idea of how the y positions change as arrows move through the level and the level scrolls.
Now the player has all the required code to shoot an arrow, but we still don't have a way to trigger it. That requires touch handling code.

