How to Make a Platform Game Like Super Mario Brothers – Part 1
This is a blog post by iOS Tutorial Team member Jacob Gundersen, an indie game developer who runs the Indie Ambitions blog. Check out his latest app – Factor Samurai! For many of us, Super Mario Brothers was the first game that made us drop our jaws in gaming excitement. Although video games started with […] By Jake Gundersen.
Sign up/Sign in
With a free Kodeco account you can download source code, track your progress, bookmark, personalise your learner profile and more!
Create accountAlready a member of Kodeco? Sign in
Sign up/Sign in
With a free Kodeco account you can download source code, track your progress, bookmark, personalise your learner profile and more!
Create accountAlready a member of Kodeco? Sign in
Contents
How to Make a Platform Game Like Super Mario Brothers – Part 1
55 mins
- Getting Started
- The Tao of Physics Engines
- Physics Engineering
- Loading the TMXTiledMap
- The Gravity of Koalio’s Situation
- Playing God
- The Law of the Land: CGPoints and Forces
- Bumps In The Night – Collision Detection
- Heavy Lifting
- I’m Surrounded By Tiles!
- Taking Away Your Koala’s Privileges
- Let’s Resolve Some Collisions!
- Pausing to Consider a Dilemma...
- Back to the Code!
- Where to Go From Here?
Learn how to make a game like Super Mario!
This is a blog post by iOS Tutorial Team member Jacob Gundersen, an indie game developer who runs the Indie Ambitions blog. Check out his latest app – Factor Samurai!
For many of us, Super Mario Brothers was the first game that made us drop our jaws in gaming excitement.
Although video games started with Atari in many ways, the intuitive and visceral controls of Super Mario Brothers and fun level design were such a dramatic improvement that it felt like something completely new – and we couldn’t put it down for hours!
In this tutorial, you’re going to recapture the magic and create your own platform jumper game – but since the hero will be a Koala instead of a plumber, we’ll call it “Super Koalio Brothers!” ;]
Also to keep things simple instead of adding enemies we’ll just have a simple challenge — avoid the spiky floors. That way you’ll be able to focus on learning how to implement the heart of a platformer game: the physics engine.
This tutorial assumes you are already familiar with Cocos2D development. If you are new to Cocos2D, check out some of the other tutorials on this site first.
Do you have the necessary koala-fications? Then let’s get hopping!
Getting Started
To get started, go ahead and download the starter project for this tutorial.
Once you’ve downloaded the file, unzip it, open the project in Xcode, and build and run. You should see the following appear on the screen:
Starter Project for Super Mario tutorial
That’s right – just a boring empty screen! :] You’ll be filling that out in the rest of the tutorial.
This starter project is pretty bare bones – the main point of giving it to you is so that you’d have all of the images/sounds you’ll need for the project pre-integrated. Take a look through the project and you’ll see it contains the following:
- Game Art. Includes the Koalio free game art pack from Ray’s wife Vicki.
- Level Map. I put together a level map for you, based on the SMB level 1-1 you all know and love!
- Gratuitous Music and Sound Effects. This is a raywenderlich.com tutorial after all! :]
- A CCLayer subclass. A class called GameLevelLayer, that will do a lot of the physics engine work. Right now it’s as empty as a drum. (It’s just waiting for you to come!)
- A CCSprite subclass. A class called Player, which will contain the Koala’s logic. Right now it’s just waiting for you to make it fly away! (Sorry for all the jokes Norah!)
Once you’ve had a chance to look through the project and fully understand what’s there, keep reading and we’ll discuss some philosophy about physics engines!
The Tao of Physics Engines
A platform game revolves around its physics engine, and in this tutorial you’ll be creating your own physics engine from scratch.
There are two main reasons why you’ll be rolling your own, instead of using pre-existing engines such as Box2D or Chipmunk:
- Fine tuning. To get the right feel for a platformer game, you need to be able to fine-tune the feel and response of the engine. In general, platformers created using pre-existing engines don’t feel like the Mario/Sonic/Contra/Russian Attack games that you’re used to.
- Simplicity. Box2D and Chipmunk have a lot of capabilities your game engine doesn’t really need, so your homebrew engine will end up being less resource-intensive overall.
A physics engine does two important things:
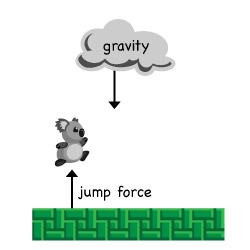
Forces acting on Koalio.
- Simulate movement. The first job of a physics engine is to simulate resistive forces like gravity, and applied forces like running, jumping, and friction.
- Detect collisions. The second job of a physics engine is to finds and resolve collisions between the player and other objects in the level.
For example, in your Koalio game you’ll apply an upward force to the Koala to make him jump. Over time, the force of gravity will act against that initial jumping force, which will give you that nice classic parabolic jump pattern.
And as for collision detection, you’ll use that to keep the Koala from falling through the ground, and to detect when our poor Koala collides with some spikes (ouch!)
Let’s see how this will work in practice.
Physics Engineering
In the physics engine you’ll create, the Koala will have its own movement-describing variables: current velocity (speed), acceleration, and position, among others. Using these variables, every movement you apply to the Koala will follow this algorithm:
- Is the jump or move action selected?
- If so, apply a jump or movement force to the Koala.
- Also apply gravity to the Koala.
- Compute the resulting velocity for the Koala.
- Apply this resulting velocity to the Koala and update his position.
- Check for collision between the Koala and other objects.
- If there’s a collision, resolve it either by moving the Koala back enough so that the collision is no longer occurring, or by causing damage to the poor Koala.
You’ll run these steps for every frame. In the game world, gravity is constantly pushing the Koala down and through the ground, but the collision resolution step will put him back on top of the ground in each frame. You can also use this feature to determine if the Koala is still touching the ground, and if not, disallow a jump action if the Koala is already in mid-jump or has just walked off a ledge.
Steps 1-5 will occur solely within the Koala’s object. All the necessary information is contained there, and it makes sense to let the Koala update its own variables.
However, when you reach the sixth step — collision detection — you need to take all of the level features into consideration, such as walls, floors, enemies, and other hazards. The collision detection step will be performed in each frame by the GameLevelLayer – remember, that’s the CCLayer subclass that will do a lot of the physics engine work.
If you allowed the Koala’s class to update his own position, he would move himself into a collision with a wall or ground block, and the GameLevelLayer would then move him back out, repeatedly — which would make him look like he was vibrating. (Had a little too much coffee, Koalio?)
So, you’re not going to allow the Koala to update his own state. Instead, the Koala will have a new variable, desiredPosition, that he will update. The GameLevelLayer will check if this desiredPosition is valid by detecting and resolving any collisions, and then the GameLevelLayer will update the Koala’s position.
Got it? Let’s try it out and see what it looks like in code!


