Beginning Automated Testing With Xcode Part 2/2
Note from Ray: This is the tenth and final iOS 6 tutorial in the iOS 6 Feast! This tutorial comes from our new book iOS 6 By Tutorials. Charlie Fulton wrote this chapter – a friend of mine and one of the newest members of the Tutorial Team. Enjoy! This is a blog post by […] By Charlie Fulton.

Note from Ray: This is the tenth and final iOS 6 tutorial in the iOS 6 Feast! This tutorial comes from our new book iOS 6 By Tutorials. Charlie Fulton wrote this chapter – a friend of mine and one of the newest members of the Tutorial Team. Enjoy!
This is a blog post by iOS Tutorial Team member Charlie Fulton, a full time iOS developer who enjoys hunting, fishing, and hanging out with his family.
Welcome back to our beginning automated testing with Xcode tutorial series!
In the first part of the tutorial, you learned how to add your code to Github, set up a Jenkins continuous integration server, and how to add a unit test to your app.
In this second and final part of the series, you’ll learn a lot more about unit testing, and how to automatically archive your builds and upload them to TestFlight!
Creating a unit test class
Now let’s add a simple unit test class for testing the WowUtils class. WowUtils looks up the string values for the Character class, Character race, and Item quality from the web service JSON data.
It’s best to create a new unit test class for each new class you want to test. Xcode has an Objective-C test case class template just for this purpose.
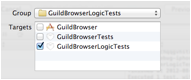
In the Xcode project navigator, right-click on the GuildBrowserLogicTests group, choose New File\Cocoa Touch\Objective-C test case class, click Next, enter WowUtilsTests for the class name, click Next again, make sure only the GuildBrowserLogicTests target is selected, and then click Create.
Now you have a test suite to which you can add some test cases. Let’s create your first test case. This test case will make sure that you get the correct response when looking up a character’s class.
Here are the methods you are testing from WowUtils.h:
+(NSString *)classFromCharacterType:(CharacterClassType)type;
+(NSString *)raceFromRaceType:(CharacterRaceType)type;
+(NSString *)qualityFromQualityType:(ItemQuality)quality;
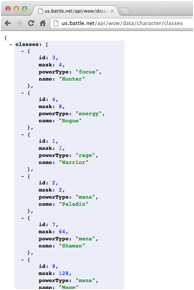
Note:These methods are expected to get the correct name based on the data retrieved from Blizzard’s web service. Below you can see the output used by the WowUtils class (Chrome is a great tool for inspecting JSON output from a web service):
Note:These methods are expected to get the correct name based on the data retrieved from Blizzard’s web service. Below you can see the output used by the WowUtils class (Chrome is a great tool for inspecting JSON output from a web service):
Replace the contents of WowUtilsTests.m with:
#import "WowUtilsTests.h"
#import "WowUtils.h"

@implementation WowUtilsTests

// 1
-(void)testCharacterClassNameLookup
{
    // 2
    STAssertEqualObjects(@"Warrior",
                         [WoWUtils classFromCharacterType:1],
                         @"ClassType should be Warrior");
    // 3
    STAssertFalse([@"Mage" isEqualToString:[WoWUtils classFromCharacterType:2]],
                  nil);

    // 4
    STAssertTrue([@"Paladin" isEqualToString:[WoWUtils classFromCharacterType:2]],
                 nil);
    // add the rest as an exercise
}

- (void)testRaceTypeLookup
{
    STAssertEqualObjects(@"Human", [WoWUtils raceFromRaceType:1], nil);
    STAssertEqualObjects(@"Orc", [WoWUtils raceFromRaceType:2], nil);
    STAssertFalse([@"Night Elf" isEqualToString:[WoWUtils raceFromRaceType:45]],nil);
    // add the rest as an exercise
}

- (void)testQualityLookup
{
    STAssertEquals(@"Grey", [WoWUtils qualityFromQualityType:1], nil);
    STAssertFalse([@"Purple" isEqualToString:[WoWUtils qualityFromQualityType:10]],nil);
    // add the rest as an exercise
}

@end
Let’s break this down bit-by-bit.
It’s always good to include a “failing test” in your test case. This is a test where the result is expected to fail. Again, you are using one of the assertion macros from the SenTestingKit – this time STAssertFalse.
The expected result, “Mage”, is compared to the result from the WowUtils method; if the test fails, you use the default message, since you passed in nil in this example.
- As I stated earlier, all test cases must start with the name test.
- The expectation is that the WowUtils class will give you the correct class name, given an ID. The way you verify this expectation is with the STAssert* macros. Here you are using the STAssertEqualObjects macro.
The expected result, “Warrior”, is compared to the result from the WowUtils method; if the test fails, you log the message “ClassType should be Warrior”. -
It’s always good to include a “failing test” in your test case. This is a test where the result is expected to fail. Again, you are using one of the assertion macros from the SenTestingKit – this time STAssertFalse.
The expected result, “Mage”, is compared to the result from the WowUtils method; if the test fails, you use the default message, since you passed in nil in this example.
- Finally, you have another example test macro to use.
Now you can run your new test suite that presently contains one test case. Go to Product\Test (⌘-U).
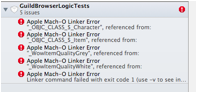
Doh! You’ll see a compile error:
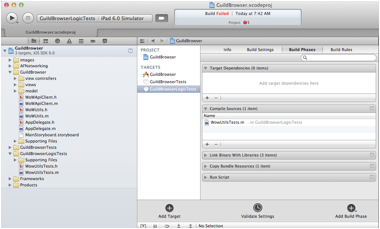
Since you added a new target, you need to let it know about the classes you’re trying to test. Every target has its own set of source files available to it. You need to add the source files manually, since you’re running a logic test target without the bundle and test host set.
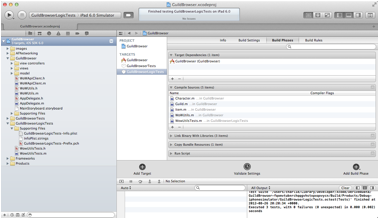
Now click on the GuildBrowserLogicTests target in the TARGETS section. You should see this:
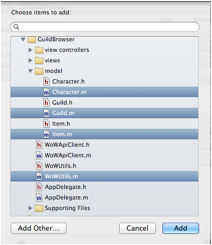
Expand the disclosure arrow in the Compile Sources section, and click on the + button. In the popup window, choose the following classes: Character.m, Guild.m, Item.m, and WowUtils.m. Then click Add.
Now add the app target as a dependency so that it will get built before your test target runs. Expand the disclosure arrow in the Target Dependencies section, click the + button, choose the GuildBrowser app target and click Add.
- Switch to the project navigator – if it’s not open, use the View\Navigators\Show Project Navigator menu item (⌘-1).
- Click on the project root to bring up the Project and Targets editor in the main editor area.
- Select the Build Phases tab along the top of Xcode’s main editing pane.
-
Now click on the GuildBrowserLogicTests target in the TARGETS section. You should see this:
-
Expand the disclosure arrow in the Compile Sources section, and click on the + button. In the popup window, choose the following classes: Character.m, Guild.m, Item.m, and WowUtils.m. Then click Add.
-
Now add the app target as a dependency so that it will get built before your test target runs. Expand the disclosure arrow in the Target Dependencies section, click the + button, choose the GuildBrowser app target and click Add.
When these steps are complete, you should see the following:
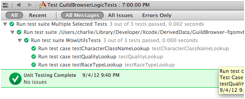
Now run Product\Test (⌘-U) and the test should succeed. You can see the output from all the tests by switching to the Log Navigator (go to View\Navigators\Show Log Navigator (⌘-7)).
You should see this when you click on the last build on the left sidebar:
Make sure to commit and push your latest changes to Github.