Overlay Images and Overlay Views with MapKit Tutorial
In this tutorial, you create an app for the Six Flags Magic Mountain amusement park using the latest version of MapKit. If you’re a roller coaster fan in the LA area, you’ll be sure to appreciate this app :] By Cesare Rocchi.
Learn how to add an overlay image using MapKit!
Learn how to add an overlay image using MapKit!
Update 7/13/2014: Updated for iOS 7 and Xcode 5 by Cesare Rocchi. Original version by Chris Wagner.
It’s quite easy to add a map into your app using MapKit. But what if you want to decorate or customize the map provided by Apple with your own annotations and images?
Luckily, Apple provides and easy way to do this with Custom Overlay Views.
In this tutorial, you create an app for the Six Flags Magic Mountain amusement park. If you’re a roller coaster fan in the LA area, you’ll be sure to appreciate this app :]
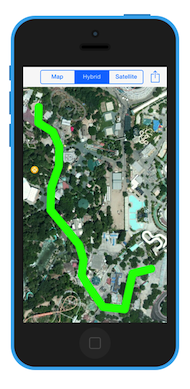
Just think about what a visitor to the park would be interested in. Things like the location of specific attractions, routes to the various rides and roller coasters, and the location of characters around the park. These are perfect candidates for custom overlay images – and that’s exactly what you’ll be adding in this tutorial.
Keep reading to add some excitement to these vanilla maps!
Note: You have two options for how to proceed with this tutorial based on your experience level:
- Already familiar with MapKit? If you’re already familiar with MapKit and want to dive right into the Overlay Images code, you can skip (or scan) ahead to the “What a View” section – we have a starter project waiting for you there.
- New to MapKit? If you are new to MapKit, keep reading and I’ll walk you through adding map into your app from the very beginning!
Apple Maps vs Google Maps

Before you start coding, I feel like I should say a few words about the Apple Maps vs Google Maps controversy.
Apple has provided a stock Maps app since the inception of iOS, which was originally backed by the Google Maps API. That all changed in iOS 6, when Apple broke their ties with Google and released their own Maps app powered by their own backend.
This has been a hot topic for bloggers, the media, users and possibly even your mom. Some will tell you that Apple has done an incredible job and made the right choice dropping Google as their mapping provider. Others will tell you it was one of the worst decisions Apple has made since the iPhone’s inception in 2007.
The bottom line is, if you’re using MapKit you are now using Apple Maps. If you’ve used MapKit in the past, you’ll be happy to know that the API is exactly the same between the two versions!
And regardless of your position, there is always room for more information on a Map! So, in this tutorial you will learn how to take Apple’s popular (whether it be infamous or famous) maps and add your own pertinent information.
Getting Started
To get started, download the starter project which provides you with a basic application for both the iPhone and the iPad, with some rudimentary navigation included – but no maps yet!
The interface provided in the starter app contains a UISegmentedControl to switch between the different map types you will implement, and an action button which presents a table of options to control which map features should be displayed. You select or deselect options by tapping them, and tapping the Done button will dismiss the options list.
The class PVMapOptionsViewController drives the options view, which defines an important enum that you’ll use later on. The rest of the code in this class is outside the scope of this tutorial. However, if you need more information on UITableView, check out one of the many UITableView tutorials to quickly get up to speed.
Open up the starter project in Xcode, and build and run. I bet you didn’t expect that so soon in the tutorial! You’ll see the following:

As advertised, the starter app is pretty basic! If your map application is going to do anything useful, then it’s going to need a map, for starters!
Do You Know the Way To San Jose? – Adding A MapView
To add a MapView to your app, start by opening MainStoryboard_iPhone.storyboard. Select the Park Map View Controller scene, and drop a Map View object on the view. Position the MapView so it fills the entire view, as shown below:
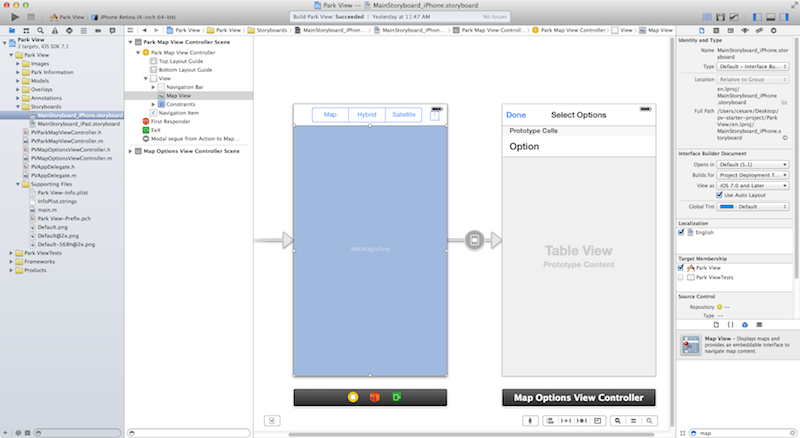
Now open up MainStoryboard_iPad.storyboard, add a MapView as above, and again adjust it so it fills the entire view.
You may be tempted to build and run the app at this point to see what it looks like with your map added; however, if you do, you will see the following exception and your app will crash:
*** Terminating app due to uncaught exception 'NSInvalidUnarchiveOperationException', reason: 'Could not instantiate class named MKMapView'
This is because you haven’t yet linked the MapKit.framework to your target!
To link it up, select the Park View project in the Project Navigator, then ensure the Park View target is selected. Next, navigate to the Build Phases tab and click the + button under the Link Library With Binary section, as shown below:
Search for MapKit in the popup window, select it, and click Add to add it to your project, as seen in the screenshot below:

Build and run to check out your snazzy new map! It should look like the screenshot below:
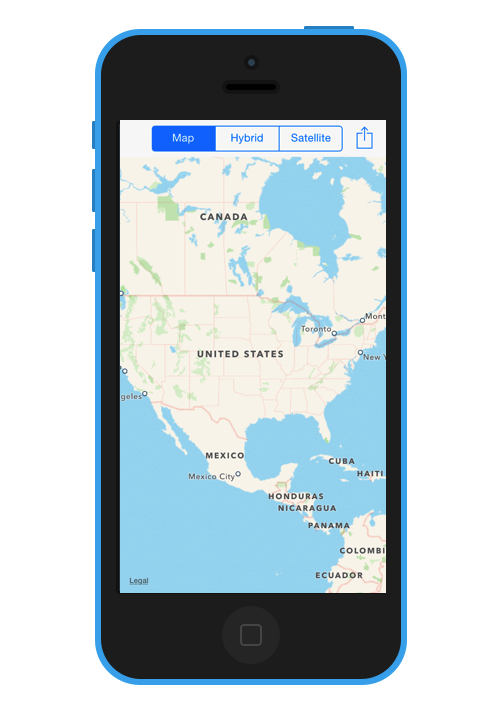
As you can see, it doesn’t take much work to add a map to your app.
As cool as it is to have a map in your application, it would be even cooler if you could actually do something with the map! :] The next section describes how to get your MapView set up to interact with your app.