iOS App Security and Analysis: Part 1/2
Learn how to do a basic analysis of iOS app security and maintain the security of your users’ data with code and network tools. By Derek Selander.
Sign up/Sign in
With a free Kodeco account you can download source code, track your progress, bookmark, personalise your learner profile and more!
Create accountAlready a member of Kodeco? Sign in
Sign up/Sign in
With a free Kodeco account you can download source code, track your progress, bookmark, personalise your learner profile and more!
Create accountAlready a member of Kodeco? Sign in
Contents
iOS App Security and Analysis: Part 1/2
30 mins
You’ve worked hard on your app and it’s in the store. Maybe there are in-app purchases, or you’re storing user credentials, or you solved an NP-complete problem and want to be the only app in the store that can solve the 3SAT problem efficiently. But how secure are your app’s code and data?
In this two-part tutorial, you will be taking on the role of a penetration tester, evaluating your iOS app security to identify vulnerabilities. The goal of this tutorial’s unique teaching perspective is not to turn you into a hacker – it is rather to make you more security-conscious by showing common methods attackers use to circumvent your application’s logic and retrieve important user data.
The biggest point this tutorial will begin with, reiterate, and end with is that no application is truly secure. If someone is determined and smart enough, they will find vulnerabilities in your app. There is no guaranteed way to prevent attacks to your app’s logic. At least, short of not releasing the app at all! :]
However, there are best practices to hinder and frustrate attackers, pushing them to look elsewhere for more vulnerable, less informed prey!
You should be reasonably experienced using Terminal to follow along with this tutorial – you don’t need to be a master, but if you don’t understand a command or flag, you shouldn’t be afraid to man
what you are doing. There won’t be too much code here, but you should have a good grasp of general Objective-C and Cocoa concepts.
Getting Started
Although attacks usually occur on jailbroken devices, you don’t need such a device for the purposes of this tutorial. Instead, you’ll use the good old Simulator. There are at least three big benefits of using the Simulator:
- You don’t need to jailbreak your device to follow this tutorial.
- You can learn and perform these attacks without learning how to do it on an actual device. That’s right, this tutorial will purposely omit some specific information you would use to attack a real app.
- Doing these attacks on the Simulator is 100% legal.
You will be using the following tools in this tutorial:
- The command line utility class-dump-z.
- Charles, a web debugging proxy application. You can demo Charles for 30 days, though you can only run it for 30-minute periods during this time.
Attackers can have many different motivations for targeting your app. They could be doing it for fun, profit, curiosity or, as Alfred would say, “Some men just want to watch the world burn.” So as to give you a motivation to “creatively explore” an app, let me paint the following scenario for you:
Imagine that a fun new app has come out for the iPad called Meme Collector. The whole world loves it. However, you know from “friends” (aka Reddit) that this game makes you pay a considerable amount of money for in-app purchases.
Your goal as an attacker is to find the logic that will let you have the app content (the memes) for free. There are a number of ways to do this and this tutorial will walk you through each one, as well potential ways to best defend against it.
As your first step to greater code warrior wisdom, download Meme Collector.
Note: Due to the complexity of this tutorial, certain shortcuts have been built into the project to make setup and analysis easier for you. For example, “purchasing” more app currency fakes a request to StoreKit, while in reality performing all the logic on the device.
Application Mapping
Your initial goal is to get a good bird’s eye view of the application. This includes what the application does from the user’s point of view, as well the basic structure that the app uses.
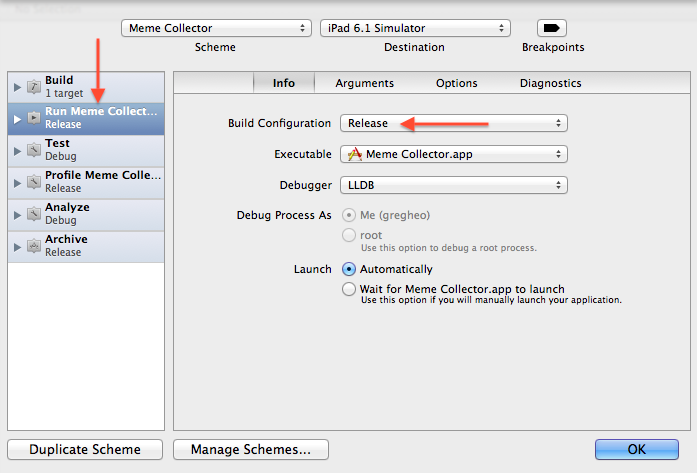
Fire up the Xcode project and run it on the 6.1 Simulator. Make sure you’re running your application in Release mode. To enable Release mode for a build, click on your scheme and select Edit Scheme.
Select the Run Meme Collector action in the left panel. Then in the Info tab, select Release under Build Configuration.
Build and run the app in the simulator. For the moment, try to refrain from looking at any of the source code. Imagine you are an attacker seeing this application for the first time. You only have access to the application, not its source files.
This simple app allows you to purchase a meme while showing you an item count of your purchases, as well as how much currency you have remaining. Click on the items until you do not have enough currency to make another purchase. Now tap the Purchase Currency button to verify that you can purchase more in app currency.
All in all, it seems pretty basic. You can purchase memes and you have some currency that you can deplete, in which case you must purchase more. Again, your goal as an attacker is to get more memes without having to press the Purchase Currency button.
Now that you have a basic understanding of what the app does visually, it’s time to peak behind the curtains and see what information you can obtain about this app.
If you haven’t already, download the excellent little command line utility called class-dump-z that will display all the Objective-C declaration information found in the executable.
Unzip the downloaded bundle and in Terminal, navigate inside the unzipped directory to class-dump-z_0.2a/mac_x86. Here you’ll find a file called class-dump-z. Install this however you might like. I personally like to copy it to my /usr/bin directory:
> sudo cp class-dump-z /usr/bin/
Once you’ve installed class-dump-z, stay in the Terminal application… yes, that text thingie you love so much. Through Terminal, you are going to navigate to the app directory that is installed on the Simulator.
Important: You will be using Terminal a lot in this tutorial. In code blocks, the >
character symbolizes the command prompt and represents the lines you’ll be typing.
Type the following line into Terminal:
> cd ~/Library/Application\ Support/iPhone\ Simulator/6.1/Applications
This is the directory that holds all the user-created applications inside the Simulator. This directory could potentially have a bunch of directory names that hold all the apps that you currently have on the Simulator. Having just run the Meme Collector app, the most recently modified directory is the one into which you want to cd
. The following command will do just that:
> cd `ls -tr | tail -n 1`
What does this voodoo command do?
- The
ls
command lists all contents and directories in the current directory. - The
-tr
flags list the output so that the most recently created directories are ordered last. - The pipe takes the output of all that info and sticks it into the
tail
command. - The
tail
command shows the last amount of data and you are explicitly telling it to show only one line. You thencd>
into the last directory.
So in summary, you are listing all the directories, ordering them from first to last, taking the last directory and changing directories into that.
If (and only if) you are having trouble with this command, you can also use the following command to hunt down the correct directory:
> find . -name "Meme Collector"
This is the directory that was just created on the Simulator when you ran your app from Xcode. For the rest of this tutorial, I will refer to this directory as your app directory.
Now cd
into the Meme Collector.app
directory. The rest of this tutorial will refer to this directory as the main application bundle.
First things first, you should check out what Frameworks the bundle links to. This can give you good insight into any important delegate methods, classes or other areas of interest. From Terminal, type:
>otool -L Meme\ Collector
You’ll see the following output:
Meme Collector:
/System/Library/Frameworks/SystemConfiguration.framework/SystemConfiguration (compatibility version 1.0.0, current version 499.5.0)
/System/Library/Frameworks/MobileCoreServices.framework/MobileCoreServices (compatibility version 1.0.0, current version 40.0.0)
/System/Library/Frameworks/Security.framework/Security (compatibility version 1.0.0, current version 1.0.0)
/System/Library/Frameworks/StoreKit.framework/StoreKit (compatibility version 1.0.0, current version 1.0.0)
/System/Library/Frameworks/QuartzCore.framework/QuartzCore (compatibility version 1.2.0, current version 1.8.0)
/System/Library/Frameworks/UIKit.framework/UIKit (compatibility version 1.0.0, current version 2380.17.0)
/System/Library/Frameworks/Foundation.framework/Foundation (compatibility version 300.0.0, current version 993.0.0)
/System/Library/Frameworks/CoreGraphics.framework/CoreGraphics (compatibility version 64.0.0, current version 600.0.0)
/usr/lib/libobjc.A.dylib (compatibility version 1.0.0, current version 227.0.0)
/usr/lib/libSystem.dylib (compatibility version 1.0.0, current version 125.0.0)
The otool -L
command lists the shared libraries and frameworks used by the app. Most notably in this case, the app uses the StoreKit framework. You can assume that this application has in-app purchase logic somewhere inside it. (Remember, though: for this tutorial the project is faking the StoreKit request. Nudge nudge, wink wink.)
Now for some more detailed snooping, you will use the class-dump-z utility. Type the following into Terminal to create a class dump file called ClassDump.txt:
> class-dump-z Meme\ Collector > ClassDump.txt
Now you have your skeleton of the application. Open ClassDump.txt in TextEdit through Terminal with the following command:
> open ClassDump.txt
Here’s what you will see:
Look at all those methods! Along with public interface for the classes, the attacker can even view all your private methods, instance variables and protocols. Glancing over the output of a full-fledged project can be tedious, but can provide tremendous insight into how the app’s internals work and interact.
As a newfound application explorer, try and hunt down all the singletons in this application. Hint: singletons will likely have class declarations (instead of instance ones), with keywords like “manager”, “shared” or “store” in their method names. If you see an interesting singleton, be sure to check out all its methods.
[spoiler title=”Meme Collector’s Singletons”]
- Various
AFNetworking
classes -
MemeManager
is interesting! It contains:+ (id)sharedManager @property(retain, nonatomic) AFHTTPClient *client @property(readonly, nonatomic) NSMutableArray *memes - (void)memePurchased:(int)arg1 - (void)getMemeInformation // This is a private method BTW
-
MoneyManager
is interesting! It contains:@property(readonly, nonatomic) NSNumber *money + (id)sharedManager - (BOOL)saveState // This is a private method BTW - (void)loadState // This is a private method BTW - (BOOL)purchaseCurrency - (BOOL)buyObject:(id)arg1
SVProgressHUD
[/spoiler]
Attackers will often do what you’ve just done and look for certain keywords in the class dump. For example, if an attacker wanted to see if there is any logic for dealing with a jailbroken device, searching the application for keywords such as: (is)jailbroken
, security
, etc. can provide some quick feedback.
How can you stop attackers from doing this? Well, there is good news and bad news.
The good news is: Apple does it for you automatically. When you submit your app to the App Store, Apple encrypts your binary with FairPlay encryption – the same type of encryption used for some iTunes content. Running class-dump-z on an encrypted binary will result in complete gibberish.
The bad news: it’s a fairly trivial matter to circumvent this defense. The process can be completed manually in about 10 minutes time and there are even tools that exist to automate it. Long story short, you must plan and expect your application to be decrypted. You must plan that attackers will see your classes, methods, instance variables, protocols… everything.
Property Lists Are Vulnerable
Now that you have the skeleton of the application, it’s time to look for low-hanging fruit. These are mistakes that developers make that attackers can easily use to their advantage.
One n00b mistake that developers can make is putting critical information in a plist file. Attackers often inspect property lists as part of application mapping because they’re easy to view and give potential insight into what technologies the application uses. You will do the same.
Provided you are still in the main application bundle, use ls
to view the directory’s contents:
> ls *.plist
Info.plist MoneyDataStore.plist
There are two plists included in the main app bundle. One is Info.plist. Run the following command to print out its contents:
> plutil -p Info.plist
{
"DTSDKName" => "iphonesimulator6.1"
"CFBundleName" => "Meme Collector"
"CFBundleDevelopmentRegion" => "en"
"CFBundleVersion" => "1.0"
... more stuff here ...
Hmm…. nothing too interesting. Take a look at the other plist with this command:
> plutil -p MoneyDataStore.plist
{
"userCurrency" => 58
}
Groovy. This plist contains a key called userCurrency
with the same value as what you currently have in your app currency. Does this mean that the application holds the currency in the plist? There’s one way to find out!
First open the file with this command:
> open MoneyDataStore.plist
Change the value of userCurrency
to a bigger number like 1234. Be sure not to touch the key name or type or anything else. Save and close the plist file.
Back in the simulator, you’ll need to remove the app from memory. The default shortcut for the home button on the Simulator is ⌘+shift+h. It acts just like a normal iOS device: one tap for the home screen, two taps to bring up the list of apps while on the home screen.
From the home screen, hit ⌘+shift+h twice to open the app switcher and remove the Meme Collector app. You need to delete the app from memory because although you’ve changed the model, you haven’t updated the view. Removing the app from memory is a sure-fire way to make the application update itself.
Once you’ve done so, re-launch the app by tapping on its icon. Sure enough, the app now has 1234 of app currency available for you to use!
User Defaults: Not Secure!
Remember how silly of an idea it was to save sensitive information in a plist? Well, guess what NSUserDefaults
is? Yep, that’s a plist as well. The physical location for the NSUserDefault plist can be found at: {App Directory}/Library/Preferences/{Bundle Identifier}.plist.
This is often a place where developers mistakenly feel a sense of security. Indie developers are not the only ones to make this mistake; large corporations will occasionally fall into this trap as well.
There are countless applications that store sensitive data in NSUserDefaults
. Why don’t you see if there is anything interesting in Meme Collector’s version?
In Terminal, make sure you are in your app directory, then cd
into the Libary/Preferences directory. In there, open the plist that contains your Bundle Identifier. For me, it is called com.selander.Meme-Collector.plist
.
> cd Library/Preferences
> open com.selander.Meme-Collector.plist
Now as an exercise for you: using the same methods previously discussed, modify the NSUserDefaults
plist so that you get a whole bunch “Y U No Memes” for free.
If attackers can access plist files even while the iOS device is locked, where is a safe place to put information? One potential solution is to encrypt the data going into NSUserDefaults
. You would then need to do a sanity check whenever you load the data to see if that data is actually valid.
Keychain Access and Best Practices
Another potential solution is to migrate sensitive data away from plists and put it in the iOS Keychain. Check out this tutorial to learn how to use it.
Keychain Access ups the ante for the attacker. Attackers will be unable to access critical information while the device is locked. However, it’s important to not put too much trust solely in the keychain system.
Here is why: Keychain is an Apple-maintained database of important information. It is encrypted with the help of the user’s password, which generally is the simple 4-digit numeric passcode.
If an attacker were to try to get past this using the hacker’s version of brute force, they could potentially figure out the password in about 20 minutes. After figuring out the password, they can simply run a command line utility that can dump the keychain database.
What can you do about this? Here are Keychain best practices:
- Encrypt the data: Although Keychain Access is more secure, it is also a high-priority target. For jailbroken iOS devices there are command line utilities that print out the Keychain Access database’s contents. Make sure you make an attacker’s life a little harder by encrypting the data using Apple’s Common Crypto APIs found in the Security Framework.
- Do NOT hardcode your encryption key to the app: A long string found in the binary data section could potentially be interesting to an attacker. Not only that, if the encryption key is hardcoded, the attacker can post it online and have this attack apply to anyone using the app. You need to make a unique encryption key for the device.
- Be aware of your methods and how an attacker can use them: Your beautiful encryption/decryption method could be the best thing out there, but attackers can control the runtime and run your decryption method on your encrypted data. You’ll see this in part 2 of this tutorial.
- Question yourself: Do you need to store it?: Since the attacker can search, modify and execute portions of your binary you did not intend, you should ask yourself, do I really have to store this on the device?
Network Penetration Testing and Mapping
Attackers also like to see what’s occurring on the network side of an application. A quick and dirty way to see if any interaction could occur on the device is to check for any URLs in the application binary.
Make sure you are in your main bundle directory and in Terminal, type:
> strings Meme\ Collector
Whoa, too much data! The strings
command will go through a binary’s different sections and print out items that qualify as strings. Let’s filter the noise a bit. In Terminal, type:
> strings Meme\ Collector | grep http
http://version1.api.memegenerator.net/Generator_Select_ByUrlNameOrGeneratorID
It looks like there’s some point in the app where it talks to that meme generator URL. If you were an attacker, you would want to explore this further by looking at the app’s network traffic.
To do this, you’ll need a network monitor to intercept all the incoming and outgoing requests. Charles is a good option for this. If you haven’t already, download Charles here.
Once Charles is installed, launch it. Make sure that Charles is working on the Simulator by checking if it reads an active network. One easy way to do this is to navigate to the Maps Application – if you see a brigade of information start showing up in Charles, then you’re good to go.
If not, go to Charles/Proxy/Mac OS X Proxy and make sure that is enabled. If you see a bunch of other network communication you did not authorize, it is likely various programs on your Mac.
Note: Charles can also work as good tool for intercepting private information by enabling SSL queries. If you do not set this up, Charles will only be able to act as a proxy for HTTP requests – not HTTPS. As you saw using the strings
command, no HTTPS requests are being made, so you don’t need to set up the SSL proxy. However, this step is required for a lot of other apps since they use HTTPS.
While Charles is activated, clear the Meme Collector app from memory and then restart it so you can see what network interactions are taking place. Upon running the app, you’ll see that the application makes three requests to http://version1.api.memegenerator.net
by expanding the arrow next to the URL.
Each of these requests to the Meme Generator subdomain contains a different parameter in the URL. For example, click on the first of the children requests of the hostname, and you’ll find that the single parameter is urlName=Foul-Bachelor-Frog. Examine the response to this request by clicking the Response tab in Charles.
The JSON is returning a bunch of key values including a title, description and image URL. The application seems to be requesting information from a third-party API and getting JSON back that is specific to a certain type of meme. After the initial JSON download, the app asks for the image’s URL returned in the JSON response and downloads the image.
Look at the next set of requests. The full URL path can be found in the Overview section.
Looking at the next hostname, http://cdn.memegenerator.net
, you can see that the app is downloading a series of images from the Meme Generator subdomain. Confirm this by looking at the response object and seeing what type of content is being returned. Sure enough, selecting the Response tab and viewing it in image format returns the memes that you saw in the application.
With this information, one can (somewhat accurately) hypothesize that these memes are downloaded from a third-party API, and that the app then does some logic to format the memes into purchasable content. Since there is no logic in the request or response to check if the memes were the original intended memes designed for the application, one can potentially purchase whatever content they want, provided they can manipulate the URL.
You are already bored of these memes, and you want to see if you can get the Success Kid meme instead of the standard default memes displayed by the application.
Select Tools/Rewrite in the menu. Rewrites intercept incoming or outgoing requests and can modify them based upon the settings you choose. In order to set it up, make sure you Enable Rewrite is checked, then click Add to add a set. You can leave the set name as-is. Click Add in the Rules section to add the rewrite rule.
Set the type to Modify Query Param. You want to rewrite the urlName
parameter, so fill in urlName as the name to both match and replace. Finally, set the replace value to success-kid. The final rule screen should look like this:
Click OK to return to the Rewrite Settings screen, and click Apply there to start rewriting.
Now hard-close and re-open the app. Success! There are Success Kids everywhere. You can now purchase a Success Kid meme.
It’s interesting, though, that there is still a valid cost for this new unspecified meme. How did this happen? The application must determine the cost based upon the JSON return value.
Open the Response tab in Charles and look at the JSON that is returned. Scan the app for potential candidates that could determine the cost in the app. Some promising JSON keys include: generatorID
, totalVotesScore
, instancesCount
, templatesCount
and ranking
. As an exercise for you, find the correct key which influences the cost of the meme.
To do this, go to Proxy/Breakpoints. Click on Enable Breakpoints and add a new breakpoint. When the edit breakpoint window appears, enter version1.api.memegenerator.net as the the Host and select the Response checkbox.
Now hard-close the app and rerun it. Once the responses return from the Meme Generator, the breakpoints should hit. When this happens, click on the Edit Response tab and the JSON Text sub-tab.
From here you can modify the JSON returned to the application. Play around with the return parameters and try to figure out which key modifies the cost of the item. After you make your changes to the JSON, click Execute to send the response. Remember, there are three API requests so you’ll need to click Execute three times.
Did you figure out which key in the JSON affects the price?
[spoiler title=”JSON Return Key That Modifies Price”]
The correct answer is ranking
. A higher ranking number will lower the price.
[/spoiler]
Important: Be quick! AFNetworking has a timeout of 30 seconds before calling the failure block. When intercepting the response, if you fail to make the changes in the appropriate time, the AFNetworking logic will return a request timeout error and execute the appropriate block – which in this particular project does nothing. If you run out of time, just hard close and re-open the app to try again.
Where to Go from Here?
So far, you’ve channeled your inner hacker and have performed basic penetration tests on the filesystem and the network interaction of an example app. You’ve defeated the simple plist and can even modify network data in transit!
Your iOS app security seems pretty safe…for now. In part 2 of this tutorial, you’ll dig deeper into the guts of an app to modify its functionality. Until then, there’s still a lot to try in terms of app data:
- Check out tools like iExplorer: iExplorer lets you examine the contents of your applications. You don’t need to jailbreak your phone in order to use it. You can explore the files that real-life apps use and see what important information they store in there.
- Set up Charles as an SSL Proxy and test on real apps: Check out all the stuff that a random app is sending out of your iOS device while it innocently sits there with a cute UI… you might be surprised. Witnessing the network interaction of a competitor’s app can also provide incredible insight into how they solved a similar problem that requires network interaction.
- Check out this tutorial on iOS (ARM) assembly. The next part of this tutorial will be a bit more intense – better prepare now!
It’s my pleasure to be your guide through the Dark Side – let us know how it’s going in the forums!