Integrating Facebook and Parse Tutorial: Part 1
Learn how to make an app to share photos with your Facebook friends, using Parse to easily create a back end for your app. By Toby Stephens.
Sign up/Sign in
With a free Kodeco account you can download source code, track your progress, bookmark, personalise your learner profile and more!
Create accountAlready a member of Kodeco? Sign in
Sign up/Sign in
With a free Kodeco account you can download source code, track your progress, bookmark, personalise your learner profile and more!
Create accountAlready a member of Kodeco? Sign in
Contents
Integrating Facebook and Parse Tutorial: Part 1
30 mins
Parse is a service you can provide to easily make web backends for your apps. In our previous Parse tutorial, you learned how to use it to create a simple photo sharing app.
Recently, Parse was acquired by Facebook. One of the benefits of this is that integrating apps made with Parse with Facebook is now easier than ever – and that is the subject of this tutorial!
In this tutorial, you will be Facebookifying (okay, I admit I made up that word!) the same type of photo sharing app you built in our previous Parse tutorial.
Your app will allow users to upload their images to Parse, and in turn, see a wall of images uploaded by the user and their friends. Comments are open on all of the images on the wall — which should provide a steady stream of insults witty banter!
This tutorial is split into two parts:
- In Part 1 (you are here!), you will learn how how to set up a project with Facebook and Parse SDKs, authenticate a user with Facebook using Parse’s Facebook toolkit and retrieve Facebook user information using the Facebook Graph API.
- In Part 2, you’ll build a data store for your images and comments in Parse, display uploaded images on an image wall and add a comment system to your app.
So without further delay, read on to get started building your three new apps!
Wait…THREE new apps?!?
Getting Started
Yes, three new apps! You’ll need one Facebook app, one Parse app, and an iOS app to pull it all together. So that means before you can set down any code, you’ll need a verified Facebook account, as well as a Parse account.
To verify your Facebook account you need to provide either a mobile number or a valid credit card on the Account Settings page of Facebook. Once you’ve verified your Facebook account, head on over to http://developers.facebook.com and click on the Apps link at the top of the page, as shown below:
On the Apps page, click the Create New App button to create your Facebook app, as such:
Enter the App Name and App Namespace in the popup dialog that appears. The namespace needs to be completely unique across all apps on Facebook, so if you have a naming collision, just try another. Psst — don’t try “fbparse”, it’s already taken! :]
You can optionally provide an App Category for your app, but it’s not mandatory. Click Continue, proceed through the security check, and you’ll be rewarded with your shiny new Facebook app.
Facebook creates apps in sandbox mode, but you’ll need to change this so that all your friends can use your app straight away. Toggle the Sandbox Mode option to Disabled as shown below:
Next, expand the Native iOS App section, and fill in the Bundle ID with com.rwtutorial.FBParse
, which is the bundle ID of your starter iOS app. You won’t be submitting this app to the App Store for now, so set iPhone App Store ID and iPad App Store ID to 0
. Turn on Facebook Login, and review your settings before saving:
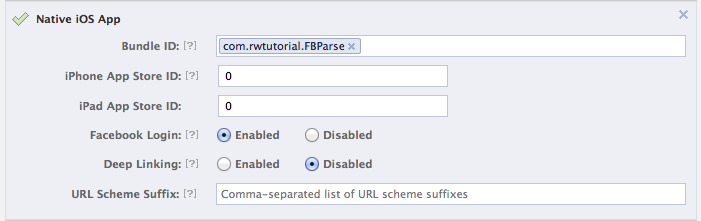
If everything looks good, click Save Changes and your Facebook app is ready to use.
Before you leave this page, make note of your Facebook App ID at the top of the page, as in the screenshot below:
Don’t lose this ID — you’ll need it later on in this tutorial.
That’s it for Facebook; you can now set up your Parse application.
Setting up Parse
Head on over to http://parse.com and click Sign Up to create a new account. When prompted, provide a username, email address and password. On the next screen, choose a name for your Parse app and select the Individual Developer option, as so:
Once you’ve done that, you’ll be presented with the Parse welcome page.
At the top right corner of the page you’ll see a drop down menu displaying your username. From this drop down list, select Account:
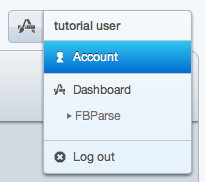
Then on the Account page, choose App Keys from the buttons at the top:
Find the Application ID and Client Key for your app; copy these to a text editor and save them in a convenient location. You’ll use these later to link your iOS app with Parse.
The Parse setup is complete — everything else you need to do takes place in the iOS app.
The Starter Project
So that you can concentrate on Facebook and Parse, download the starter project here. The starter project provides a storyboard and all the UI elements you’ll need.
Open up the starter project in Xcode and build and run. You’ll see a Login screen, but since you haven’t yet integrated Parse with your app, it won’t do much at this point.
Open MainStoryboard.storyboard; it will appear as below:
Your storyboard contains three view controllers:
- Login: Provides a mechanism to log in to the app using Facebook authentication.
- Image Wall: Displays the images the user and their Facebook friends have uploaded along with comments on the images.
- Image Upload: Uploads images along with their comments.
The Image Wall is a basic table view; the storyboard provides prototype cells to display the following elements:
- A section header cell showing the image, who uploaded it, and a timestamp.
- A comment cell, to show all the comments for that image.
- A cell providing a text field to submit a new comment.
The view controller segues are simple push segues.
In order to use Facebook and Parse in your app, you will need to include the appropriate SDKs in your build.
Adding Requisite Libraries
Head over to http://developers.facebook.com/ios/ and select Download the latest SDK.
Install the downloaded package; the SDK will be installed in ~/Documents/FacebookSDK by default.
In Finder, drag the FacebookSDK.framework folder from the SDK installation folder into the Frameworks section of your project in Xcode. Choose Create groups for any added folders and deselect Copy items into destination group’s folder (if needed) to keep the reference to the SDK installation folder, rather than creating a copy.
Now drag the FBUserSettingsViewResources.bundle file from FacebookSDK.framework/Resources into the Frameworks section of your project in Xcode. As before, choose Create groups for any added folders and deselect Copy items into destination group’s folder (if needed).
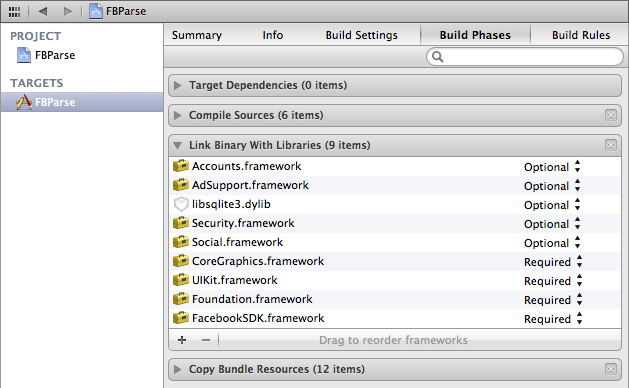
To make use of the Facebook features built into iOS 6, the Facebook SDK requires five other Frameworks and Libraries:
- AdSupport
- Accounts
- libsqlite3.dylib
- Security
- Social
To add these, go to the Link Binary With Libraries section of the Build Phases for the FBParse target in your project. Add the Frameworks and Libraries as Optional, rather than Required, so that your app supports devices running iOS 5 as well as iOS 6.
When you’re done, your list of Libraries should look like the following:
Remember that Facebook App ID you captured earlier? (You did save it somewhere, didn’t you?) It’s time to put that to use in your project.
Open the main project’s .plist file Supporting Files\FBParse-Info.plist. Using Facebook requires three new entries in this file. Create the following three keys and values in the .plist file:
-
FacebookAppID
as a string value containing the Facebook App ID you stored safely away early in the tutorial. -
FacebookDisplayName
as a string value containing the display name you set up previously when creating your Facebook app. -
URL types
as a single array sub-item namedURL Schemes
, which contains your Facebook App ID prefixed withfb
. This value is used when handling callbacks from the Facebook web dialogs, should the Login not be handled natively by iOS.
When you’re done, your .plist file should look like the following:
Build and run your project to ensure you have no compilation issues with the Facebook SDK and the included Frameworks and Libraries.
Integrating Parse in Your iOS App
That takes care of Facebook — now it’s time to integrate Parse into your app. Head over to http://www.parse.com/docs/downloads and download the Parse iOS SDK. In Finder, locate Parse.framework and drag it into the Frameworks section of your project.
Just as with the Facebook SDK, Parse requires a few other Frameworks and Libraries to be included in the project. Okay, admittedly, it’s more than a few. Add the following list of Frameworks and Libraries to your project’s Link Binary With Libraries:
- AudioToolbox
- CFNetwork
- CoreGraphics (usually added by default)
- CoreLocation
- libz.1.1.3.dylib
- MobileCoreServices
- QuartzCore
- StoreKit
- SystemConfiguration
Once you’ve completed this step, your Frameworks structure should look like the following:
Since you’re going to be using Parse throughout the app, you’ll import the Parse header in the pre-compile header, rather than in each individual class header file. Open Supporting Files\FBParse-Prefix.pch and add the following import:
#import <Parse/Parse.h>
Build and run once more to confirm that you have no compilation issues with all the included SDKs, Frameworks and Libraries. The app still doesn’t do much of anything — don’t worry, you’ll see some visible progress soon!
Building the iOS App
That was a lot of prerequisite work, but you came through with flying colors. Now it’s time to work on the code of your app.
Open AppDelegate.m and add the following two lines to the top of application:didFinishLaunchingWithOptions: method:
// Register our Parse Application.
[Parse setApplicationId:@"<your_parse_app_id>" clientKey:@"<your_parse_client_key>"];
// Initialize Parse's Facebook Utilities singleton. This uses the FacebookAppID we specified in our App bundle's plist.
[PFFacebookUtils initializeFacebook];
Be sure to replace the placeholder keys here with your actual Parse Application ID and Client Key that you got earlier when creating the app in Parse.
The above code informs your app of the existence of your Parse app and initializes the the Facebook features built in to the Parse SDK.
Add the following methods to the bottom of AppDelegate.m:
- (BOOL) application:(UIApplication *)application handleOpenURL:(NSURL *)url {
return [PFFacebookUtils handleOpenURL:url];
}
- (BOOL)application:(UIApplication *)application openURL:(NSURL *)url sourceApplication:(NSString *)sourceApplication annotation:(id)annotation {
return [PFFacebookUtils handleOpenURL:url];
}
These methods are required for your app to handle the URL callbacks that are part of OAuth authentication. You simply call a helper method in PDFFacebookUtils
and it takes care of the rest.
Build and run your app to confirm there are no compilation issues – your app is now linked to your Parse app!
Leveraging the Login
You’ve seen the Login screen a few times now and you’re probably itching to make it do something useful. Here’s your chance.
To keep all of the communications code in a convenient place, you’ll put the login code into a new Comms class. This class will have static methods for all of your calls to Parse and Facebook.
Create a new Objective-C class with a subclass of NSObject in your project and name the class Comms.
Open Comms.h and replace the contents with the following:
@protocol CommsDelegate <NSObject>
@optional
- (void) commsDidLogin:(BOOL)loggedIn;
@end
@interface Comms : NSObject
+ (void) login:(id<CommsDelegate>)delegate;
@end
The Comms
class has a single method so far: login:
. When you call this method, you will pass an object that implements the CommsDelegate
protocol. When the login completes, the Comms
class will call the commsDidLogin:
method on the delegate object.
Now for the login method itself. Open Comms.m file and add the code below inside the @implementation
:
+ (void) login:(id<CommsDelegate>)delegate
{
// Basic User information and your friends are part of the standard permissions
// so there is no reason to ask for additional permissions
[PFFacebookUtils logInWithPermissions:nil block:^(PFUser *user, NSError *error) {
// Was login successful ?
if (!user) {
if (!error) {
NSLog(@"The user cancelled the Facebook login.");
} else {
NSLog(@"An error occurred: %@", error.localizedDescription);
}
// Callback - login failed
if ([delegate respondsToSelector:@selector(commsDidLogin:)]) {
[delegate commsDidLogin:NO];
}
} else {
if (user.isNew) {
NSLog(@"User signed up and logged in through Facebook!");
} else {
NSLog(@"User logged in through Facebook!");
}
// Callback - login successful
if ([delegate respondsToSelector:@selector(commsDidLogin:)]) {
[delegate commsDidLogin:YES];
}
}
}];
}
The code above uses Parse’s Facebook Utils to login to Parse using Facebook credentials. You don’t need to ask for any specific Facebook permissions because the basic user information and list of friends is part of the default permissions. The code then calls the delegate method to inform the calling object of the success or failure of the logon attempt.
The methods in your Comms
class should to be accessible from anywhere in the app, so it makes sense to put the Comms class header import into the pre-compile.
Open Supporting Files\FBParse-Prefix.pch and add the following import:
#import "Comms.h"
Now you need to call your new login method from the Facebook login button on the login view controller. Open FBLoginViewController.m and add the following code to loginPressed:
// Disable the Login button to prevent multiple touches
[_btnLogin setEnabled:NO];
// Show an activity indicator
[_activityLogin startAnimating];
// Do the login
[Comms login:self];
The method is referenced in your storyboard, to the touch-up-inside event on the Facebook login button. When the button is pressed, you disable the Facebook login button so that you don’t get any trigger-happy users attempts to hit the button multiple times. Next, you display an activity indicator to inform the user that something is happening behind the scenes. Finally, you call your new login:
method that you added to the Comms
class.
The only thing left to do is make FBLoginViewController
conform to the CommsDelegate
protocol so that it can be informed about Comms actions.
Still in the FBLoginViewController.m file, add the CommsDelegate
protocol to the class extension as so:
@interface FBLoginViewController () <CommsDelegate>
Then implement the required delegate method as follows:
- (void) commsDidLogin:(BOOL)loggedIn {
// Re-enable the Login button
[_btnLogin setEnabled:YES];
// Stop the activity indicator
[_activityLogin stopAnimating];
// Did we login successfully ?
if (loggedIn) {
// Seque to the Image Wall
[self performSegueWithIdentifier:@"LoginSuccessful" sender:self];
} else {
// Show error alert
[[[UIAlertView alloc] initWithTitle:@"Login Failed"
message:@"Facebook Login failed. Please try again"
delegate:nil
cancelButtonTitle:@"Ok"
otherButtonTitles:nil] show];
}
}
The above method is your callback from the Comms class. First, the method does a bit of cleanup by re-enabling the Login button and hiding the activity indicator. Then, on a successful login, it performs a segue to the next view controller. However, if the login attempt failed, it displays an alert to the user.
Build and run your project, and behold as your app asks for permission to access your basic Facebook account details:
Choose OK, and if authentication succeeds the app will automatically transition to the image wall:
Also, if you check the console you will see that the login was successful:
FBParse[1727:907] User signed up and logged in through Facebook!
The Parse PFFacebookUtils
class makes use of the three Facebook authentication methods available on iOS devices. First, it tries to use the native Facebook app. If the Facebook app is not installed on the device, it attempts to use the Facebook account set up in the operating system on iOS 6 and above. Finally, if neither of these options are available, it falls back on the basic Facebook web dialogs.
Logging Out
Now that you can log into the app, take a moment to browse through the various views. The Upload navigation item takes you to the Upload screen – but this doesn’t work yet. The Logout navigation item takes you back to the login screen.
Hmm, that’s not really what you want to do, is it? Currently, tapping the Logout button simply pops the Image Wall view controller from the navigation stack. You’ll need to implement the calls to log the user out of Parse.
Open ImageWallViewController.m and add the following line to the top of logoutPressed:
[PFUser logOut];
Hey — that was much easier than expected. This is the only method you need to call to clean up your user on Parse and log out of Facebook.
Ordinarily, you would allow PFUser
to persist between launches of the app so that the app would automatically log the user in when the app starts. However, since the login is an important part of this tutorial, you’ll need to call logOut
as well when the app loads.
Open FBLoginViewController.m and add the following to the bottom of viewDidLoad:
// Ensure the User is Logged out when loading this View Controller
// Going forward, we would check the state of the current user and bypass the Login Screen
// but here, the Login screen is an important part of the tutorial
[PFUser logOut];
Build and run again; log in to the app as before and click Logout and you will return to the Login screen. When you run the app again, you’ll be prompted to re-login, since logOut
was called when the main view was loaded.
Uploading Images
Your app now logs in and out of Facebook properly; now it’s time to upload some images.
In order to share an image with your friends, Parse needs to associate your Facebook ID with your Parse User. This way, if you have a list of Facebook IDs of friends, you can find the Parse Users to share the image with.
Unfortunately, when Parse stores the logged-in user in its Users table, it doesn’t store the Facebook user ID as a field; instead, it stores Facebook authentication data as an object. So you’ll have to put the user data into the model yourself.
Open up Comms.m and replace the following code in login:
// Callback - login successful
if ([delegate respondsToSelector:@selector(commsDidLogin:)]) {
[delegate commsDidLogin:YES];
}
…with this code:
[FBRequestConnection startForMeWithCompletionHandler:^(FBRequestConnection *connection, id result, NSError *error) {
if (!error) {
NSDictionary<FBGraphUser> *me = (NSDictionary<FBGraphUser> *)result;
// Store the Facebook Id
[[PFUser currentUser] setObject:me.id forKey:@"fbId"];
[[PFUser currentUser] saveInBackground];
}
// Callback - login successful
if ([delegate respondsToSelector:@selector(commsDidLogin:)]) {
[delegate commsDidLogin:YES];
}
}];
The code above sends a request to Facebook for all of the user’s details including their Facebook id. If no error is received from the request, then take the FBGraphUser
from the returned object and get the value of the Facebook user ID stored in the me.id
element.
[PFUser currentUser]
provides you with the currently logged-in Parse user. You then add the Facebook ID to the current user’s dictionary of fields and issue a saveInBackground
command on the PFUser object. Your Parse app now has all the information about the logged-in user — including the user’s Facebook ID — needed to run future queries.
Build and run the app, and log in as usual.
To check that it worked, go to http://parse.com in your browser and choose your app name under the Dashboard entry in the drop down menu in the top right hand corner.
In the next screen, select Data Browser at the top and you will see the User’s data, which includes your new fbId
field that contains your Facebook user ID:
Leave this browser page open as you will return to this page shortly to view your uploaded images.
Uploading Images with Comments
On a recent Sunday afternoon stroll, you were surprised to learn that the Loch Ness Monster was alive and well and living in a nearby stretch of canal. You jumped at the chance to snap this once in a lifetime photo, and now you can’t wait to share this experience with your Facebook friends through your new app.
To send the image and a comment to Parse you’ll use your Comms
class. Open Comms.h and add the following method declaration:
+ (void) uploadImage:(UIImage *)image withComment:(NSString *)comment forDelegate:(id<CommsDelegate>)delegate;
Then add the following callback methods to the CommsDelegate
protocol at the top of the file:
- (void) commsUploadImageProgress:(short)progress;
- (void) commsUploadImageComplete:(BOOL)success;
Parse provides you with an upload progress callback as your image uploads. You need to pass this on to the delegate using commsUploadImageProgress:
so that your app can display the upload progress to the user. Once the upload is complete, you call commsUploadImageComplete:
so that the delegate knows the image upload is complete.
Open up Comms.m and add the following method:
+ (void) uploadImage:(UIImage *)image withComment:(NSString *)comment forDelegate:(id<CommsDelegate>)delegate
{
// 1
NSData *imageData = UIImagePNGRepresentation(image);
// 2
PFFile *imageFile = [PFFile fileWithName:@"img" data:imageData];
[imageFile saveInBackgroundWithBlock:^(BOOL succeeded, NSError *error) {
if (succeeded) {
// 3
PFObject *wallImageObject = [PFObject objectWithClassName:@"WallImage"];
wallImageObject[@"image"] = imageFile;
wallImageObject[@"userFBId"] = [[PFUser currentUser] objectForKey:@"fbId"];
wallImageObject[@"user"] = [PFUser currentUser].username;
[wallImageObject saveInBackgroundWithBlock:^(BOOL succeeded, NSError *error) {
if (succeeded) {
// 4
PFObject *wallImageCommentObject = [PFObject objectWithClassName:@"WallImageComment"];
wallImageCommentObject[@"comment"] = comment;
wallImageCommentObject[@"userFBId"] = [[PFUser currentUser] objectForKey:@"fbId"];
wallImageCommentObject[@"user"] = [PFUser currentUser].username;
wallImageCommentObject[@"imageObjectId"] = wallImageObject.objectId;
[wallImageCommentObject saveInBackgroundWithBlock:^(BOOL succeeded, NSError *error) {
// 5
if ([delegate respondsToSelector:@selector(commsUploadImageComplete:)]) {
[delegate commsUploadImageComplete:YES];
}
}];
} else {
// 6
if ([delegate respondsToSelector:@selector(commsUploadImageComplete:)]) {
[delegate commsUploadImageComplete:NO];
}
}
}];
} else {
// 7
if ([delegate respondsToSelector:@selector(commsUploadImageComplete:)]) {
[delegate commsUploadImageComplete:NO];
}
}
} progressBlock:^(int percentDone) {
// 8
if ([delegate respondsToSelector:@selector(commsUploadImageProgress:)]) {
[delegate commsUploadImageProgress:percentDone];
}
}];
}
There’s a fair bit of code here, but the points below describe what you do in each step:
- Get the image data for uploading.
- Convert the image data into a Parse file type
PFFile
and save the file asynchronously. - If the save was successful, create a new Parse object to contain the image and all the relevant data (the user’s name and Facebook user ID). The timestamp is saved automatically with the object when it is sent to Parse. Save this new object asynchronously.
- If the save was successful, save the comment in another new Parse object. Again, save the user’s name and Facebook user ID along with the comment string.
- Once this is all done, report success back to the delegate class.
- If there was an error saving the Wall Image Parse object, report the failure back to the delegate class.
- If there was an error saving the image to Parse, report the failure back to the delegate class.
- During the image upload, report progress back to the delegate class.
Now you need to call your new upload method from the upload screen.
Open UploadImageViewController.m and add the following call to the end of uploadImage:
// Upload the image to Parse
[Comms uploadImage:self.imgToUpload.image withComment:_txtComment.text forDelegate:self];
You’ll notice when you add this method Xcode presents a warning. Can you figure out the source of the warning?
[spoiler]It’s because the UploadImageViewController
class does not conform to the CommsDelegate
protocol. The Comms method uploadImage:withComment:forDelegate:
expects a CommsDelegate
, which it’s not getting.[/spoiler]
To fix this, add CommsDelegate
to the protocols in the class extension at the top of UploadImageViewController.m, like so:
@interface UploadImageViewController () <UINavigationControllerDelegate, UIImagePickerControllerDelegate, UITextViewDelegate, CommsDelegate>
The warning is gone, but before you test this, you need to handle those callbacks from the Comms class.
Still in UploadImageViewController.m, add the following method:
- (void) commsUploadImageComplete:(BOOL)success
{
// Reset the UI
[_vProgressUpload setHidden:YES];
[_btnUpload setEnabled:YES];
[_lblChooseAnImage setHidden:NO];
[_imgToUpload setImage:nil];
// Did the upload work ?
if (success) {
[self.navigationController popViewControllerAnimated:YES];
} else {
[[[UIAlertView alloc] initWithTitle:@"Upload Error"
message:@"Error uploading image. Please try again."
delegate:nil
cancelButtonTitle:@"Ok"
otherButtonTitles:nil] show];
}
}
The code above resets the UI to be ready for the next image upload. If the upload is successful, the view controller is popped and returns the user to the Image Wall screen. If the upload fails, the code alerts the user of the failure.
All that’s left to add is the progress indicator. Add the following method to UploadImageViewController.m:
- (void) commsUploadImageProgress:(short)progress
{
NSLog(@"Uploaded: %d%%", progress);
[_progressUpload setProgress:(progress/100.0f)];
}
The upload progress is displayed as a percentage, which fits nicely into the progress bar on the screen.
Build and run your project; select an image from the upload screen, add a comment and tap the Send To Image Wall button.
You can either navigate to an image on the web using Mobile Safari, or simply drag and drop an image from Finder into the Simulator. Press and hold on the image in the simulator and you can then save it to the iOS simulator’s photo album.
The image upload progress indicator will change as the image is uploaded; when the image is completely uploaded, the view controller is reset and popped and you will be returned to the Image Wall, safe in the knowledge that your images and comment are saved in your Parse app.
Or are they?
Verifying Image Uploads in Parse
Okay, so you need some proof that your images and comments made it to Parse. Since you haven’t actually coded the Image Wall yet, the only way to prove that your image is saved to Parse is to take a look at the Parse Data Browser.
If you kept the browser window open from the previous section, simply refresh the page and you’ll see two new tables – Wall Image and Wall Image Comment. Take a look at the Wall Image table and you’ll see one new row. Click on the img button and Parse will show you your uploaded image as demonstrated below:
Where To Go From Here?
Here is the sample code which includes everything you have done up to this point in this tutorial.
In Part 1 of this tutorial, you built an app that uses both the Facebook and Parse SDKs, added Facebook authentication using Parse’s Facebook Utils, and have successfully uploaded images to Parse. This knowledge gives you a good foundation to develop apps that use Facebook and Parse together.
In Part 2 of this tutorial you will complete your app by fleshing out the Image Wall and allowing the user to create comments on friends’ images — and vice versa!
If you want to learn more about the Parse SDK, check out the Parse iOS SDK reference. In particular, you might be interested in the documentation for the classes you’ve used so far – PFFacebookUtils, PFFile, and PFUser.
Please use the comments section below to ask any questions about the tutorial, integrating Facebook and/or Parse and with any suggestions for related tutorials going forward.
All videos. All books.
One low price.
A Kodeco subscription is the best way to learn and master mobile development — plans start at just $19.99/month! Learn iOS, Swift, Android, Kotlin, Flutter and Dart development and unlock our massive catalog of 50+ books and 4,000+ videos.
Learn more