How To Write A Simple Node.js/MongoDB Web Service for an iOS App
Learn how to create a simple Node.js and MongoDB web service for an iOS app in this tutorial. By Michael Katz.
Node Packages
Node.js applications are divided up into packages, which are the “frameworks” of the Node.js world. Node.js comes with several basic and powerful packages, but there are over 50,000 public packages provided by the vibrant developer community — and if you can’t find what you need, you can easily make your own.
Replace the contents of index.js with the following code:
//1
var http = require('http');

//2
http.createServer(function (req, res) {
  res.writeHead(200, {'Content-Type': 'text/html'});
  res.end('<html><body><h1>Hello World</h1></body></html>');
}).listen(3000);

console.log('Server running on port 3000.');
Taking each numbered comment in turn, you’ll see the following:
-
requireimports modules into the current file. In this case you’re importing the HTTP libraries. - Here you create the web service that responds to simple HTTP requests by sending a 200 response and writes the page content into the response.
One of the biggest strengths of Node.js as a runtime environment is its event-driven model. It’s designed around the concept of callbacks that are called asynchronously. In the above example, you’re listening on port 3000 for incoming http requests. When you receive a request, your script calls function (req, res) {…} and returns a response to the caller.
Save your file, then return to Terminal and execute the following command:
node index.js
You should see the following console output:

Open your favorite browser and navigate to http://localhost:3000; lo and behold, there’s Node.js serving up your “Hello World” page:

Your script is still sitting there, patiently waiting for http requests on port 3000. To kill your Node instance, simply press Ctrl+C in Terminal.
require function. This helps manage scope and expose the module’s API in a sane manner. You’ll see how to create a custom module later in this tutorial when you add a driver for MongoDB.NPM – Using External Node Modules
The previous section covered Node.js built-in modules, but what about third party modules such as Express which you’ll need later to provide the routing middleware for your server platform?
External modules are also imported into the file with the require function, but you have to download them separately and then make them available to your Node instance.
Node.js uses npm — the Node Packages Module — to download, install, and maintain package dependencies. If you’re familiar with Cocoapods or ruby gems, then npm will feel familiar. Your Node.js application uses package.json which defines the configuration and dependencies of npm.
Using Express
Express is a popular Node.js module for routing middleware. Why do you need this separate package? Consider the following scenario.
If you used just the http module by itself, you’d have to parse each request’s location separately to figure out what content to serve up to the caller — and that would become unwieldy in a very short time.
However, with Express you can easily define routes and chains of callbacks for each request. Express also makes it easy to provide different callbacks based on the http verb (eg. POST, PUT, GET, DELETE, HEAD, etc).
A Short Diversion into HTTP Verbs
An HTTP request includes a method — or verb — value. The default value is GET, which is for fetching data, such as web pages in a browser. POST is meant for uploading data, such submitting web forms. For web APIs, POST is generally used to add data, but it can also be used for remote procedure call-type endpoints.
PUT differs from POST in that it is generally used to replace existing data. In practical terms POST and PUT are usually used in the same way: to provide entities in the request body to be placed into a backend datastore. DELETE is used to remove items from your backend datastore.
POST, GET, PUT, and DELETE are the HTTP implementations of the CRUD model — Create, Read, Update and Delete.
There are a few other HTTP verbs that are less well-known. HEAD acts like GET but only returns the response headers and not the the body. This helps minimize data transfer if the information in the response header is sufficient to determine if there is new data available. Other verbs such as TRACE and CONNECT are used for network routing.
Adding a Package to Your Node Instance
Execute the following command in Terminal:
edit package.json
This creates a new package.json to contain your package configuration and dependencies.
Add the following code to package.json:
{
  "name": "mongo-server",
  "version": "0.0.1",
  "private": true,
  "dependencies": {
    "express": "3.3.4"
  }
}
This file defines some metadata such as the project name and version, some scripts, and most importantly for your purposes, the package dependencies. Here’s what each line means:
- name is the name of the project.
- version is the current version of the project.
-
private prevents the project from being published accidentally if you set it to
true. - dependencies is a list containing the Node.js modules used by your application.
Dependencies take the form of key/value pairs of module names and versions. Your list of dependencies contains version 3.3.4 of Express; if you want to instruct Node.js to use the latest version of a package, you can use the wildcard “*”.
Save your file, then execute the following command in Terminal:
npm install
You’ll see the following output:
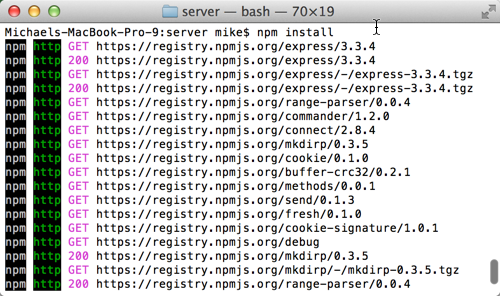
install downloads and installs the dependencies specified in package.json — and your dependencies’ dependencies! :] — into a folder named node_modules folder and makes them available to your application.
Once npm has completed, you can now use Express in your application.
Find the following line in index.js:
var http = require('http');
…and add the require call for Express, as below:
var http = require('http'),
    express = require('express');
This imports the Express package and stores it in a variable named express.
Add the following code to index.js just after the section you added above:
var app = express();
app.set('port', process.env.PORT || 3000);
This creates an Express app and sets its port to 3000 by default. You can overwrite this default by creating an environment variable named PORT. This type of customization is pretty handy during development tool, especially if you have multiple applications listening on various ports.
Add the following code to index.js just under the section you added above:
app.get('/', function (req, res) {
  res.send('<html><body><h1>Hello World</h1></body></html>');
});
This creates a route handler, which is a fancy name for a chain of request handlers for a given URL. Express matches the specified paths in the request and executes the callback appropriately.
Your callback above tells Express to match the root “/” and return the given HTML in the response. send formats the various response headers for you — such as content-type and the status code — so you can focus on writing great code instead.
Finally, replace the current http.createServer(...) section right down to and including the console.log line with the following code:
http.createServer(app).listen(app.get('port'), function(){
  console.log('Express server listening on port ' + app.get('port'));
});
This is a little more compact than before. app implements the function(req,res) callback separately instead of including it inline here in the createServer call. You’ve also added a completion handler callback that is called once the port is open and ready to receive requests. Now your app waits for the port to be ready before logging the “listening” message to the console.
To review, index.js should now look like the following:
var http = require('http'),
    express = require('express');

var app = express();
app.set('port', process.env.PORT || 3000);

app.get('/', function (req, res) {
  res.send('<html><body><h1>Hello World</h1></body></html>');
});

http.createServer(app).listen(app.get('port'), function(){
  console.log('Express server listening on port ' + app.get('port'));
});
Save your file and execute the following command in Terminal:
node index.js
Return to your browser and reload http://localhost:3000 to check that your Hello World page still loads.
Your page looks no different than before, but there’s more than one way to see what’s going on under the hood.
Create another instance of Terminal and execute the following command:
curl -v http://localhost:3000
You should see the following output:

curl spits back the response headers and content for your HTTP request to show you the raw details of what’s being served up. Note the “X-Powered-By : Express” header; Express adds this metadata automatically to the response.