Raspberry Pi Airplay Tutorial

A tutorial that guides you through setting up a Raspberry Pi AirPlay receiver. It then shows you how to use a Raspberry Pi as a web server. By .

Leave a rating/review
Save for later
Share
Raspberry Pi AirPlay Receiver

Make your Raspberry Pi into an AirPlay receiver!

The Raspberry Pi is a full Linux computer that is about the size of a credit card and sells for $25–$35. It has a 700Mhz ARM CPU and 512MB of RAM. Because of its capabilities and its low price, it has become wildly popular with the hobbyist market. Some people have done ingenious things with theirs.

If you’re like me, you toyed with the idea of getting an AirPort Express in the past but the $100 price seemed a bit steep, since all you really wanted to do with it is play audio using AirPlay. Sound familiar?

Maybe you also have a new Raspberry Pi and don’t know what to do with it. Well, guess what – you can turn that baby into an AirPlay speaker. That’s right, instead of spending $100 on an AirPort Express, you can put together a cool DIY AirPlay receiver for around $45 using the Raspberry Pi. That’s what you’re going to do in this tutorial. By the end of it you’ll have your very own Raspberry Pi AirPlay receiver!

After that, you’ll look further into the usefulness of the Raspberry Pi to iOS developers. Most complex apps need some sort of backend web service and a Raspberry Pi is a perfect server for development or perhaps even a small app. You’ll install the Apache web server, MySQL database and PHP, then use them to create a web service that you can access from an iOS chat app.

Getting Started: What You’ll Need

Here are the hardware components you’ll need for this project (places to buy the equipment listed next to each component):

  • Raspberry Pi. (Buy)
  • SD Card. (Amazon) 4 GB is all you should need for this project. This is the storage for the project and will act as the hard drive for the Raspberry Pi.
  • Ethernet cable/jack. The Raspberry Pi doesn’t have WiFi built in so we’ll use the wired connection
  • OS X or Linux computer on which you have sudo rights. You’ll need a computer to load the OS onto the SD Card and to SSH into the Raspberry Pi.
  • Memory card reader. The one built into your computer will work fine if it has one. You need this to load the OS onto the memory card.
  • iPhone or iPad. You going to use this to airplay audio from and to run the demo app
  • Micro-USB cable. (Buy) To power the Raspberry Pi.
  • Set of speakers with a mini audio cable.(This is just to normal analog audio connecter) So you can hear the AirPlayed audio

You’re going to download and run Shairport, a project that emulates the proprietary Apple AirPort protocol with software so that Raspberry Pi will appear as an AirPort receiver on your network. The AirPlay protocol isn’t something that Apple publishes publicly but somebody reverse engineered it and created an executable that will appear as an AirPlay receiver. You can check out the open source project here.

A Brief Introduction to the Raspberry Pi

RaspiModelB

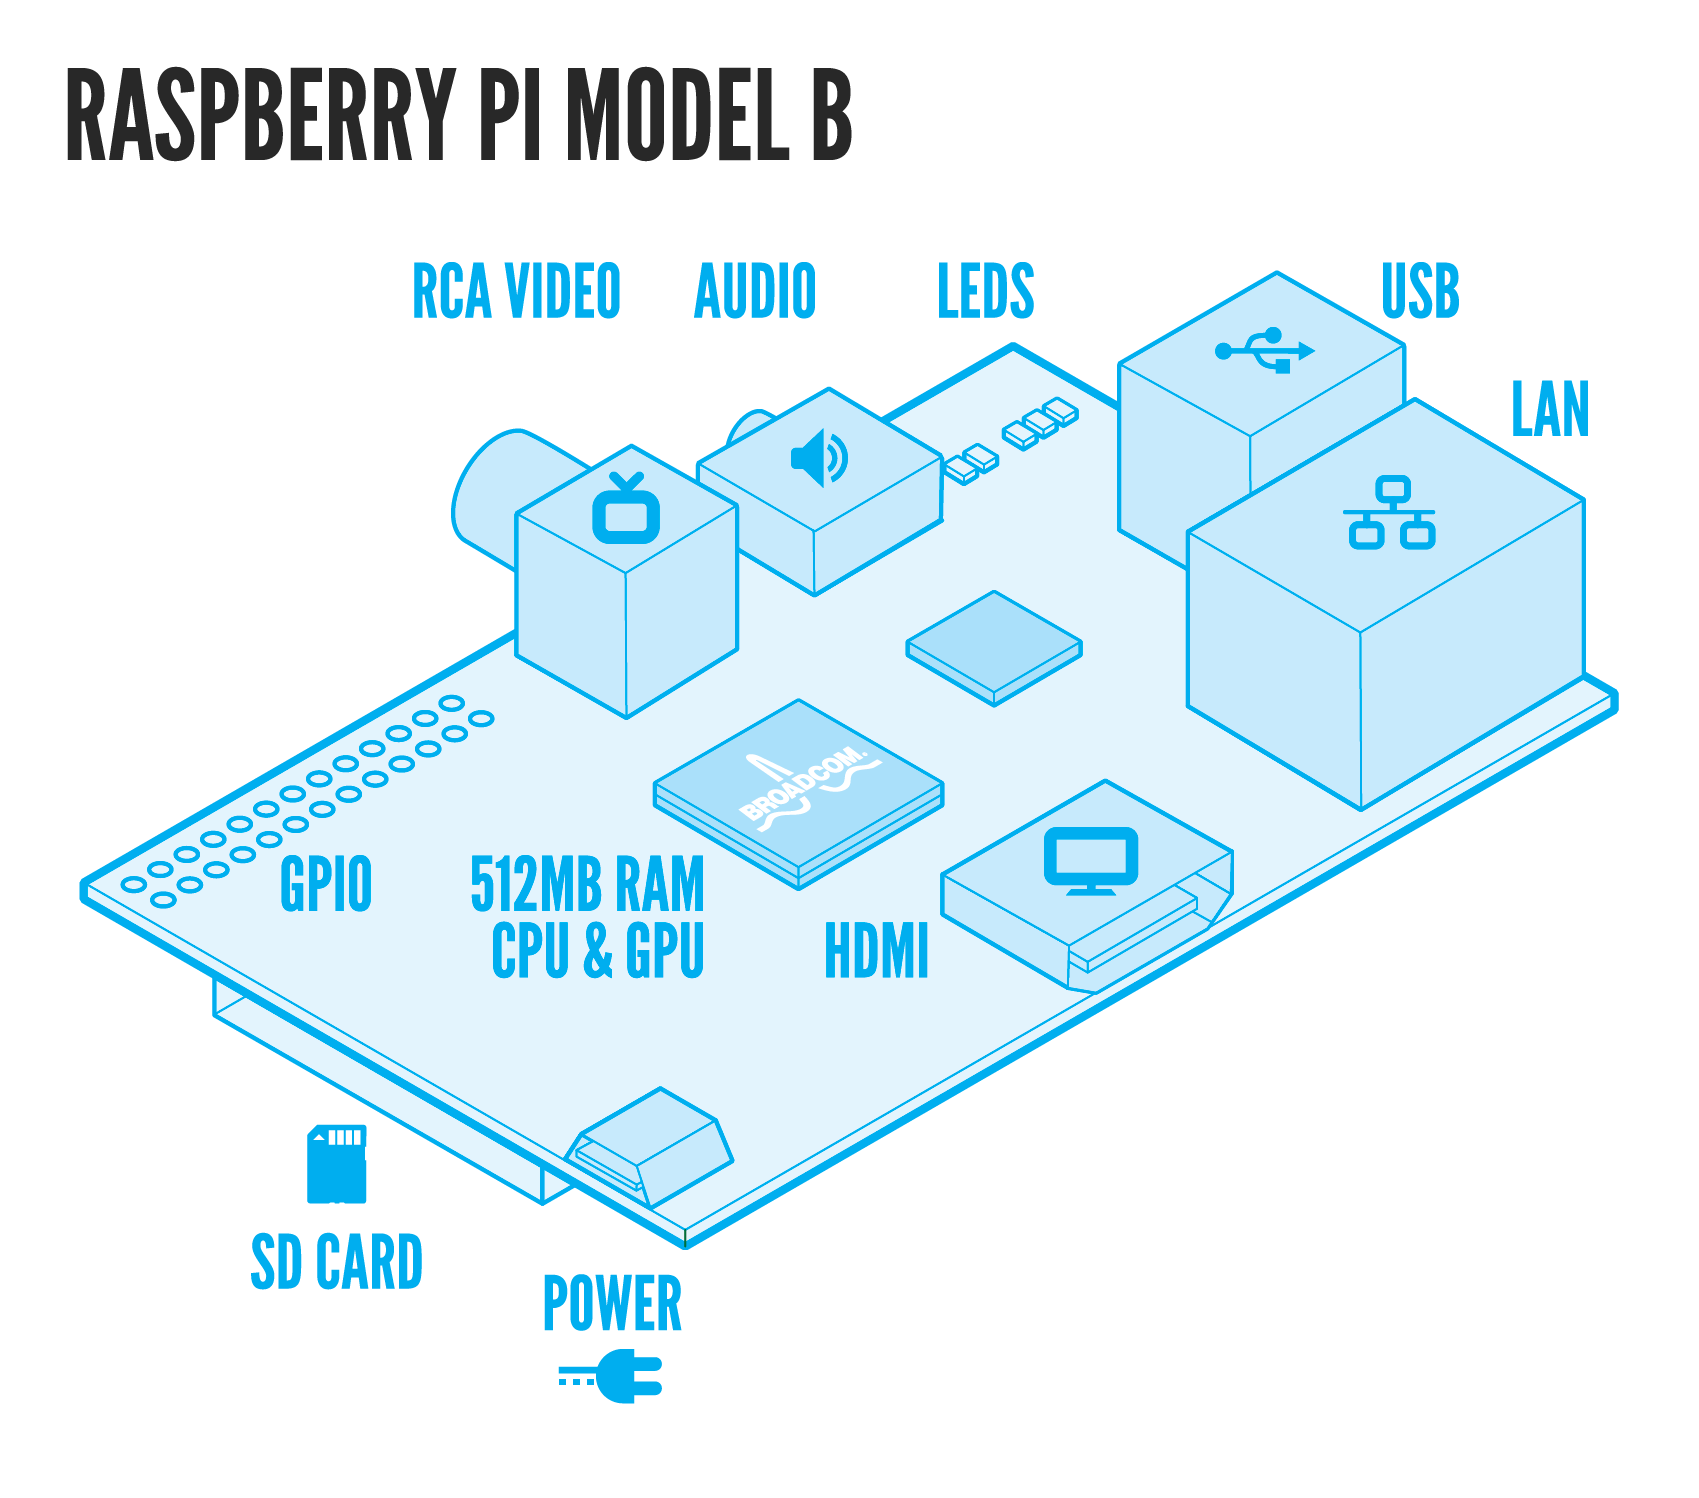
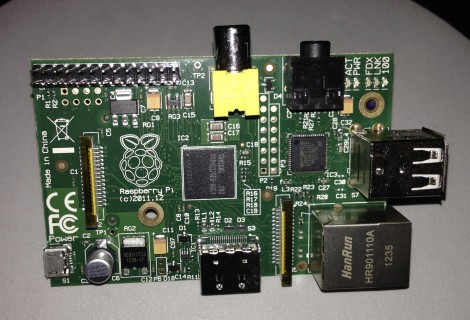
The Raspberry Pi is quite a little device. Although not the first of its kind, it has exploded in popularity because it has combined very capable, full feature computer hardware in a tiny form factor at a unbelievable price ($25-35). It has a 700Mhz ARM CPU with 512 MB of RAM with all the standard connectors that you would expect to come on a computer like an analog audio out port, 2 USB ports, wired ethernet, and analog RCA and digital HDMI video out for connecting a monitor. In addition to that, it has a bank of GPIO (General Purpose Input/Output) pins for connecting to hardware. These can be used for anything from simply controlling a LED to a motor to reading from any number of different kinds of sensors.

There is also a SD Card reader onboard. There is no onboard memory on the Raspberry Pi so all files are kept on a SD Card. Think of it exactly like the hard drive in your computer.

The final component of interest onboard is the micro-USB port. This is not used for data or connecting to your computer but rather as the power for the Raspberry Pi. The Raspberry Pi used very little power and 5V that USB provides is enough to power it as long as you aren’t using any addition devices plugged into the Pi that use a lot of power.

Here is a quick start guide to help you get started if need to help hooking it up and powering it on.

Loading the Operating System

Every computer needs an operating system (OS). Your Mac runs Mac OS X and your iPhone, iPad, etc run iOS. The OS handles all the interfacing to the hardware so that “apps” can just do what they need to do.

A Raspberry Pi can run many different OSs, but the one you’re going to use here is Raspbian. Raspbian is a version of the Debian Linux distribution dedicated to running on a Raspberry Pi. Therefore it’s perfect for this tutorial!

To get your Raspberry Pi up and running with Raspbian, you’ll first need to download and install it. This is done by downloading something called an “image”. An image is simply a snapshot of a pre-installed copy of Raspbian, ready to copy over onto your memory card to run on your Raspberry Pi.

Downloading the Image

Go to http://www.raspberrypi.org/downloads and look down the page for the Raw Images section. Under the Raspbian sub-section, download the image either as the direct ZIP or using the torrent. The torrent is downloaded using the bit torrent protocol. If you don’t know what that is just download the image directly.

Screen Shot 2013-09-29 at 2.47.24 PM

The zip file contains a disk image (a .img file) of the entire installed operating system. Download and extract the image from the zip anywhere you have access to it. Then you are just going to copy the data in the disk image on the SD card (in the next section).

The default root (administrator) username and password are:

Username: pi    Password: raspberry

Make a note of these, because they’ll come into play later.

Loading the Image onto the Card

In order to copy the image on the card, you’re going to have to use the terminal or command line. Though all the typing is a little intimating at first, in some ways it’s a more powerful interface that a standard GUI interface for some tasks. Don’t be afraid of it, the hardest part is just memorizing the commands but hey, that’s what this tutorial is here for!

Open a Terminal window. You can do this quickly by hitting Command+Space and typing terminal into Spotlight. Run the following command, without the memory card inserted:

df -h

As you can see, the df command shows the free space on each disk. Notice that the command also shows the address of each disk (e.g. /dev/disk0s2).

Screen Shot 2013-07-08 at 10.23.56 PM

You’re going to use df to discover the address of your memory card. Insert the memory card now into either the memory card reader on your Mac or into a separate reader that’s connected to your Mac. Run the df –h command again, and you should see something like this:

Screen Shot 2013-07-08 at 10.24.13 PM

You should see a new disk, something like /dev/disk1s1, that matches the size of your memory card. The description of the new disk is the card’s address. Unmount the memory card’s disk with this command:

sudo diskutil unmount /dev/disk1s1

Next you need to get the device address. This is the address of you memory card “reader”. To do this, take the address you were using before, in my case /dev/disk1s1, remove the s1 portion from the end of it and add r in front of disk so that /dev/disk1s1 becomes /dev/rdisk1. The two addresses are different in that /dev/disk1s1 is the address where first file system partition is mounted. /dev/rdisk1 is the address of the memory card reader device (has nothing to do with the card that is inserted at the time).

You can now write the image file that you downloaded above onto the memory card. Run the following command:

sudo dd bs=5m if=~/Downloads/wheezy-raspbian.img of=/dev/YOURDISKNAME

This is where all the magic happens. You are using the dd command to copy an input stream byte-for-byte. You can’t use a standard drag-and-drop copy to move the files over since special formatting for system boot partitions are different and the Raspberry Pi wouldn’t know that it was a boot partition if you just dragged them over. Let’s take a look at each component of this command:

  • bs specifies the block size that the dd tool uses. Specifying a larger block size helps copy the image faster.
  • if specifies the input file. You point this to the image file you downloaded earlier.
  • of specifies the output file. You set this to the disk name you came up with earlier, /dev/rdisk1.

Hit enter to run the command. It will take a few minutes to complete – use this time to start building that rocking playlist you’ll soon be streaming!

When the command is done running, you’ll see something like this:

Screen Shot 2013-07-08 at 10.42.09 PM

Now pop the memory card out of your computer and put it into the Raspberry Pi.

IMG_1963

Plug in the Ethernet cable and then the micro-USB cable for power. Connect the other end of the ethernet cable to your router and the micro-USB cable into a computer or power adapter (like the one that comes with an iPhone or iPad).

IMG_1965

IMG_1964

Now how do you get access to the Raspberry Pi? In this tutorial, you are going to be setting up the Raspberry Pi computer without a monitor, keyboard or mouse. Instead you’re going to remotely log into it from your Mac.

SSHing into Raspberry Pi

SSH stand for Secure SHell and is a way to open a terminal session into a remote computer, letting you run a command just as if you were physically on that computer. This is convenient when you need to makes changes to a computer you don’t have physical access to, or, as in your case, one without a keyboard or monitor.

You’re going to be SSHing into the Raspberry Pi for a couple of reasons:

  • Plugging in a mouse, keyboard, and monitor can add a large power drain that can lead to hardware failures and/or erratic behavior.
  • SSH is a important and good skill to learn.

Before you can SSH into your Raspberry Pi, you need to figure out its IP address. This can be tricky, because by default it will use DHCP to automatically obtain an IP address. So you don’t know what it is. There’s a few ways to get the IP address, but I recommend you download an iPhone app called Fing that will do a network scan.

Download Fing and make sure your iPhone/iPad and the Raspberry Pi are on the same network. Run the app and you should see a list of all the devices on the network:

IMG_1968

Though I don’t recommend it, if you want to try connecting a monitor, keyboard and mouse to the Raspberry Pi, then you can use ifconfig, a Linux command, to list information about your network connections. If you do decide to go with route, connect a monitor and a keyboard and power it on. Once you’ve got your components connected and power on, you should be taken directly to a login where you should enter your username and password.

IMG_4203


IMG_4204

Once logged in, you should be left at a terminal command line and should be able to type ifconfig:

Screen Shot 2013-09-29 at 10.50.49 PM

It is a little pointless to ssh in if you went through all the trouble to connect a keyboard, mouse, and monitor but it is still a good skill to learn.

Once you’ve obtained the IP address in one of these ways, you can SSH into the Raspberry Pi. Let’s say your IP address is 192.168.1.10. In the Terminal window, type:

ssh pi@192.168.1.10       //remember to replace with YOUR IP address

You’ll get the following:

Screen Shot 2013-07-08 at 10.50.46 PM

Type yes and hit enter. Terminal will now ask you for a password, which by default is raspberry. Enter that password and you should be remotely logged into the Raspberry Pi and ready to go.

Screen Shot 2013-07-08 at 10.50.59 PM

Note: If you can’t seem to find your Raspberry Pi on the network, then it might be because it is not booting properly. This can happen if you aren’t supplying enough power to the device. You can check for that by plugging in a monitor via HDMI. If it continually reboots, then power is likely the problem.

Expanding the File System

Now you need to expand the file system to take up the entire size of the SD card. You see, the image you loaded onto the SD card was of minimal size so that it would be quick to download and fit on all SD card sizes. Since we copied over the contents of the disk image onto the SD card, the partition size is the exact size of the disk image even though the size of your SD card might be bigger. But this leaves you with little space with which to work.

Your card probably looks something like this by now

Your card probably looks something like this by now.

To set up the AirPlay receiver components and all the server components, you’re going to need more space. Luckily, it couldn’t be simpler to resize the partition to take advantage of the entire card. SSH back into your Raspberry Pi if you aren’t there already and run the following command:

sudo raspi-config

When the config menu comes up, select expand_rootfs.

Raspberry Pi Config Menu

The Raspberry Pi config menu.

You’ll then see the following, letting you know that the root partition has been resized:

03

When it asks if you want to reboot now, select Yes.

04

You’ll have to wait a minute or two and then SSH back in. You should now have plenty of space for the server components.

The new space on my 32GB card

The new space on my 32GB card

Setting Up the Project

Now that you’re logged into the Raspberry Pi, you need to perform some basic setup. These include

  • Update the current system
  • Update the audio settings so sound comes out of the green, mini-jack port instead of the HDMI port
  • Install some needed libraries for the Shairport project
  • Install the Shairport project
  • Daemonize the Shairport project so that it start at startup

Let’s get cracking!

Updating the Packages

First you should update the current package sources and packages. This is kind of like running Windows Update or Software Update on OS X. With Raspbian, the tool apt-get handles all software packages for you.

Run the following two commands, one at a time:

sudo apt-get update
sudo apt-get upgrade

The first command, update, updates the list of packages and the versions. The second command, upgrade, compares that new information to all the packages you currently have installed and upgrades them if an upgrade is available.

You will probably notice quite a few packages being updated. Just sit tight!

Changing the Default Audio Port

By default, the audio comes out of the HDMI port on the Raspberry Pi. You want to change that to the mini-audio jack since pretty much anything that connects to audio can connect to a mini-audio jack and if you leave it set to HDMI, you’d probably have to have it hooked up to a TV all the time. Run the following command:

sudo amixer cset numid=3 1

You should see these results:

Screen Shot 2013-07-08 at 11.04.11 PM copy

The amixer command lets you view and set the options of sound cards. Here, you are setting the third soundcard element to 1, thereby activating the analog output for the Raspberry Pi. That might all sound magic, and, well, it is really. You just need to know that command. But fortunately I’ve found that out for you – that’s why you’re here!

Installing the Prerequisites

The Shairport project you are going to be using has a number of prerequisites. Enter the following command to download and install these prerequisites using the same mechanism you used to update the system earlier:

sudo apt-get install git libao-dev libssl-dev libcrypt-openssl-rsa-perl libio-socket-inet6-perl libwww-perl avahi-utils libmodule-build-perl

This is a pretty long command but its actually pretty simple. Lets look at each individual part:

  • sudo – Runs the next command in administrator mode
  • apt-get – This the package manager program
  • install – Tells the package manager program to install the following libraries
  • git libao-dev libssl-dev libcrypt-openssl-rsa-perl libio-socket-inet6-perl libwww-perl avahi-utils libmodule-build-perl – These are the libraries we are installing. You can see there’s a couple here like git, some security/encryption libraries, and some libraries for the Perl programming language.

You’ll see the following:

Screen Shot 2013-07-08 at 11.04.11 PM

It’s telling you what will be installed. This will include the libraries you asked specifically to be installed, and any prerequisites.

Installing Perl Net-SDP

Since iOS 6, AirPlay has used the SDP protocol. The Perl Net-SDP project will help communicate using this protocol. So you’re now going to install it.

Run the following commands (still in your Raspberry Pi SSH session!):

git clone https://github.com/njh/perl-net-sdp.git perl-net-sdp

This clones the GitHub repository of Perl Net-SDP so that now you have a copy of it on your Raspberry Pi. You’ll get the following output:

Screen Shot 2013-07-08 at 11.10.12 PM

Now enter the following commands, one line at a time:

cd perl-net-sdp
perl Build.PL
sudo ./Build
sudo ./Build test
sudo ./Build install
cd ..

These commands compile and install the components of Perl Net-SDP in the proper locations.

Screen Shot 2013-07-08 at 11.11.13 PM

Setting up your Raspberry Pi AirPlay receiver

You have reached the meat and potatoes of the project, the purpose of all of that setting up you just accomplished. Once you download and run Shairport, it’s only a few simple steps until you hear music!

Installing and Running Shairport

Run these commands, which will clone the Shairport repository, then build the software:

git clone https://github.com/hendrikw82/shairport.git
cd shairport
make

Screen Shot 2013-07-08 at 11.11.33 PM

Then run one last command to start the Shairport script:

./shairport.pl -a RayPi

The -a command specifies the name of the AirPlay receiver, which in this case you are calling RayPi.

Live From Your Raspberry Pi…

Now if you open any audio or music app on your iOS device or open iTunes on your Mac, you should see RayPi on the list of AirPlay devices!

IMG_0002

When you’re done, hit Control+C to stop the process. You can change RayPi in the previous command to anything you want to call your AirPlay receiver.

As it stands right now, every time you want to use Shairport, you have to start up the Raspberry Pi, SSH into it and run the Shairport program. That sounds horrible to me. What can you do about it?

*Deep daemon voice* DAEMONIZE IT *End deep daemon voice*

*cough*

Daemonizing Shairport

That sounds evil, doesn’t it? Actually, it’s quite the opposite – daemonizing will make your life much simpler.

So what is it? Daemons are tasks on Unix and Linux systems that run in the background and typically begin at system startup. It’s the perfect solution to your problem. You can create a daemonize the executable you just ran above so that it runs in the background and is started right at startup; that way you never have to worry about starting it up yourself.

SSH into the Raspberry Pi (if you aren’t still) and enter following commands to copy and configure the necessary files:

cd shairport
sudo make install
sudo cp shairport.init.sample /etc/init.d/shairport

This copies a sample init file to the daemon directory, the daemon directory was create by the ‘make install’ command.

Now enter these commands, one line at a time:

cd /etc/init.d
sudo chmod a+x shairport
sudo update-rc.d shairport defaults

Here you move to the daemon directory, change the permissions and then “install” the Shairport init file with the default options.

Now enter the following commands, one line at a time:

sudo vi shairport
DAEMON_ARGS="-w $PIDFILE -a RayPi"

You can use nano or any other text editor here if you’re more comfortable with that, but what you are doing is going into the Shairport config file and adding the -a RayPi part to the DAEMON_ARGS option. Just as when you trigger the script manually, you are modifying this to set the default name of the AirPlay receiver.

Screen Shot 2013-09-29 at 6.21.46 PM

If you are using the vi text editor, hit escape, then type :wq and hit enter to save the changes. Now whenever you startup the Raspberry Pi, it will start the Shairport executable.

Setting Up A Web Server

Now that you have a functioning AirPlay receiver that you built yourself, let’s take a look at what the Raspberry Pi can do for an iOS developer by using it to set up web services to read and write chat messages between the Raspberry Pi and an iOS app. Most all mobile apps need some sort of backend database and web services to store user data. The Raspberry Pi is a great way to host these services for a small project or during the development of a project.

To summarize what you will be doing:

  • Installing Apache – the web server used to serve the web services
  • Installing MySQL – the database used to hold the data
  • Installing PHP – the scripting language
  • Creating a MySQL database and table – you will create the structures to hold the data
  • Copying a set of web services – you’ll copy a set of services that I provide to read and write data to the MySQL database
  • Testing those services
  • Accessing the services from a demo iOS app

Calling in the Apache

AH-64D_DVD-1098-2_375x300

No, not that Apache. You want the web server:

apache318x260

Apache is the name of the software you are going to use to serve pages and create web services. This web server software handles incoming requests and returns data, whether a simple HTML file or binary data. Later, you’ll install PHP and then Apache will know to accept incoming PHP requests and return the data the PHP module has processed.

Run the following command to download and install Apache:

sudo apt-get install apache2

When prompted, enter Y to continue.

08

With Apache now installed and running, you can examine the default page that the server will load. Run the following commands:

cd /var/www
vi index.html

You’ll see that the default page is just a plain HTML file.

11

Hit escape and type :q! to close and exit. On your computer, you should be able to go to http://your-ip-address (mine is http://10.0.1.18) and see a webpage now.

10

Installing MySQL

MySQL is the de facto standard when it comes to databases. A database is a way of storing data and retrieving it in a structured way. You’re going to use one to store the chat messages. Run the following command to download and install MySQL:

sudo apt-get install mysql-server

When prompted, enter Y to continue.

13

This install is a bit different. Part way through it, you will be asked for a root password.

14

You are being asked for the password for the root MySQL account, which is different from the one for the root account of the Raspberry Pi itself. Enter whatever you want here, but just make a note of it. After you’ve chosen the root password, the install should finish.

Installing PHP

PHP is the scripting language that you are going to use to write the web service. Enter the following command to download and install PHP:

sudo apt-get install php5

When prompted, enter Y to continue:

Screen Shot 2013-09-03 at 11.11.57 PM

Now with PHP installed, you also need a library to access MySQL from PHP code. This command should do the trick:

sudo apt-get install php5-mysql

Setting Up the Database

With everything installed, it remains for you to set up the database and a table within the database to store the information. This is the database and table that will hold the message information. Each row in the table will be a chat message that was sent to the service with the name of the user, the message, and a unique row id. Run the following command to start up MySQL and login as root:

mysql --user=root --pass=YOUR-MYSQL-ROOT-PASSWORD

Remember to enter the password you set when you were installing MySQL.

Logged into MySql

Logged into MySQL.

To create a database, enter this command:

CREATE DATABASE `rw`;

Note that the quotes are backquotes (to the left of the 1 key) and don’t forget the semicolon at the end.

Screen Shot 2013-09-03 at 11.21.46 PM

Creating the database

Now you need to tell MySQL that you want to target that database with the commands you’re going to run. Enter this command:

USE `rw`;

MySQL will let you know it has changed the database.

Screen Shot 2013-09-03 at 11.25.18 PM

Now that you’ve created a database and set it as the active database, you need to create a table to actually store the information. This is going to be a chat app, so you want the table to contain columns for the name of the person who sent the message and the message itself. You’ll also need a column called id that is simply an integer that increments each time a new row in created/inserted. This ensures you have something unique by which to identify each row.

Copy and paste the following create statement to create the table:

CREATE TABLE chat ( id MEDIUMINT NOT NULL AUTO_INCREMENT, name CHAR(30) NOT NULL, message CHAR(255) NOT NULL, PRIMARY KEY (id));

Screen Shot 2013-09-03 at 11.25.31 PM

That wasn’t so bad, right? Let’s examine exactly what’s happening in the above statement:

CREATE TABLE chat

This is simply saying, “create a table named chat in the current database (‘rw’ in your case)”.

id MEDIUMINT NOT NULL AUTO_INCREMENT

This creates a column named id that is a MEDIUMINT type. This column cannot be null and will automatically increase, meaning it will increment each time a new record is added.

name CHAR(30) NOT NULL

This creates the name column. It can have 30 characters and also cannot be null.

message CHAR(255) NOT NULL

This creates the message column. It can have 255 characters and also cannot be null.

PRIMARY KEY (id)

This tells the table that the id column is a key column meaning it is a important column for searching and therefore will be indexed for faster retrieval.

Your database is all set up!

600b393baee71a4544e98c939c5e316dcf155d306b7607f989180ff8acb203b8

Let’s give it a test. Insert a row into the table with this command:

INSERT INTO chat(name, message) VALUES ("name","message");

Then show the whole table with this command:

SELECT * from chat;

Try it out a few times to get a feel for it. Notice how you don’t have to specifically set the ‘id’ column because it automatically gets set to the next number each time you add a row.

Screen Shot 2013-09-04 at 12.00.03 AM

Running the Web Service Script

This being a tutorial about the Raspberry Pi, I’ll provide the web service script – you just need to download it to the right location. Run the following commands, one at a time:

cd /var/www
sudo mkdir api

cd api

This changes your working directory to the web server directory, creates a new folder called api and then moves into that folder.

Now run these commands, one at a time:

sudo curl https://koenig-media.raywenderlich.com/uploads/2013/10/index.txt > ~/index.php
sudo mv ~/index.php .

curl downloads data from a remote address. The > at the end of the URL tells the command to redirect the output into a file. You then move the file from your home directory into the current directory, the web server directory.

Let’s examine a few parts of this script. Run the following:

sudo vi index.php

Screen Shot 2013-11-07 at 1.00.07 AM

You will see the PHP script for the inserting and reading data from the database.

Changing Your Password

There is one thing you need to change on line 98:

Screen Shot 2013-09-13 at 1.27.25 AM

The PHP script needs to know how to open the connection to the database, so it needs to have the root password to your MySQL database. Replace SQL-ROOT-PASSWORD with the MySql password you entered earlier.

Examining the Script

Rerun the command to examine the script. Look at line 80. You can see the chunk of code that reads and returns the top 10 chat messages.

You can type ":80" to just to that line in vi.

You can type “:80” to jump to that line in vi

This looks a little different than the statement you used in the MySQL program above ( SELECT * from chat; ) in that this one limits it to just the last 10 messages and sorts it so the newest messages are at the bottom. Then it converts the PHP array into a JSON-encoded string and returns it from the web service.

Now look at the code chunk on line 69:

Screen Shot 2013-09-13 at 1.27.07 AM

This is the other part of the web service, the one that lets you post messages to the database. If there are appropriate POST variables set in the call, then it will trigger this part of the service. This db call looks much more like what you ran before ( INSERT INTO chat(name, message) VALUES (“name”,”message”); ).

If you would like to learn more about writing your own web services, I suggest reading this other tutorial on the subject.

Testing the Script

Now that you have the script installed, it’s time to test it out. Just as you used curl to download files earlier, you can use it to hit your web services and test them out. Just as you were able to insert and read directly into the MySQL database, you can access the insert and read web services with curl to test them out.

Open a new Terminal window and run the following command from your local machine:

curl 10.0.1.18/api/

This uses the curl command to hit the read web service. This is the same as the SELECT statement you ran earlier. You should see a JSON array of the last 10 messages (up to 10).

Now try the insert test:

curl -F name="Adam" -F message="test insert" 10.0.1.18/api/

Note that you set the variables with the -F flag. You won’t see any response from this command because this web service doesn’t return any data but if you run the previous command to get the last 10 messages, you should see your new message there.

Perform both of these tests a few times. You should be able to insert new messages and see them when you call the list of all messages.

Using the Web Services with an iOS App

I’ve created a small iPhone app you can grab here that uses the web services. The only thing you should have to do is change the IP address to your Raspberry Pi. You’ll need to do that in the precompiled header file:

Screen Shot 2013-09-16 at 2.14.55 AM

This is a pretty simple iPhone app. Open CHTRemoteCalls.m. Here you’ll see the remote API calls and how they are formed. There is one for getting messages and one for posting a message. Each uses an NSURLConnection to hit the server. In your case, this is hitting your Raspberry Pi!

Build & run the project. You’ll see something like this:

Screen Shot 2013-11-06 at 11.57.30 PM

You can use the very basic interface to send a message and then wait for it to come back again. Messages are refreshed every 10 seconds, so you may need to wait until the next refresh to see your message.

Each time you send a message, it is actually hitting your Raspberry Pi and inserting a row into the database. Neat eh! Each time the messages are updated, the database is being read and the last 10 messages returned.

This is a very simple test app, but hopefully it has showed you what you might be able to use your own Raspberry Pi for. You might want to use it to host a website for you while you’re doing some development work on an app. Why bother going to the effort of setting up a web server somewhere in the cloud when you can use the tiny device sitting in front of you!

Where to Go from Here?

You’ve set up a Raspberry Pi with the necessary software to run a small web service and listen to some cool tunes while you do it. Here are some things you might want to try now:

  • Securing your Raspberry Pi. This tutorial wasn’t written with much security in mind. Changing passwords, not using the root accounts and preventing SQL injection are all things you should do to make the system more secure.
  • Create your own services. Look at the example in this project and try creating your own.
  • Create your own iOS app to consume the services. Create an iOS app that needs a backend database then use the Raspberry Pi to create the database and the web service. Perhaps a online ordering system/menu app, score keeping app, or a online registry.

Many thanks to Jordan Burgess, who wrote the blog post that formed the basis of this tutorial.