Make Your First Android App: Part 3/3
Build upon the foundations of the first two part on how to make your first Android app and create a book search application using web APIs. By Matt Luedke.
Connecting the List to the Adapter
The last thing you need to do before you can test your newly-webified app is connect the ListView to the JSONAdapter.
Remove the following code from onCreate in MainActivity.java:
// Create an ArrayAdapter for the ListView
mArrayAdapter = new ArrayAdapter(this,
		android.R.layout.simple_list_item_1,
		mNameList);

// Set the ListView to use the ArrayAdapter
mainListView.setAdapter(mArrayAdapter);
Also remove the following from onItemClick in MainActivity.java:
// 5. Log the item's position and contents
// to the console in Debug
Log.d("omg android", position
		+ ": "
		+ mNameList.get(position));
You don’t need any of that simple stuff now that you’ve got your own souped-up Adapter!
Now, to start using the your adapter class, replace this line at the beginning of the class:
ArrayAdapter mArrayAdapter;
With this:
JSONAdapter mJSONAdapter;
Next, add the following to the end of onCreate:
	// 10. Create a JSONAdapter for the ListView
	mJSONAdapter = new JSONAdapter(this, getLayoutInflater());

	// Set the ListView to use the ArrayAdapter
	mainListView.setAdapter(mJSONAdapter);
Great! You just created an instance of your snazzy new JSONAdapter, feeding it a Context and a LayoutInflater. Now your adapter is hooked up and can provide your ListView with the data it needs.
If you were to build and run, though, you would be rather underwhelmed by the results. Even after inputting a search String, the ListView remains empty. Why?
Because, if you recall, you created your Adapter using its constructor, public JSONAdapter(Context context, LayoutInflater inflater). That method creates an empty JSONArray as a placeholder.
An empty list is OK to start with, of course, but it sure would be great to update the list when your search is done! That’s not happening yet, so that’s next on your agenda.
Updating the List Data
To update the list, you need to add an update method to your adapter and then call it from your activity.
First, add the following method to JSONAdapter.java:
public void updateData(JSONArray jsonArray) {
	// update the adapter's dataset
	mJsonArray = jsonArray;
	notifyDataSetChanged();
}
This method accepts a JSONArray input, sets it as the adapter’s datasource, and calls notifyDataSetChanged to refresh the list. The adapter is already set up to know what to do with the data, so that’s all you need!
Now go back to MainActivity.java. You’re going to use your new method to update the list when the network call comes back. Find the following code in onSuccess, which is embedded within queryBooks:
// 8. For now, just log results
Log.d("omg android", jsonObject.toString());
Replace it with this instead:
// update the data in your custom method.
mJSONAdapter.updateData(jsonObject.optJSONArray("docs"));
This is simply a call to updateData with the newly-returned query response. As soon as the data comes back, you don’t waste any time — you send it straight to the adapter, which whips it into shape for the ListView!
It’s finally time — run your app, and search away!

Now you can type a search string into your EditText, tap the Search button and let the ListView (somewhat) magically populate from your web search. Not only that — you can scroll through all the results and look at book titles, author names, and thumbnails of the cover images. This is already a pretty cool app!
Showing Progress
One nice feature you may notice missing is some kind of progress bar or spinner to let the user know your app is “thinking.” There’s a convenient place to show one on Android — the Action Bar.
Add the following to onCreate in MainActivity.java, before everything else in the method except the call to super:
	// 11. Add a spinning progress bar (and make sure it's off)
	requestWindowFeature(Window.FEATURE_INDETERMINATE_PROGRESS);
	setProgressBarIndeterminateVisibility(false);
This whole request business simply gives you easy access to the progress bar when you need it. The place to turn it on is right as your network query begins, so add this line to queryBooks, immediately after creating your AsyncHttpClient:
// 11. start progress bar
setProgressBarIndeterminateVisibility(true);
You want the spinner to stop when the request is over, which could actually be in one of two spots – onSuccess or onFailure. Add the following line at the very beginning of onSuccess:
	// 11. stop progress bar
	setProgressBarIndeterminateVisibility(false);
And add the same line to the beginning of onFailure:
	// 11. stop progress bar
	setProgressBarIndeterminateVisibility(false);
Now, run the app again and do another search.

This time, you’ll notice a progress indicator pop up and start spinning in the Action Bar as your networking calls happen. Much better!
The Detail Activity
Seeing the list of all the books is exciting! The next logical step is to let the user select a book from the list to see more details or a larger version of the cover.
For this app, you’ll only show a larger version of the cover. But the techniques you use will pave the way for the additional challenge of displaying any further details that may interest you. Let’s get started!
First, add the following line to res/values/strings.xml:
<string name="activity_details">Book Details</string>
This is simply to provide a title for the activity. As mentioned before, it’s good to keep all the strings in one file!
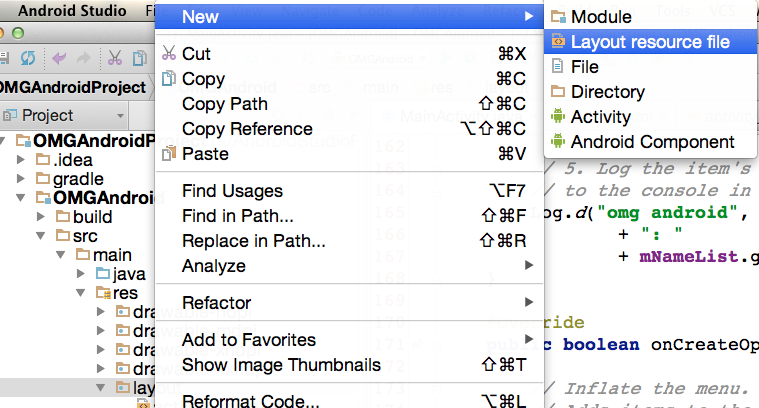
Next is the layout XML. It won’t be complicated. Right-click on res/layout and select New > Layout Resource File.
Name it activity_detail.xml, with a Root Element of ImageView.
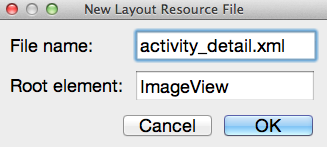
That’s almost it right there. All you need to do now is give the ImageView an id, a default image, and a bit of margin space for good measure. Edit activity_detail.xml to look like this:
<?xml version="1.0" encoding="utf-8"?>
<ImageView
    xmlns:android="http://schemas.android.com/apk/res/android"
    android:id="@+id/img_cover"
    android:layout_width="match_parent"
    android:layout_height="match_parent"
    android:layout_margin="25dp"
    android:src="@drawable/img_books_large"/>
That’s simple enough. This screen will now show a single ImageView with a 25dp margin all around, and the default image is img_books_large.
Next, you need to make a new Activity. Right-click on the com.example.omgandroid package (or the package name you set originally) and select New > Java Class, as before.
Name the class DetailActivity.

This creates a simple, empty class for you. Next, modify the class definition so that your new class extends Activity, like this:
public class DetailActivity extends Activity {
You already know you need to access the ImageView from your layout, so add the following method to your activity:
@Override
protected void onCreate(Bundle savedInstanceState) {
	super.onCreate(savedInstanceState);

	// Tell the activity which XML layout is right
	setContentView(R.layout.activity_detail);

	// Enable the "Up" button for more navigation options
	getActionBar().setDisplayHomeAsUpEnabled(true);

	// Access the imageview from XML
	ImageView imageView = (ImageView) findViewById(R.id.img_cover);
}
The above code simply tells the Activity to use the simple XML layout you made earlier, and then grabs the ImageView you need from it. But wait: what is that getActionBar stuff doing in there?