How to Make a Game Like Mega Jump With Sprite Kit: Part 2/2
In Part Two of this tutorial series, you’ll finish developing your Uber Jump game by adding accelerometer-driven controls, a scoring system and more. By Toby Stephens.
Building the HUD
Before you start awarding points, you’re going to build a simple HUD so that the player can see their score and star count.
Your HUD will show the total number of collected stars on the top-left of the scene and the current score on the top-right of the scene. For this, you need to create two SKLabelNodes.
Add the following variable declarations to the class extension in MyScene.m:
// Labels for score and stars
SKLabelNode *_lblScore;
SKLabelNode *_lblStars;
To build the HUD, add the following code to initWithSize: in MyScene.m, just before the line that initializes _motionManager:
// Build the HUD

// Stars
// 1
SKSpriteNode *star = [SKSpriteNode spriteNodeWithImageNamed:@"Star"];
star.position = CGPointMake(25, self.size.height-30);
[_hudNode addChild:star];
// 2
_lblStars = [SKLabelNode labelNodeWithFontNamed:@"ChalkboardSE-Bold"];
_lblStars.fontSize = 30;
_lblStars.fontColor = [SKColor whiteColor];
_lblStars.position = CGPointMake(50, self.size.height-40);
_lblStars.horizontalAlignmentMode = SKLabelHorizontalAlignmentModeLeft;
// 3
[_lblStars setText:[NSString stringWithFormat:@"X %d", [GameState sharedInstance].stars]];
[_hudNode addChild:_lblStars];

// Score
// 4
_lblScore = [SKLabelNode labelNodeWithFontNamed:@"ChalkboardSE-Bold"];
_lblScore.fontSize = 30;
_lblScore.fontColor = [SKColor whiteColor];
_lblScore.position = CGPointMake(self.size.width-20, self.size.height-40);
_lblScore.horizontalAlignmentMode = SKLabelHorizontalAlignmentModeRight;
// 5
[_lblScore setText:@"0"];
[_hudNode addChild:_lblScore];
Take a closer look at this section of code:
- First you add a star graphic in the top-left corner of the scene to tell the player that the following number is the collected star count.
- Next to the star, you place a left-aligned
SKLabelNode. - You initialize the label with the number of stars from
GameState. - You add a right-aligned
SKLabelNodein the top-right corner of the scene. - You initialize that label to zero, as there is no score currently.
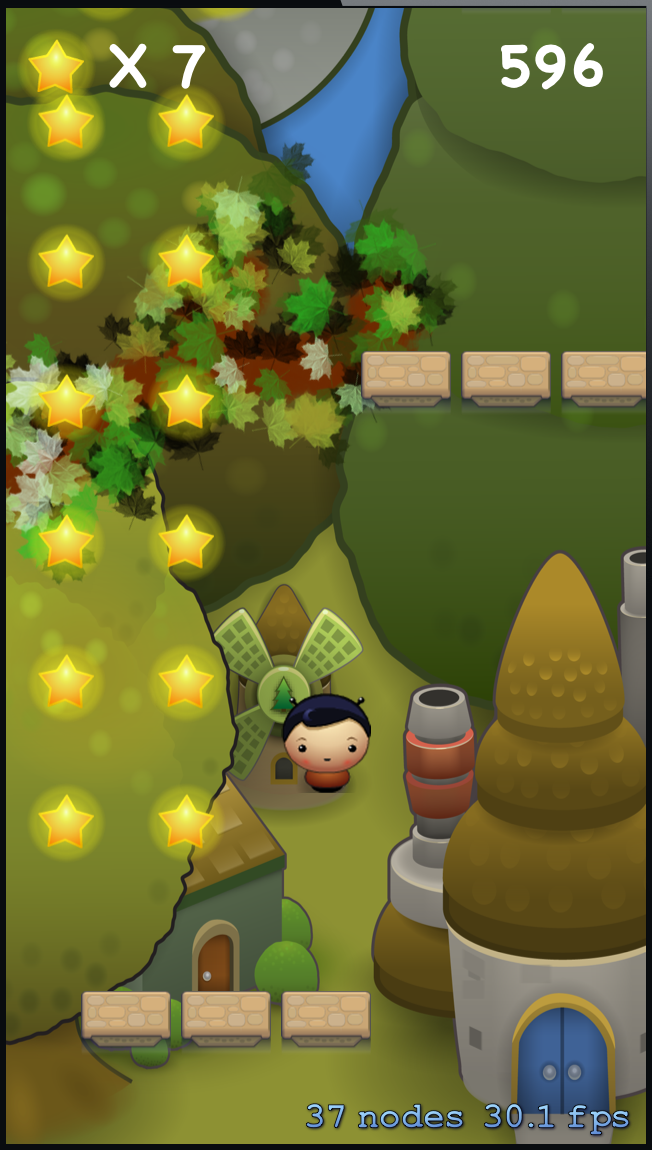
Build and run. You’ll see the two labels at the top of the screen.

The last layer of your game is complete! Now let’s have some points already!
Awarding Points
It’s finally time to award points for the player’s hard work. There are two ways to score points in Uber Jump: climbing up the scene and collecting stars.
To award points for collecting stars, simply add the following code to the bottom of collisionWithPlayer: in StarNode.m, just before the return statement:
// Award score
[GameState sharedInstance].score += (_starType == STAR_NORMAL ? 20 : 100);
That’s it! You add 20 points to the score for a normal star and 100 points for the special type.
To show this updated score, go back to didBeginContact: in MyScene.m. Recall from Part One of this tutorial that this method sets a flag named updateHUD to YES when it determines that the values displayed in the HUD need to change.
Add the following two lines of code to didBeginContact: inside the if(updateHUD) {} condition curly braces. There should be a comment there that reads TODO: Update HUD in Part 2:
[_lblStars setText:[NSString stringWithFormat:@"X %d", [GameState sharedInstance].stars]];
[_lblScore setText:[NSString stringWithFormat:@"%d", [GameState sharedInstance].score]];
Build and run, and tap to start the game. As you collect stars, watch your score increase.

To work out when to award points for traveling up the screen, you need to store the highest point along the y-axis that the player has reached during this play-through. You’ll use this data to increase the score only when the player reaches a new high point, rather than award points constantly as the player bobs up and down the screen.
Add the following instance variable to the class extension in MyScene.m:
// Max y reached by player
int _maxPlayerY;
The player node initially starts at a y-coordinate of 80.0, so you need to initialize _maxPlayerY to 80 if you don’t want to give the player 80 points just for starting the game. ;]
Add the following line to initWithSize: in MyScene.m, just after the line that sets the background color:
// Reset
_maxPlayerY = 80;
To increase the score when the player travels up the screen, go to MyScene.m. At the top of update:, add the following lines:
// New max height ?
// 1
if ((int)_player.position.y > _maxPlayerY) {
  // 2
  [GameState sharedInstance].score += (int)_player.position.y - _maxPlayerY;
  // 3
  _maxPlayerY = (int)_player.position.y;
  // 4
  [_lblScore setText:[NSString stringWithFormat:@"%d", [GameState sharedInstance].score]];
}
This deserves closer inspection:
- First, you check whether the player node has travelled higher than it has yet travelled in this play-through.
- If so, you add to the score the difference between the player node’s current y-coordinate and the max y-value.
- You set the new max y-value.
- Finally, you update the score label with the new score.
Build and run, and tap to start. As you play, your score will go up as you move higher through the level.

Now consider the star count. You need to increment it every time the player node collides with a star, so open StarNode.m and add the following code to collisionWithPlayer:, just after the line that awards the points:
// Award stars
[GameState sharedInstance].stars += (_starType == STAR_NORMAL ? 1 : 5);
That’s all that needs doing! Build and run, and tap to start. Watch the star count increase as you collect them.
As you play, you may notice that when you fall, all the game objects you passed are still in the game. “Hey!” you are surely thinking “I spent a considerable amount of time with Mega Jump, and I am sure that’s not how it was in that game!” Yes, but that’s easy to fix.
Recall that you added a method named checkForNodeRemoval: to GameObjectNode that checks whether or not to remove a node. It’s now time to call that method every frame.
Add the following code to update: in MyScene.m, just before the line that checks if the player node’s position is greater than 200:
// Remove game objects that have passed by
[_foregroundNode enumerateChildNodesWithName:@"NODE_PLATFORM" usingBlock:^(SKNode *node, BOOL *stop) {
  [((PlatformNode *)node) checkNodeRemoval:_player.position.y];
}];
[_foregroundNode enumerateChildNodesWithName:@"NODE_STAR" usingBlock:^(SKNode *node, BOOL *stop) {
  [((StarNode *)node) checkNodeRemoval:_player.position.y];
}];
Here you enumerate through the platforms in the foreground node and call checkNodeRemoval: for each one. You then do the same for each of the stars.
Build and run, and tap to start. Now when you fall, it’s nothing but empty sky!

Game Over!
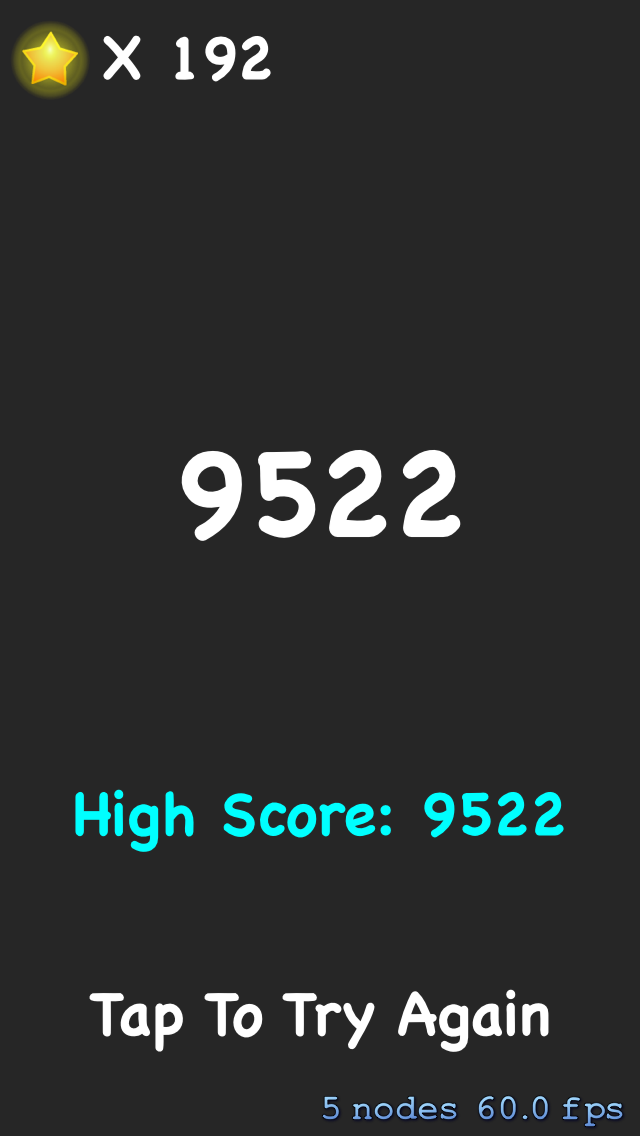
At the end of the game, when the player falls off the bottom of the scene or climbs to the top of the level, you want to show the final score and the current high score. You’ll do it by transitioning to an end game scene.
Create a new Objective-C class called EndGameScene and make it a subclass of SKScene.

EndGameScene will be a simple screen that shows the player’s score, their star count and the current high score. You add all the nodes in initWithSize:, so open EndGameScene.m and add the following method:
- (id) initWithSize:(CGSize)size
{
  if (self = [super initWithSize:size]) {
    // Stars
    SKSpriteNode *star = [SKSpriteNode spriteNodeWithImageNamed:@"Star"];
    star.position = CGPointMake(25, self.size.height-30);
    [self addChild:star];
    SKLabelNode *lblStars = [SKLabelNode labelNodeWithFontNamed:@"ChalkboardSE-Bold"];
    lblStars.fontSize = 30;
    lblStars.fontColor = [SKColor whiteColor];
    lblStars.position = CGPointMake(50, self.size.height-40);
    lblStars.horizontalAlignmentMode = SKLabelHorizontalAlignmentModeLeft;
    [lblStars setText:[NSString stringWithFormat:@"X %d", [GameState sharedInstance].stars]];
    [self addChild:lblStars];

    // Score
    SKLabelNode *lblScore = [SKLabelNode labelNodeWithFontNamed:@"ChalkboardSE-Bold"];
    lblScore.fontSize = 60;
    lblScore.fontColor = [SKColor whiteColor];
    lblScore.position = CGPointMake(160, 300);
    lblScore.horizontalAlignmentMode = SKLabelHorizontalAlignmentModeCenter;
    [lblScore setText:[NSString stringWithFormat:@"%d", [GameState sharedInstance].score]];
    [self addChild:lblScore];

    // High Score
    SKLabelNode *lblHighScore = [SKLabelNode labelNodeWithFontNamed:@"ChalkboardSE-Bold"];
    lblHighScore.fontSize = 30;
    lblHighScore.fontColor = [SKColor cyanColor];
    lblHighScore.position = CGPointMake(160, 150);
    lblHighScore.horizontalAlignmentMode = SKLabelHorizontalAlignmentModeCenter;
    [lblHighScore setText:[NSString stringWithFormat:@"High Score: %d", [GameState sharedInstance].highScore]];
    [self addChild:lblHighScore];

    // Try again
    SKLabelNode *lblTryAgain = [SKLabelNode labelNodeWithFontNamed:@"ChalkboardSE-Bold"];
    lblTryAgain.fontSize = 30;
    lblTryAgain.fontColor = [SKColor whiteColor];
    lblTryAgain.position = CGPointMake(160, 50);
    lblTryAgain.horizontalAlignmentMode = SKLabelHorizontalAlignmentModeCenter;
    [lblTryAgain setText:@"Tap To Try Again"];
    [self addChild:lblTryAgain];
  }
  return self;
}
That’s a lot of code, but by now, after all you’ve done in this tutorial, you’ve got pwnage.
In brief, you create three labels: one each to show the star count, the final score and the high score. You populate these labels with values from the GameState singleton. You also add a label explaining to the player that they can tap the screen to play again.
To track whether or not the game is over, add the following BOOL to the class extension in MyScene.m:
// Game over dude !
BOOL _gameOver;
At the end of the game, the GameState singleton needs to save the current state and transition to the new scene. In MyScene.m, add the following import at the top:
#import "EndGameScene.h"
Now, add the following method to MyScene.m:
- (void) endGame
{
  // 1
  _gameOver = YES;

  // 2
  // Save stars and high score
  [[GameState sharedInstance] saveState];

  // 3
  SKScene *endGameScene = [[EndGameScene alloc] initWithSize:self.size];
  SKTransition *reveal = [SKTransition fadeWithDuration:0.5];
  [self.view presentScene:endGameScene transition:reveal];
}
Look at this method in detail:
- First you set
_gameOvertoYES. - Then you instruct the
GameStatesingleton to save the game state to the app’s user defaults. - Finally, you instantiate an
EndGameSceneand transition to it by fading over a period of 0.5 seconds.
The game needs to call endGame when the player node either falls off the bottom of the screen or reaches the maximum height for the level. You’ll test for both of these triggers in update: in the main scene.
Open MyScene.m and add the following code to the end of update::
// 1
// Check if we've finished the level
if (_player.position.y > _endLevelY) {
  [self endGame];
}

// 2
// Check if we've fallen too far
if (_player.position.y < (_maxPlayerY - 400)) {
  [self endGame];
}
Take a look at these checks:
- Remember, you loaded
_endLevelYfrom the level’s property list—it's the y-value at which the player has finished the level. - If the player node falls by more than 400 points below the max height they’ve reached, then it’s game over.
Before you can run the game to see your end game scene, you need to make sure the game doesn’t try to call endGame more than once, which might happen if update: runs again for another frame.
Add the following line to the start of update: in MyScene.m:
if (_gameOver) return;
Now, when the game calls update:, the method checks to see if the game is already over before progressing.
Build and run. Tap to start and then play the game, allowing the Uber Jumper to fall at some point. The game will transition to the end game scene.