Android Tutorial for Beginners: Part 2
An Android Tutorial that shows you how to make your first app app step-by-step, using Android Studio! By Darryl Bayliss.
Detecting List Selections
Looking at the items in a list is cool, but this is an app, and interactivity is even better! So next you’re going to set up a way to detect user selections from the list.
First, modify the class definition in MainActivity.java to add support for another interface. To do this, modify this line:
public class MainActivity extends ActionBarActivity implements View.OnClickListener {
To look like this:
public class MainActivity extends ActionBarActivity implements View.OnClickListener, AdapterView.OnItemClickListener {
All you’ve really done is add support for a new interface – AdapterView.OnItemClickListener, which, as the name suggests, listens for item selections from a ListView. MainActivity is really stacking up the credentials!
You should also have a red line highlighting the line where you’ve just added your new interface, Android Studio is letting you know that you haven’t actually implemented the interface yet. You can fix this easily by clicking the highlighted line, pressing Alt-Enter,clicking Implement Methods and finally clicking Ok.

Next, add the following code to the end of onCreate:
// 5. Set this activity to react to list items being pressed
mainListView.setOnItemClickListener(this);
The above code sets MainActivity as the listener for any item clicks on mainListView.
Now replace the onItemClick Method that was automatically generated for you with the following:
@Override
public void onItemClick(AdapterView<?> parent, View view, int position, long id) {

    // Log the item's position and contents
    // to the console in Debug
    Log.d("omg android", position + ": " + mNameList.get(position));
}
You may need to use your old friend Alt-Enter to import and use Log.
Well done! Your MainActivity Class has implemented onItemClick and can live up to the title of being a card-carrying OnItemClickListener.
But what’s happening inside onItemClick? There’s a weird Log.d in there, and then something with a get(position)…
Take a look at what you’re passing along to onItemClick. In particular, look at int position, which is an integer equal to the index of the item the user pressed on the list (counting up from 0).
You take that position, as well as the item at that index in your list of names, and log them. Logging is a very basic, but very useful debugging technique.
Run your app, enter a few values and add them to the list, just as before. Then select an item. There’s no visible effect for the moment.
With the app still running, look at the bottom section of Android Studio:
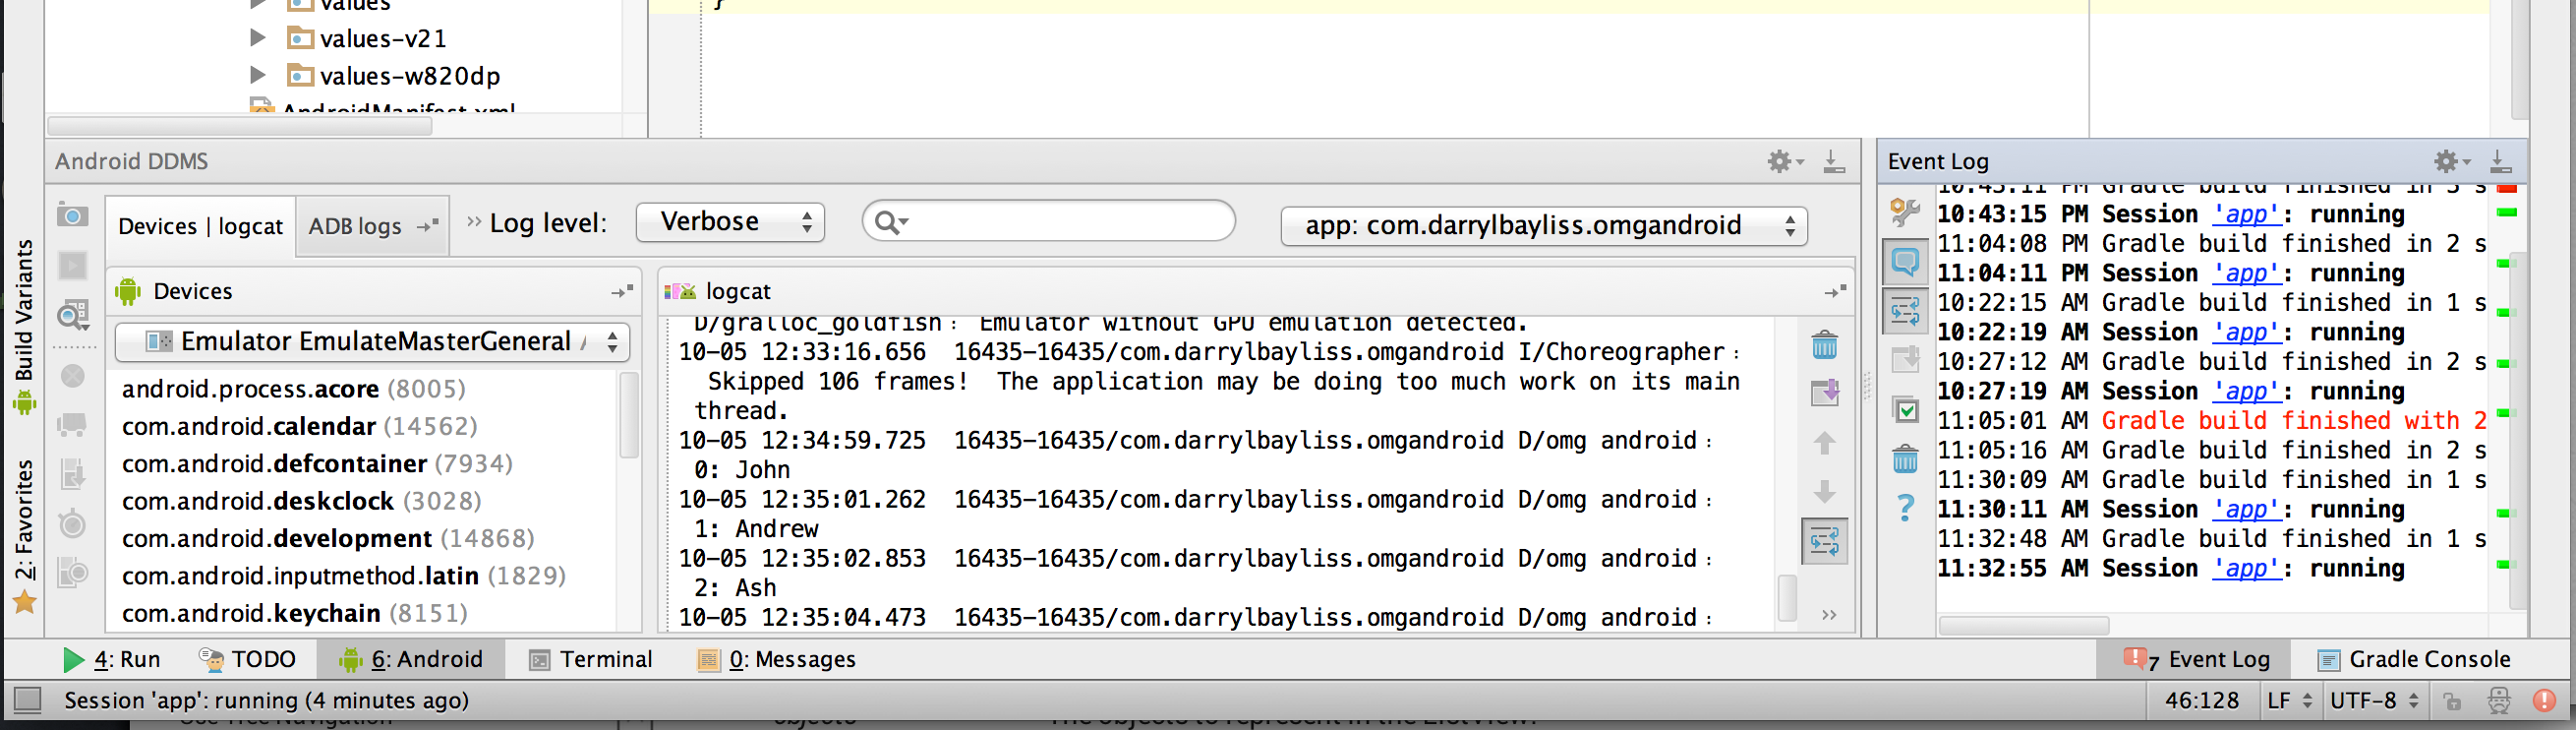
The bottom left section of the window contains information about your Device or Emulator, what processes are running and logs of what is currently happening within those processes. These logs appear in a console called logcat. It will read off tons of stuff from your emulator or device, the majority of which is not of much interest to you at this point. The log statements you generated with your selections are here, but there’s too much noise to see them.
Here are some useful ways to filter out the noise and see only what you want:
Notice the option for Log level in a dropdown at the top of the console. When you put your Log command into code, it specifically was the Log.d command. The d is for “debug” level. The levels are:
-
v: Verbose -
d: Debug -
i: Info -
w: Warning -
e: Error
When you select a log level for logcat, it will only show messages at that level or higher. And the levels start at verbose and go up to error, in the same order as listed above. So, if you select the log level as Warning, then you’ll see all warnings and errors but nothing else.
Meanwhile, you can use the text box to the right of the log level drop-down to apply a filter and show only those messages that contain the text you typed in.
Now that you know this, set the log level to Debug and type omg android into the filter text box.

Great! You now have a clean feed of log statements and you can detect when a certain item gets selected in your list. The ability to log will come in handy as you create more complicated apps and want to stay informed of the inner workings of your code.
The Action Bar
Your app has several different views now, and it’s time to think about other ways to add functionality. Older Android devices used to have a Menu device button that would display a bunch of options depending on the situation, but since Honeycomb in early 2011, Android has used the Action Bar to display any options for the current view.

The Action Bar provides a familiar base for your users. Since it’s present across apps, making good use of the Action Bar means a significant part of your app’s functionality will be immediately intuitive to an Android user. Conversely, neglecting the Action Bar would confuse all your users who expect it to work — and that would be weird!
The Action Bar is already in your app — it just has no options attached to it yet. That will be your first order of business next!
Sharing
Soon you’ll have a chance to show off the fact that you’re learning Android, from within your own app! You’ll do this using an intersection of the Android concept of the Intent and the Action Bar, known as a ShareActionProvider.
One of the advantages of an Intent is that you can construct it in either a specific (explicit) or generic (implicit) manner. You used an example of the explicit type when you specifically defined the Intent that launches your app, which the manifest then identifies as MainActivity. Now you’ll see an example of the implicit type.
A generic Intention really helps in this case. After all, some of us prefer to share things with the entire world, and others with just a few friends. Rather than wondering what a potential user’s favorite social network might be and integrating them one by one, you can politely tell the Android device that you’d very much like to share a bit of content (thus expressing an Intent), and Android will graciously take it from there!
Navigate to res/menu/menu_main.xml and open it.

You’ll note that there’s some auto-generated XML in there, but you don’t need it. Replace the whole thing with this:
<!-- Defines the menu item that will appear on the Action Bar in MainActivity -->
<menu xmlns:android="http://schemas.android.com/apk/res/android"
      xmlns:omgandroid="http://schemas.android.com/apk/res-auto">
    <!-- Share item -->
    <item
        android:id="@+id/menu_item_share"
        android:title="Share"
        omgandroid:showAsAction="ifRoom"
        omgandroid:actionProviderClass= "android.support.v7.widget.ShareActionProvider" />
</menu>
Because your App is running on versions of Android lower than Lollipop, it’s often the case that you need to use features that don’t exist on previous versions of Android. This means you ether build your own functionality to ensure users have a seamless experience across multiple versions or you provide it using 3rd party libraries.
Google provide various App Compatibility libraries to try and reduce this fragmentation issue. In the XML above, you can see you are making use of the android.support.v7 libraries in your XML. Making use of the support library now means the code you are about to implement will work all the way down to Android v7. You can read more about the support libraries here.
Now head over to MainActivity.java and add the following variable underneath the rest of your variables:
ShareActionProvider mShareActionProvider;
ShareActionProvider you mean, so if it asks, use android.support.v7.widget.ShareActionProvider. If you have enabled auto imports then double check it has imported the right one.Next, you need to add the following two methods to the class – the first one, onCreateOptionsMenu, might already be implemented in the class. If it is, simply replace the existing implementation with the new one.
@Override
public boolean onCreateOptionsMenu(Menu menu) {

    // Inflate the menu.
    // Adds items to the action bar if it is present.
    getMenuInflater().inflate(R.menu.menu_main, menu);

    // Access the Share Item defined in menu XML
    MenuItem shareItem = menu.findItem(R.id.menu_item_share);

    // Access the object responsible for
    // putting together the sharing submenu
    if (shareItem != null) {
        mShareActionProvider = (ShareActionProvider) MenuItemCompat.getActionProvider(shareItem);
    }

    // Create an Intent to share your content
    setShareIntent();

    return true;
}

private void setShareIntent() {

    if (mShareActionProvider != null) {

        // create an Intent with the contents of the TextView
        Intent shareIntent = new Intent(Intent.ACTION_SEND);
        shareIntent.setType("text/plain");
        shareIntent.putExtra(Intent.EXTRA_SUBJECT, "Android Development");
        shareIntent.putExtra(Intent.EXTRA_TEXT, mainTextView.getText());

        // Make sure the provider knows
        // it should work with that Intent
        mShareActionProvider.setShareIntent(shareIntent);
    }
}
onOptionsItemSelected in the class, remove it.Add your imports so they are recognised by your Activity.
onCreateOptionsMenu gets called once, when the activity first starts. Similar to how you specified which layout XML file you wanted to use for the activity in onCreate, you now direct the menu inflater to look at menu_main.xml for the menu items that go on the Action Bar.
From there, you can access the menu item you defined in XML by its id, menu_item_share, and then you can access its action provider. Previously, you specified that this item’s action provider was a ShareActionProvider. So, you can safely cast to that type in your code and hang onto a reference to it via the mShareActionProvider variable.
Then, you call setShareIntent. This method creates an Intent, but not just any Intent. It creates an Intent whose action you’ve set to ACTION_SEND. It’s truly as generic as it looks: you’re going to tell Android you want to take the action of sending something.
From there, you set the Intent‘s content type, subject — used by email programs and the like, as the subject header of the message —, and text. The text matches whatever is currently in your TextView. After you’ve packed up everything the Intent needs to know, you pair it with mShareActionProvider.
This code will work, but only “kind of.” As-is, you only call setShareIntent once, at the creation of the menu. It would be much better to update the Intent whenever the TextView changes — otherwise you’re stuck with the initial message forever!
Add the following code to the end of onClick:
// 6. The text you'd like to share has changed,
// and you need to update
setShareIntent();
Here, you simply make sure that the share intent is always up-to-date.
Run the app, and try out the new sharing feature – tapping the share icon on the Action Bar should reveal a number of choices, depending on what is installed on your emulator or device.

The ShareActionProvider automatically puts together an array of possible avenues for sharing content based on the apps you have installed on a given device. This array of options will differ from device to device. The emulator will most likely have far fewer options for sharing, whereas you may have apps like Twitter and Facebook on an actual device and could share through those networks, too.