Google Glass App Tutorial
In this Google Glass app tutorial, you will learn how to make your first Google Glass app – a simple shopping list app! By Evan Dekhayser.
Sign up/Sign in
With a free Kodeco account you can download source code, track your progress, bookmark, personalise your learner profile and more!
Create accountAlready a member of Kodeco? Sign in
Sign up/Sign in
With a free Kodeco account you can download source code, track your progress, bookmark, personalise your learner profile and more!
Create accountAlready a member of Kodeco? Sign in
Contents
Google Glass App Tutorial
30 mins
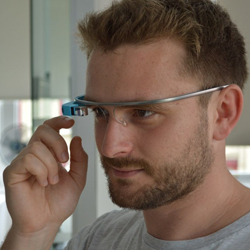
Google Glass is a headset you wear like a pair of eyeglasses, except it has an optical display.
Not only does it make you feel like a bad-ass Terminator, but you can make apps for it too!
In this tutorial, you’ll get a head start with Google Glass development by learning how to make a simple Google Glass shopping list app. In the process, you’ll learn:
- The difference between Simple Live Cards and Immersion Activities
- Using Google’s GDK (Glass Development Kit)
- Testing on the device
- How to change the app’s theme
- How to create custom voice commands
Come with me if you want to live – in the world of Google Glass!
Developing for Google Glass
Attribution: Matt Brown

Attribution: Matt Brown
Google Glass development is unlike any other kind of mobile development.
Because the device is on your face and not in your hand, touch isn’t the main source of input. Imagine tapping, pinching and swiping on a pair of glasses; you’d have to clean them every two seconds!
Google Glass is meant to free your hands, and as such, voice input is the main source of interaction with Glass apps.
Another distinct difference is that because the display is so much smaller than hand-held devices, you have less real estate to work to show information. As a result, user interfaces tend to be plain and simple.
You may have heard that Google is no longer accepting new “Explorers” to purchase early copies of Google Glass. Although this means you can’t get access to a Google Glass if you don’t have one already, the project is far from dead.
Think of it as Google Glass’s way of saying “I’ll be back.”
There’s been a recent change of leadership and direction, so you can expect Glass 2.0 to surface within the next year or two. Wearables are the future of technology, and Glass is anything but a thing of the past.
Note: Because there is no simulator, you’ll need an actual Google Glass to test your work. If you don’t have one, you can at least read along to see what’s involved :]
Note: Because there is no simulator, you’ll need an actual Google Glass to test your work. If you don’t have one, you can at least read along to see what’s involved :]
Getting Started
Google Glass runs a modified version of Android, and much of the code and many of tools you’ll use are the same.
Install Android Studio by following the instructions in this Android for Beginners tutorial.
When you launch Android Studio for the first time, the main menu will come up. By default, Android Studio doesn’t install all the tools necessary for Glass development.
To download these tools, press Configure\SDK Manager. Under Android 4.4.2 (API 19), choose SDK Platform and Glass Development Kit Preview. Deselect everything else.
Press Install 2 packages and accept the license for each tool. Once downloading finishes, close out of the SDK manager.
Two Types of Glass Apps
There are two different types of Google Glass apps:
- Live Cards exist inside the timeline, so the user doesn’t have to enter or exit the app. They are minimally dependent on user interaction. One example is Google+, which uses a Live Card to show posts on the timeline.
- Immersion Activities take up the entire Glass display and require the user exit to return to the main timeline. These behave more like apps for your phone.
You’ll be creating an Immersion Activity in this Google Glass app tutorial.
Interactions In the Moment
Though they are rivals, Glass apps are remarkably similar to Apple Watch apps. From a design perspective, both primarily show white text on a black background. Both platforms allow for limited require user interaction.
In the Apple Watch Human Interface Guidelines, Apple states, “If you measure interactions with your iOS app in minutes, you can expect interactions with your WatchKit app to be measured in seconds.”
The user will not be using your app for very long, so you need it to be fast, simple and straightforward. This is why I say Apple Watch and Google Glass have a lot in common.
Google’s Glass Design Principles state: “Glass works best with information that is simple, relevant and current.” Glass is meant to be in the moment, not stuck in the past hour, month or year.
What you can take away about wearable tech is it’s not meant to have complex apps that do everything. Wearable demands short, frequent and periodic use in order to show the user current, relevant information.
So let’s get get going on creating your Google Glass app!
Creating the Project
On the Welcome screen, select Start a new Android Studio project.
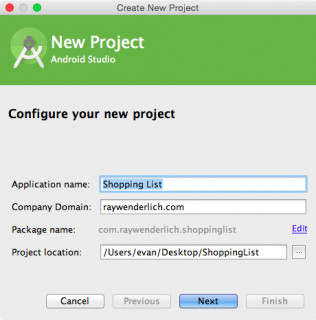
Name the application “Shopping List” and press Next.
This next screen is where you’ll choose what devices you want to run the app. Deselect the default Phone and Tablet and select Glass.
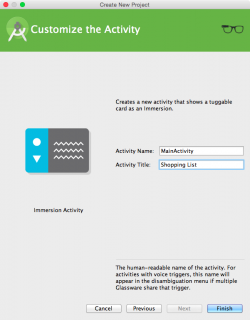
As mentioned before, you’ll be creating an Immersion Activity. The next page of the project setup lets you select this option.
Keep the default Activity Name, MainActivity, but change the Activity Title from Hello World Immersion to Shopping List. This title is what shows in the user’s list of activities.
When you’re done, press Finish.
Running your Glass Activity
Before you can actually run activity on your Glass, you first need to enable testing on the device. On your Glass, go to Settings\Device Info\Turn on debug. Now you’re ready to make some magic.
Plug your Google Glass into your computer’s USB port. You’ll hear a dinging sound come from the Glass when it is connected properly.
In Android Studio, press the Run button on the toolbar, which is the right arrow to the left of the bug icon.
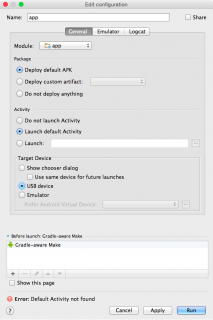
An Edit Configuration screen will appear. Make sure that your settings on this screen are the same as below:
- Module: app
- Package: Deploy default APK
- Activity: Launch default Activity
- Target Device: USB Device
Press Run. If a pop-up informs you that Configuration is still incorrect, select Continue Anyway.
Android Studio will now build and run the app on your device. Go you! Your app is now running on your Google Glass.
When you first run it, it won’t show up on screen automatically; you have to have a chat with it. So, while wearing the Glass, say “OK Glass,” then ask it to “Show me a demo.” This phrase is the default voice trigger that launches your app.
Your screen should now look like this:


