Deep Links in Android: Getting Started
In this tutorial you’ll learn how to use intent filters to create deep links in to your Android app. By Harun Wangereka.
Adding Custom Schemes
There are two types of schemes: http and https. Other links, such as tutorial://android/deeplink, don’t conform to these two types of schemes.
Deep linking supports such URLs without you having to add any modifications. The data tag for such a URL is:
<data
  android:scheme="tutorial"
  android:host="android"
  android:pathPrefix="/deeplink" />
You use tutorial as the scheme instead of the normal http or https. Android will handle the deep link the same way it did the others.
Handling Multiple URIs in One Activity
Sometimes you need to handle two URIs. In those cases, you can either:
- Add many
datatags in one intent filter. This isn’t recommended sincedataelements are merged together to represent all variations of their combined attributes. This might lead to the intent filter handling more URIs which isn’t the intention. - Create separate intent filters when your intention is to declare unique URLs. This is the recommended way to handle many URIs.
At this point, you know how the deep link work. But it only works when you have your app installed on the device. Next, you’ll see how to handle deep links when the user doesn’t have your app installed.
Handling Deep Links When the User Doesn’t Have Your App Installed
Your main goal is to provide the best experience when users click links that navigate to your app. For cases when the user doesn’t have your app installed, you would want the link to redirect the user to Play Store. Then the user can download the app and proceed to the specified section in your app.
Fortunately, Firebase Dynamic links can help you achieve better user experience across different platforms.
Firebase Dynamic Links usually work across different platforms in a similar manner even if your app isn’t installed. Whether the user opens the link on a web browser, in Android or in iOS, the link redirects to the specific destination in your app.
Before you can use Firebase Dynamic Links, you need to create a subdomain.
Creating a Subdomain for Your Dynamic Link
To use Firebase Dynamic Links, you have to have a project in Firebase Console and connect your project to Firebase. Learn how to set up Firebase for your app in the “Rev it up!” section of our Firebase Tutorial for Android.
com.raywenderlich.android.promoapp when registering the app in Firebase. Once the app is registered, overwrite the google-services.json file with the newly generated one from your Firebase account. Feel free to use the provided google-services.json file though if you do not want to create your own Firebase project.
After your project is set, navigate to the Dynamic Links section on the left panel and under the Engage category. Click it and you’ll see:

Click Get Started. You’ll see the steps for adding your subdomain.

Here, you add your domain for the dynamic link. If you have your own domain, you can configure it on Firebase, too. For this tutorial, you’re going to use the free custom page.link subdomain.
Click Continue to get to the final step.

This confirms you’ve verified the subdomain and gotten approval. Click Finish to complete setting up your subdomain. You’ll see something like this:

From the image, you can see you haven’t added a Dynamic Link. You’ll do that in the next few steps.
Creating a Firebase Dynamic Link
Click New Dynamic Link. You’ll see the steps for creating one below:

In the first step, you’ll customize your dynamic link. You can make it short or add more context to it. For now, you’ll use the default one generated by Firebase. Click Next.
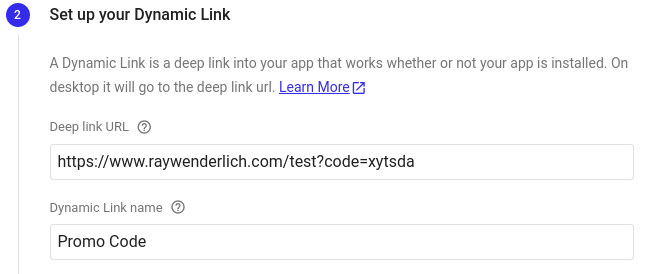
Then, you’ll add your deep link URL and name. In this case, since you already have one, you’ll use the one shown in the image below:
Click Next. Now, you’ll define the behavior you want for iOS apps:

Firebase provides two options:
- Opening the link in a web browser.
- Opening the link in an iOS app. This option requires your Firebase project to have an iOS app added.
Select Open deep link URL in a browser option. Click Next.
Now, you’ll define link behavior in Android as shown below:

For Android, select Open the deep link in your Android app. Then select your app from the dropdown, in this case the com.raywenderlich.android.promoapp.
If you can’t find the app in the dropdown, you might not have Firebase configured for your app. As mentioned earlier, you can do that by following the “Rev it up!” section in Firebase Tutorial for Android: Getting Started.
You also need to define the behavior you want when the user doesn’t have your app installed. The dialog gives you the option to send the user to a Google Play page for your app or a Custom URL or Google Play Instant Experience. For now, choose Google Play page for your app. Click Next.
There’s an optional setting where you can define the minimum Android version for your deep link. You won’t set that in this tutorial.
The last step covers tracking and adding social tags. While optional, this step is useful for measuring your campaign’s success.
![]()
Click Create. Congratulations! You created your first Firebase Dynamic Link. Next, you’ll handle dynamic links in your app.
Handling Dynamic Links in Your App
Before your app can handle Firebase Dynamic Links, you have to add intent filters with the URL you defined in Firebase Console. Because you’ve already added this in your AndroidManifest.xml you can skip this step.
Now, navigate to buid.gradle(app) and add the following dependencies:
//Firebase
implementation 'com.google.firebase:firebase-dynamic-links-ktx:19.1.1'
implementation 'com.google.firebase:firebase-analytics-ktx:18.0.0'
Here, you add dependencies for Firebase Dynamic Links and Analytics so your app can gather statistics. Click Sync Now and wait for the build to complete.
Next, go to PromoActivity.kt. Add the following code below showDeepLinkOffer:
private fun handleFirebaseDynamicLinks(intent: Intent) {
  // 1
  Firebase.dynamicLinks
    .getDynamicLink(intent)
    .addOnSuccessListener { dynamicLinkData ->
      // 2
      if (dynamicLinkData != null) {
        showDynamicLinkOffer(dynamicLinkData.link)
      }
    }
    // 3
    .addOnFailureListener(this) { e ->
      Log.d("DynamicLinkError", e.localizedMessage)
    }
}
In the code above:
- First, you retrieve the link in your app and add a success listener.
- Second, you check if your link has data. Then you get the link from the data.
- Third, you add a failure listener for cases when you can’t get the link.
Add these imports to your imports to resolve errors:
import com.google.firebase.dynamiclinks.ktx.dynamicLinks
import com.google.firebase.ktx.Firebase
import android.util.Log
Notice you still have an error on showDynamicLinkOffer. Add the following code below handleFirebaseDynamicLinks:
private fun showDynamicLinkOffer(uri: Uri?) {
  val promotionCode = uri?.getQueryParameter("code")
  if (promotionCode.isNullOrBlank().not()) {
    activityPromoBinding.discountGroup.visibility = View.VISIBLE
    activityPromoBinding.tvPromoCode.text = promotionCode
    activityPromoBinding.btnClaimOffer.setOnClickListener {
      activityPromoBinding.tvOfferClaimed.visibility = View.VISIBLE
    }
  } else {
    activityPromoBinding.discountGroup.visibility = View.GONE
  }
}
In the method above, you show the offer again, but this time the link comes from a Firebase Dynamic Link. You also show the offer only when the link has the code query parameter.
Next, add a call to handleFirebaseDynamicLinks() in onCreate():
handleFirebaseDynamicLinks(intent)
Here you call handleFirebaseDynamicLinks() and pass the intent from onCreate().
Add the following code below super.onCreate(savedInstanceState):
FirebaseAnalytics.getInstance(this)
You get an instance of Firebase Analytics so Google Analytics can track analytics events and show them in the Firebase console.
Build and run.

Open the link you generated in the Firebase console on a browser on your Android device. For this tutorial, you can use this link: https://rwdynamiclinks.page.link/mVFa.
Opening the link redirects you to the app. Tap CLAIM OFFER:

Great! You claimed your offer from a Firebase Dynamic Link. Next, you’ll see the analytics available on Firebase Console.