Android ListView Tutorial with Kotlin
In this tutorial, you’ll learn how to use Android’s ListView to easily create scrollable lists, by creating a simple recipe list app using Kotlin. By Joe Howard.
Update Note: This tutorial is now up to date with the latest version of Android Studio version 3.0.1, and uses Kotlin for app development. Update by Joe Howard. Original tutorial by Odie Edo-Osagie.
Update Note: This tutorial is now up to date with the latest version of Android Studio version 3.0.1, and uses Kotlin for app development. Update by Joe Howard. Original tutorial by Odie Edo-Osagie.
How many times have you needed an app to display a group of related items in a list? How about all the time. :]
Displaying a specific list is essential to the function of almost any app that queries a set of data and returns a list of results, so many apps need to do this at one point or another. For instance, maybe you have a chat app that queries a certain social platform’s database to find your friends, and then want to display them in a list that lets you select which friends to connect with.
Any time you need to display a lot of data and make it easy to navigate, you’ve got a job for Android’s ListView, which handily creates scrollable lists.
In recent years, ListView has been supplanted by RecyclerView. Nevertheless, studying ListView still has it’s benefits:
- You can gain insights into why RecyclerView works the way it does
- You may run into ListView in legacy code, and it’s best to know how to work with it
By working through this tutorial, you’ll become familiar with ListView, and you’ll do so by creating a recipe list app. Specifically, you’ll learn:
- How to construct and populate a ListView
- How to customize the layout
- How to style and beautify a ListView
- How to optimize a ListView’s performance
You’re welcome to up your game in the kitchen by learning the recipes too, but maybe wait until you’ve built the app, okay?
Note: If you’re new to Android Development or Kotlin, it’s highly recommended that you start with Beginning Android Development with Kotlin to learn your way around the basic tools and concepts.
Note: If you’re new to Android Development or Kotlin, it’s highly recommended that you start with Beginning Android Development with Kotlin to learn your way around the basic tools and concepts.
Getting Started
To kick things off, start by downloading the materials for this tutorial (you can find a link at the top or bottom of the page) and open Android Studio 3.0.1 or greater.
In the Welcome to Android Studio dialog, select Open an existing Android Studio project.
In the following dialog, select the top-level directory of the starter project AllTheRecipes-Starter and click OK.

Inside the imported project, you’ll find some assets and resources that you’ll use to create your app, such as strings, colors, XML layout files, and fonts. Additionally, there’s some boilerplate code modeling a Recipe and a bare bones MainActivity class.
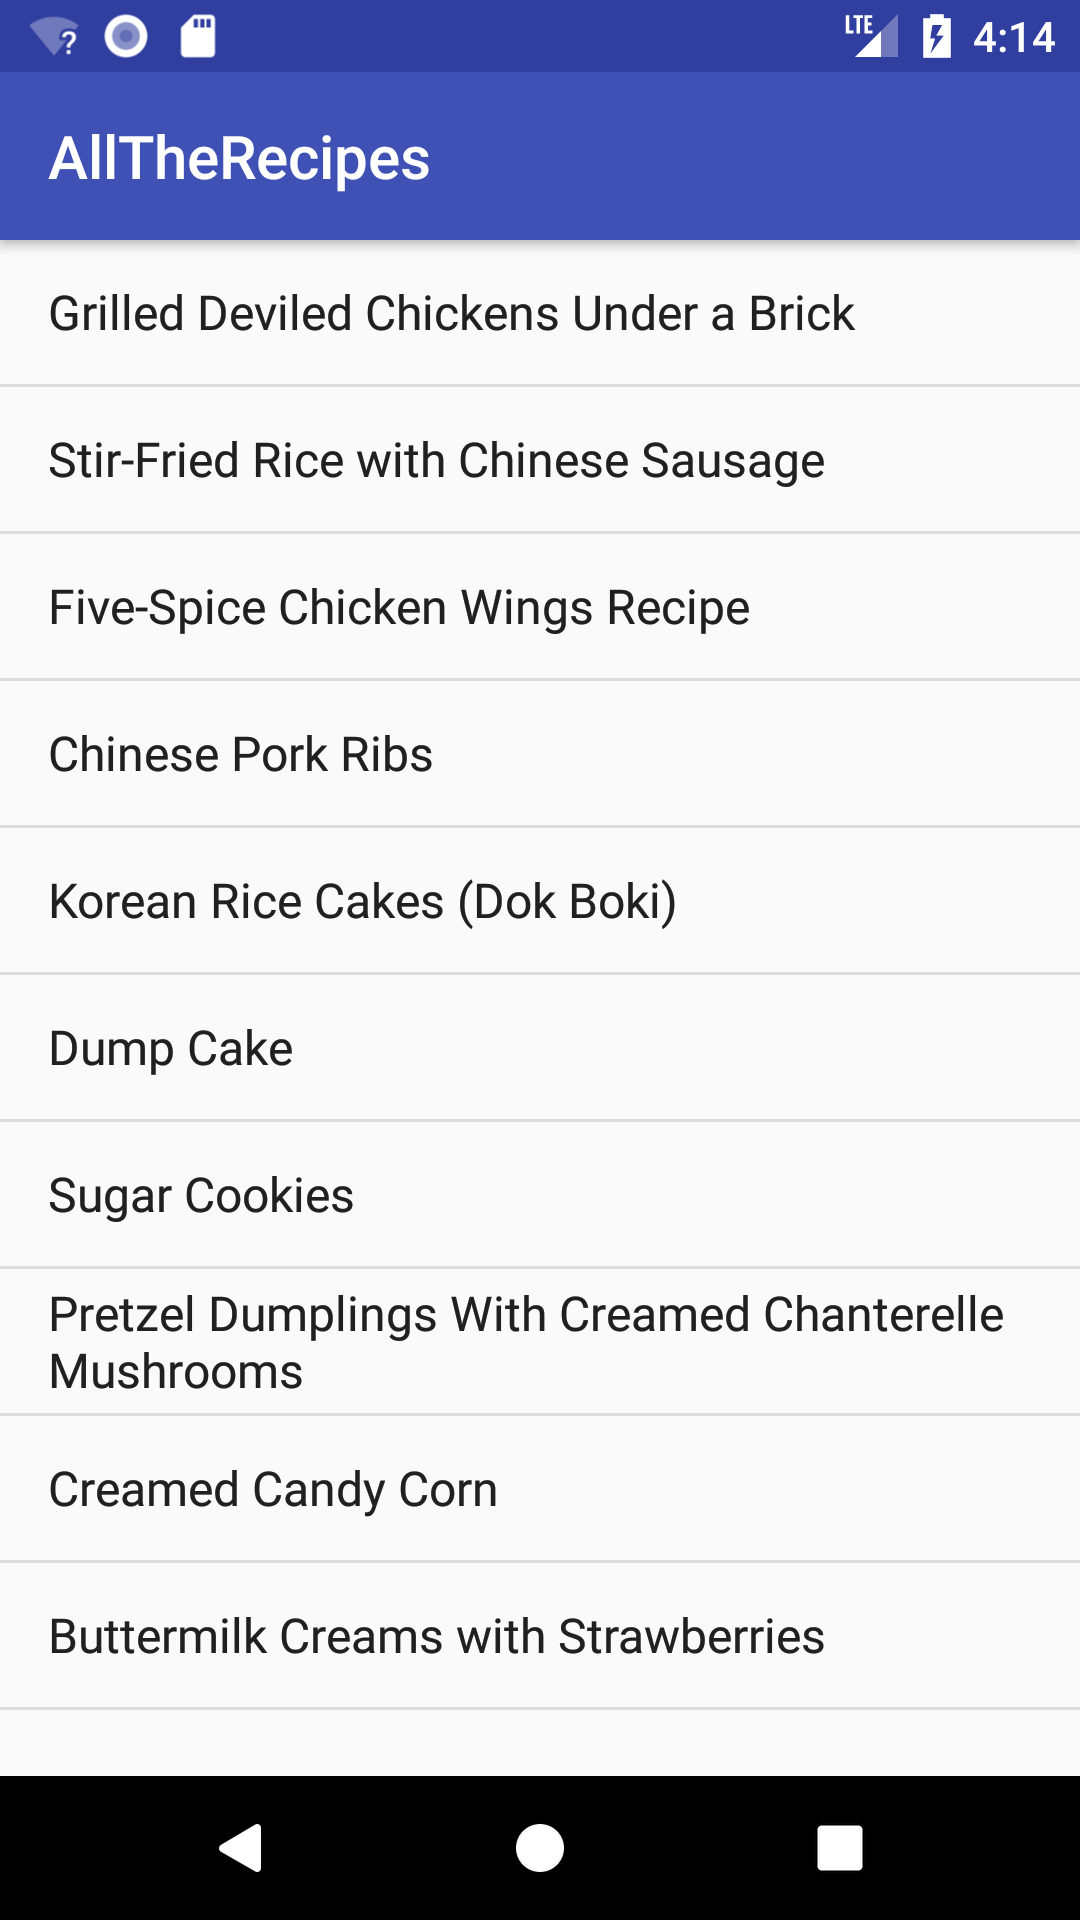
Build and run. You should see something like this:

Are you ready to get cracking on this list thing? Awesome!
Add Your First ListView
The first order of business is to add a ListView to MainActivity.
Open res/layout/activity_main.xml. As you may know, this is the file that describes the layout of MainActivity. Add a ListView to MainActivity by inserting the following code snippet inside the ConstraintLayout tag:
<ListView
  android:id="@+id/recipe_list_view"
  android:layout_width="0dp"
  android:layout_height="0dp"
  app:layout_constraintBottom_toBottomOf="parent"
  app:layout_constraintEnd_toEndOf="parent"
  app:layout_constraintStart_toStartOf="parent"
  app:layout_constraintTop_toTopOf="parent" />
Open MainActivity and add an instance variable for your ListView with the following line:
private lateinit var listView ListView
Add the following snippet below the existing code inside the onCreate method:
listView = findViewById<ListView>(R.id.recipe_list_view)
// 1
val recipeList = Recipe.getRecipesFromFile("recipes.json", this)
// 2
val listItems = arrayOfNulls<String>(recipeList.size)
// 3
for (i in 0 until recipeList.size) {
  val recipe = recipeList[i]
  listItems[i] = recipe.title
}
// 4
val adapter = ArrayAdapter(this, android.R.layout.simple_list_item_1, listItems)
listView.adapter = adapter
Here’s a breakdown of what’s happening in there:
- This loads a list of
Recipeobjects from a JSON asset in the app. Notice that the starter project contains aRecipeclass that models and stores the information about the recipes that will be displayed. - This creates an array of strings that’ll contain the text to be displayed in the ListView.
- This populates the ListView’s data source with the titles of the recipes loaded in section one.
- This creates and sets a simple adapter for the ListView. The
ArrayAdaptertakes in the current context, a layout file specifying what each row in the list should look like, and the data that will populate the list as arguments.
Enough talk! Your ListView has all that it needs to function. Build and run the project. You should see something like this:
Adapters: Servants of the ListView
Your recipe app is starting to look functional, but not all that appetizing…yet.
In the previous section, you successfully built a list of recipe titles. It works, but it’s nothing to get excited about. What if you needed to show more than just the titles? More than just text? Maybe even add some screen-licking worthy thumbnails?
For these cases, the simple ArrayAdapter you just used won’t cut it. You’ll have to take matters into your own hands and write your own adapter. Well, you won’t actually write your own adapter, per se; you’ll simply extend a regular adapter and make some tweaks.
What Exactly is an Adapter?
An adapter loads the information to be displayed from a data source, such as an array or database query, and creates a view for each item. Then it inserts the views into the ListView.
Adapters not only exist for ListViews, but for other kinds of views as well; ListView is a subclass of AdapterView, so you can populate it by binding it to an adapter.
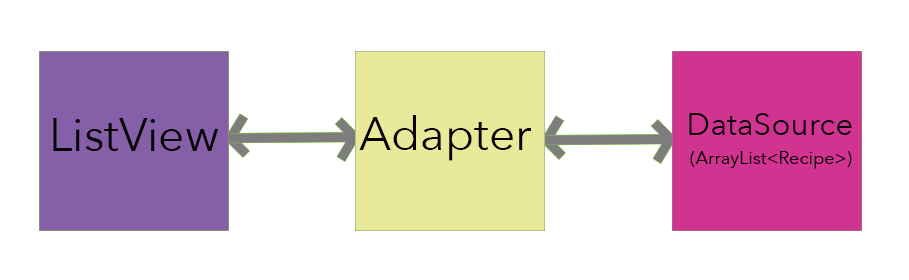
The adapter acts as the middle man between the ListView and data source, or its provider. It works kind of like this:
The ListView asks the adapter what it should display, and the adapter jumps into action:
In short, The ListView isn’t very smart, but when given the right inputs it does a fine job. It fully relies on the adapter to tell it what to display and how to display it.