Kotlin Coroutines Tutorial for Android: Getting Started

In this Kotlin Coroutines tutorial, you’ll learn how to write asynchronous code just as naturally as your normal, synchronous code. By Amanjeet Singh.

Leave a rating/review
Download materials
Save for later
Share

Asynchronous programming is very important for modern applications. Using it increases amount of work your app can perform in parallel. This in turn allows you to run heavy-duty tasks away from the UI thread, in the background. By doing so, you avoid UI freezes, and provide a fluid experience for your users.

Android provides several asynchronous programming mechanisms, but it’s difficult to find the most appropriate one to use. Some mechanisms have a huge learning curve. Others require a ton of boilerplate code to implement, and aren’t that concise. This all which affects the scalability of your app, and increases the cognitive load for new developers. It’s best if the APIs you rely on are easy to use and scale when needed.

Because all platforms on the JVM had the same problem, the team from JetBrains has come up with a new API. The idea behind it is to help you solve all these problems, without a steep learning curve. In this tutorial, you’ll learn about that API – Kotlin Coroutines.

Why Use Coroutines?

As you may know, Android developers today have many async tools at hand. These include RxJava/Kotlin/Android, AsyncTasks, Jobs, Threads, and more. So why would you need another tool in the toolbox, something else to learn?

If you’ve worked with Rx, then you know it takes a lot of effort to get to know it enough, to be able to use it safely. On the other hand, AsyncTasks and Threads can easily introduce leaks and memory overhead. Finally, relying on all these APIs, which use callbacks, can introduce a ton of code. Not only that, but the code can become unreadable, as you introduce more callbacks.

So trust me, after trying out Kotlin Coroutines, you’ll realize they aren’t just another tool. They’re a whole new way of thinking about asynchronicity!

Kotlin Coroutines help you to write asynchronous code in a more natural way. That is, in a sequential style of programming, which is more humanly-understandable and readable. They offer several benefits, which you’ll learn about in this tutorial.

Throughout this tutorial, you’ll develop a photo editing app, Snowy, which will allow you to download an image and then apply a snow filter to that image. To download the images, and process them, you’ll need to perform asynchronous tasks.

Along the way you’ll also learn:

  • How Kotlin Coroutines work internally.
  • How to create your own coroutines.
  • Exception handling with coroutines.
  • How Kotlin Coroutines compare to other tools like Threads, RxKotlin and so on.
Note: This tutorial assumes you’re already familiar with the basics of Android development. If you are completely new to developing apps on Android, read our Beginner Android Series. You’ll also need some basic knowledge of asynchronous programming and how threads work.

Getting Started

To start, download the materials for this tutorial by clicking the Download Materials button at the top or bottom of the tutorial. Then open the starter project in Android Studio 3.5 or later and look through its content.

You should see:

  • The model package with the Tutorial model, which has three properties: the tutorial’s name, the description and the image url.
  • The utils package with the SnowFilter, which has a function called applySnowEffect(). applySnowEffect() takes a Bitmap as an argument and returns a Bitmap with a snow filter.
  • MainActivity, which hosts four tabs: Kotlin, Android, RxKotlin and Kitura.
  • TutorialFragment, which shows details of different tutorials.
  • TutorialPagerAdapter: A FragmentPagerAdapter to set up the tabs and ViewPager.

Build and run the starter project and you’ll see four tabs with their names and descriptions. The view also has an ImageView bordered by a red line in the screenshot below. You’ll load an image, every time a tutorial is selected, into the ImageView. Before showing the image, you’ll apply a snowy filter to the tutorial logo.

But before you download the images and apply the snow filter to them, let’s see how to use Kotlin Coroutines.

Introduction to Coroutines

The documentation says Kotlin Coroutines are like lightweight threads. They are lightweight because creating coroutines doesn’t allocate new threads. Instead, they use predefined thread pools, and smart scheduling. Scheduling is the process of determining which piece of work you will execute next. Just like a regular schedule.

Additionally, coroutines can be suspended and resumed mid-execution. This means you can have a long-running task, which you can execute little-by-little. You can pause it any number of times, and resume it when you’re ready again. Knowing this, creating a large number of Kotlin Coroutines won’t bring unnecessary memory overhead to your program. You’ll just suspend some of them until the thread pool frees up.

So what does suspended at certain points mean and how is it different from blocking the thread?

Suspending vs. blocking

Well, suspension and blocking sound similar, but they’re actually very different. A blocking call to a function means that a call to any other function, from the same thread, will halt the parent’s execution. Following up, this means that if you make a blocking call on the main thread’s execution, you effectively freeze the UI. Until that blocking calls finishes, the user will see a static screen, which is not a good thing.

You can visualize it like this:

On the other hand, suspending doesn’t necessarily block your parent function’s execution. If you call a suspending function in some thread, you can easily push that function to a different thread. In case it is a heavy operation, it won’t block the main thread. Moreover, if you require a result from the function, you can bridge back to the main thread, without a lot of code. That way you can fetch data in a coroutine, from the main thread. All you have to do is launch the coroutine in a worker thread. This way you’ll effectively call something from the main thread, switch to the background, and switch back once the data is ready.

If the suspending function has to suspend, it will simply pause its execution. This way you free up its thread for other work. Once it’s done suspending, it will get the next free thread from the pool, to finish its work.

You can visualize the difference like this:

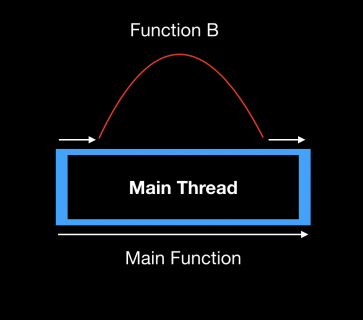
In the example above, Function B suspends on the main thread, but you can resume it on any other worker thread. As soon as the suspended function returns, you can consume the results, on the main thread.

Coroutine Terminology

Kotlin Coroutines give you an API to write your asynchronous code sequentially. Take this snippet of code for example:

val snowyBitmap = getFilteredBitmap()
showBitmap(bitmap)

Here, showBitmap() uses the snowyBitmap from getFilteredBitmap(), which fetches the bitmap from a given API and applies a snow filter.

But this sequential code can also perform blocking operations, which would be better off in a different thread. You can do this by wrapping it with Kotlin Coroutines. But before that, let’s review some terminology for the Kotlin Coroutines API.

  • Suspending functions: This kind of function can be suspended without blocking the current thread. Instead of returning a simple value, it also knows in which context the caller suspended it. Using this, it can resume appropriately, when ready.
  • CoroutineBuilders: These take a suspending lambda as an argument to create a coroutine. There are a bunch of coroutine builders provided by Kotlin Coroutines, including async(), launch(), runBlocking.
  • CoroutineScope: Helps to define the lifecycle of Kotlin Coroutines. It can be application-wide or bound to a component like the Android Activity. You have to use a scope to start a coroutine.
  • CoroutineDispatcher: Defines thread pools to launch your Kotlin Coroutines in. This could be the background thread pool, main thread or even your custom thread pool. You’ll use this to switch between, and return results from, threads

All of these terms will sink in, once you start working with Kotlin Coroutines in the project.

Adding Kotlin Coroutines support

Now, let’s return to the example. You can solve the problem of blocking, by wrapping the getFilteredBitmap function inside an async block.

val snowyBitmap = async { getFilteredBitmap() }
// do some work
showBitmap(bitmap.await())

That marks showBitmap() as a suspension point for the compiler, because it calls for the result of async(). Now, as soon as the program needs a snowyBitmap, it can await() the result. This will try to fetch the filtered bitmap. async(), runs immediately, wrapping the value in another construct. This construct is called Deferred. Until you actually wait for the value, you don’t suspend or block the caller.

This means that if there’s any other code between the function call and its result, that code can execute freely. Also, by the time you call await() if the value is computed, you can simply resume with the rest of the code. This is a really powerful feature of Kotlin Coroutines.

And it’s only a small piece of what Kotlin Coroutines have to offer, but to fully explore them, let’s switch to Snowy! :]

Setting Up Your Code

Before you can create coroutines, you have to add the dependencies to your Android project. Start by opening the app level build.gradle and adding the following dependencies:

implementation 'org.jetbrains.kotlinx:kotlinx-coroutines-core:1.3.0'
implementation 'org.jetbrains.kotlinx:kotlinx-coroutines-android:1.3.0'

These dependencies are important for integrating the different components of coroutines in your project. They and also provide Android support of coroutines for your project, like the main thread dispatcher.

When you start working with Kotlin Coroutines, you’ll be hearing a lot about Jobs. It’s one of the basic constructs in the Kotlin Coroutines API. As such, it’s vital to understand what it does.

Coroutine Jobs

Open TutorialFragment.kt and a property named parentJob of type Job as follows, under the companion object:

private val parentJob = Job()

As the name suggests, a Job represents a piece of work that needs to be done. Additionally, every Job can be cancelled, finishing its execution. Because of that, it has a lifecycle and can also have nested children. Coroutine builders like launch() and async() return jobs as a result.

If you create a child for a Job, by nesting coroutines, it forms a parent-child hierarchy. With the hierarchy, you can control all the children through this single instance of a Job. If you cancel the parent, all of the children get canceled too. If a child fails in execution, the rest of the hierarchy fails, as well.

Describing a parent-child hierarchy helps you to control the lifecycle of coroutines from a single instance when using it inside of an Activity or Fragment.

This is why you’re declaring a parentJob. You can use it to cancel and clear up all coroutines which you launched in TutorialFragment.

Next, it’s important to understand how threading works with coroutines.

Using Dispatchers With Kotlin Coroutines

You can execute a coroutine using different CoroutineDispatchers, as mentioned before. Some of the available CoroutineDispatchers in the API are: Dispatchers.Main, Dispatchers.IO and Dispatchers.Default.

You can use these dispatchers for the following use cases:

  • Dispatchers.Default: CPU-intensive work, such as sorting large lists, doing complex calculations and similar. A shared pool of threads on the JVM backs it.
  • Dispatchers.IO: networking or reading and writing from files. In short – any input and output, as the name states
  • Dispatchers.Main: recommended dispatcher for performing UI-related events. For example, showing lists in a RecyclerView, updating Views and so on.

You’ll use some of these dispatchers to switch between the main and background threads. One last step before you can launch coroutines – defining a CoroutineScope.

Scoping Kotlin Coroutines

Now, to define the scope when the coroutine runs, you’ll use a custom CoroutineScope to handle the lifecycle of the coroutines.

To do it, declare a property, as shown below, and initialize it under the parentJob:

private val coroutineScope = CoroutineScope(Dispatchers.Main + parentJob)

The plus() operator helps you create a Set of CoroutineContext elements, which you associate with the coroutines in a particular scope. The contexts and their elements are a set of rules each Kotlin Coroutine has to adhere to.

This set of elements can have information about:

  • Dispatchers, which dispatch coroutines in a particular thread pool and executor.
  • CoroutineExceptionHandler, which let you handle thrown exceptions.
  • Parent Job, which you can use to cancel all Kotlin Coroutines within the scope.

Both the CoroutineDispatcher and a Job implement CoroutineContext. This allows you to sum them – using plus(), to combine their functionality.

Now it’s finally time to launch some Kotlin Coroutines!

Downloading Images With Kotlin Coroutines

Now, you’ll write a coroutine to download an image from a URL. Add the following snippet at the bottom of TutorialFragment.kt:

// 1
private fun getOriginalBitmapAsync(tutorial: Tutorial): Deferred<Bitmap> =
  // 2
  coroutineScope.async(Dispatchers.IO) {
    // 3
    URL(tutorial.url).openStream().use {
      return@async BitmapFactory.decodeStream(it)
    }
}

Here’s what this code does:

  1. Creates a regular function, getOriginalBitmapAsync(), which returns a Deferred Bitmap value. This emphasizes that the result may not be immediately available.
  2. Use the async() to create a coroutine in an input-output optimized Dispatcher. This will offload work from the main thread, to avoid freezing the UI.
  3. Opens a stream from the image’s URL and uses it to create a Bitmap, finally returning it.

Next, you have to apply the image filters to the result!

Applying the Snow Filter

You need another function which uses coroutines to apply a filter. Create a function loadSnowFilterAsync() as follows, at the bottom of TutorialFragment.kt:

private fun loadSnowFilterAsync(originalBitmap: Bitmap): Deferred<Bitmap> =
  coroutineScope.async(Dispatchers.Default) {
    SnowFilter.applySnowEffect(originalBitmap)
  }

Applying a filter is a heavy task because it has to work pixel-by-pixel, for the entire image. This is usually CPU intensive work, so you can use the Default dispatcher to use a worker thread.

You create a function, loadSnowFilterAsync>(), which takes a bitmap as an argument. This method returns a Deferred again. It represents a Bitmap with a snowy filter applied to it. It uses the async() builder to execute on a worker thread and apply the snow filter on the Bitmap.

Putting Everything Together

At this point, you’ve created all the necessary code, so you’re ready to put all the pieces together and create some Kotlin Coroutines. You’ll see how they make creating asynchronous operations easy.

Right now, you’re returning Deferreds. But you want the results when they become available. You’ll have to use await(), a suspending function, on the Deferreds, which will give you the result when it’s available. In your case – a Bitmap.

For example, to get your original bitmap, you’ll call getOriginalBitmapAsync(tutorial).await(). However, calling this function directly from onViewCreated() of the TutorialFragment will give you the following error:

There are two things to note here:

  • await is a suspending function; calling this function from a non-suspended instance would give an error. You can only call this function from within a coroutine or another suspended function. Just like the error states.
  • Android Studio is capable of showing you such suspension points in your code. For example, calling await() would add a suspension point, displaying a green arrow next to your line number.

Suspension points are markings the compiler creates, to let the system and the user know that a coroutine could be suspended there.

Resolving the Error

To get rid of this error, you’ll need to await() in a coroutine. Then, you’ll have to update the UI thread as soon as you apply the snow filter. To do this, use a coroutine builder like so:

coroutineScope.launch(Dispatchers.Main) {
  val originalBitmap = getOriginalBitmapAsync(tutorial).await()
}

In this code snippet, you launch a coroutine on the main thread. But the originalBitmap is computed in a worker thread pool, so it doesn’t freeze the UI. Once you call await(), it will suspend launch(), until the image value is returned.

Now, you need to call a method to apply the snow filter on the image, then load the final image.

To do it, create loadImage(), underneath this code, as follows:

private fun loadImage(snowFilterBitmap: Bitmap){
  progressBar.visibility = View.GONE
  snowFilterImage?.setImageBitmap(snowFilterBitmap)
}

By calling up loadSnowFilterAsync() to get the filtered Bitmap and loading it into the Image view, you’ll get:

coroutineScope.launch(Dispatchers.Main) {
  val originalBitmap = getOriginalBitmapAsync(tutorial).await()
  //1
  val snowFilterBitmap = loadSnowFilterAsync(originalBitmap).await()
  //2
  loadImage(snowFilterBitmap)
}

You’re simply applying the filter to a loaded image, and then passing it to loadImage(). That’s the beauty of coroutines: they help convert your async operations into natural, sequential, method calls.

Internal Workings of Coroutines

Internally, Kotlin Coroutines use the concept of Continuation-Passing Style programming, also known as CPS. This style of programming involves passing the control flow of the program as an argument to functions. This argument, in Kotlin Coroutines’ world, is known as Continuation.

A continuation is nothing more than a callback. Although, it’s much more system-level than you standard callbacks. The system uses them to know when a suspended function should continue or return a value.

For example, when you call await(), the system suspends the outer coroutine until there is a value present. Once the value is there, it uses the continuation, to return it back to the outer coroutine. This way, it doesn’t have to block threads, it can just notify itself that a coroutine needs a thread to continue its work. Really neat, huh? :]

Hopefully, it now makes a bit more sense, and it doesn’t seem all that magical! Another really important thing to understand, in Kotlin Coroutines, is the way exceptions are handled.

Handling Exceptions

Exception handling in Kotlin Coroutines behaves differently depending on the CoroutineBuilder you are using. The exception may get propagated automatically or it may get deferred till the consumer consumes the result.

Here’s how exceptions behave for the builders you used in your code and how to handle them:

  • launch: The exception propagates to the parent and will fail your coroutine parent-child hierarchy. This will throw an exception in the coroutine thread immediately. You can avoid these exceptions with try/catch blocks, or a custom exception handler.
  • async: You defer exceptions until you consume the result for the async block. That means if you forgot or did not consume the result of the async block, through await(), you may not get an exception at all! The coroutine will bury it, and your app will be fine. If you want to avoid exceptions from await(), use a try/catch block either on the await() call, or within async().

Here’s how to handle exceptions for your Snowy app:

Create a property, coroutineExceptionHandler, as follows:

// 1
private val coroutineExceptionHandler: CoroutineExceptionHandler =
    CoroutineExceptionHandler { _, throwable ->
      //2
      coroutineScope.launch(Dispatchers.Main) {
        //3
        errorMessage.visibility = View.VISIBLE
        errorMessage.text = getString(R.string.error_message)
      }

      GlobalScope.launch { println("Caught $throwable") }
    }

This creates a CoroutineExceptionHandler to log exceptions. Additionally, it creates a coroutine on the main thread to show error messages on the UI. You also log your exceptions in a separate coroutine, which will live with your app’s lifecycle. This is useful if you need to log your exceptions to tools like Crashlytics. Since GlobalScope won’t be destroyed with the UI, you can log exceptions in it, so you don’t lose the logs.

Now, it’s time to associate this handler with your CoroutineScope. Add the following in the property definition of coroutineScope:

private val coroutineScope = 
    CoroutineScope(Dispatchers.Main + parentJob + coroutineExceptionHandler)

Now, if you have any exceptions in coroutines you start, you’ll log them and display a message in a TextView.

Remember, if you’re using async(), always try to call await() from a try-catch block or a scope where you’ve installed a CoroutineExceptionHandler.

Cleaning Up

Your last task is to clean up your coroutines, to avoid leaks. Override onDestroy and add the following code to it:

override fun onDestroy() {
  super.onDestroy()
  parentJob.cancel()
}

This will cancel and clear up all the coroutines you launched with the coroutineScope.

And that’s all you need to implement your coroutine. Build and run your app and you’ll see the following:

Note: Once you cancel a Job, you cannot reuse it for coroutines. You have to create a new one. This is why it’s a good practice to either avoid adding Jobs to the CoroutineContext of your scope, or to recreate jobs according to your app’s lifecycle.

Writing Expressive Kotlin Coroutines

One thing we didn’t really pay attention to is the expressiveness of our Kotlin Coroutines. You did good context switching, to offload the main thread, but there’s some cognitive overhead you created. If you look at the code below:

private fun getOriginalBitmapAsync(tutorial: Tutorial): Deferred<Bitmap> =
    // 2
    coroutineScope.async(Dispatchers.IO) {
      // 3
      URL(tutorial.url).openStream().use {
        return@async BitmapFactory.decodeStream(it)
      }
    }

private fun loadSnowFilterAsync(originalBitmap: Bitmap): Deferred<Bitmap> =
    coroutineScope.async(Dispatchers.Default) {
      SnowFilter.applySnowEffect(originalBitmap)
    }

It is returning a value asynchronously. But async() is better used if you have multiple requests. It’s really useful for parallelism, as you can run a few operations, without blocking or suspending, at the same time. Just create multiple async() blocks!

But here, it’s much better to go on the path of using withContext():

private suspend fun getOriginalBitmapAsync(tutorial: Tutorial): Bitmap =
    withContext(Dispatchers.IO) {
      URL(tutorial.url).openStream().use {
        return@withContext BitmapFactory.decodeStream(it)
      }
    }

private suspend fun loadSnowFilterAsync(originalBitmap: Bitmap): Bitmap =
    withContext(Dispatchers.Default) {
      SnowFilter.applySnowEffect(originalBitmap)
    }

Instead of deferring the value, you mark the functions with suspend. This tells the caller it’s using a coroutine, and it might take some time to finish. But now, instead of having to await(), your code will change to this:

coroutineScope.launch(Dispatchers.Main) {
  val originalBitmap = getOriginalBitmapAsync(tutorial)
  //1
  val snowFilterBitmap = loadSnowFilterAsync(originalBitmap)
  //2
  loadImage(snowFilterBitmap)
}

Which is much more intuitive and clean. There’s no additional overhead. Furthermore, the functions you call can determine the implementation details on how they will produce the value. This makes the code more decoupled if you decide to introduce more layers to your app.

Where to Go From Here?

Good job finishing the tutorial! In the end, you learned Kotlin Coroutines are not just another tool in a dusty shed we call asynchronous programming. The API is much more than that. It’s a new way to think about async programming overall. Which is really funny, because the concept dates back to the 50s and 60s. You saw how easy it was to switch between threads and return values asynchronously. You also saw how handling exceptions can be straightforward, and how cleaning up resources takes one function call.

You can download the final project by using the Download Materials button at the top or bottom of this tutorial.

If you want to learn more about coroutines, check out the Kotlin Documentation. You might also want to check out our Kotlin Coroutines by Tutorials book, which is out in stores. It brings an even more in-depth look at the Kotlin Coroutines and offers more tutorials.

I hope you enjoyed this tutorial on coroutines. Join us in the forums to discuss this tutorial and your findings as you work with them!