What’s New in Android Studio 3
Android Studio 3 was recently released – take a quick tour of what’s new! By Aldo Olivares.
Sign up/Sign in
With a free Kodeco account you can download source code, track your progress, bookmark, personalise your learner profile and more!
Create accountAlready a member of Kodeco? Sign in
Sign up/Sign in
With a free Kodeco account you can download source code, track your progress, bookmark, personalise your learner profile and more!
Create accountAlready a member of Kodeco? Sign in
Sign up/Sign in
With a free Kodeco account you can download source code, track your progress, bookmark, personalise your learner profile and more!
Create accountAlready a member of Kodeco? Sign in
Contents
At I/O 2017, Google announced first-party support of the Kotlin programming language for Android Development, with Kotlin tools built right-in to an upcoming version of Android Studio.
Almost every Android developer around the world was excited for this change. Many have wanted an alternative to Java for several reasons, but until now had to use external plugins to achieve such a task.
On October 27, 2017, Android Studio 3.0 went to a stable version and many Android developers began to develop completely in Kotlin. We at raywenderlich.com are no exception, and most of our Android tutorials are now written in this great programming language.
But Kotlin support is only one of the changes in Android Studio 3. In this tutorial, you will learn about some of the other improvements that Android Studio 3 has to offer.
You will also learn about some of the best movies ever made thanks to our sample app: Color Movies.
Grab some popcorn and let’s code!
Note: For this project, I assume that you know the basics of Android development with Kotlin. You should also know how to set up and run Android Studio and the Android Emulator. If you need some help with that, check out our Beginning Android Development with Kotlin tutorial.
Getting Started
To kick things off, start by downloading the materials for this tutorial (you can find a link at the top or bottom of the page). The sample project has everything you need to try the new features in Android Studio 3.
Launch Android Studio 3.0.1 or greater, and in the Welcome to Android Studio window select Import Project (Eclipse, ADT, etc).
Select the high-level project directory and click OK.
If you explore the project, you will find a folder with models, a folder for the API services, a Kotlin extension file, an activity and a layout file. It is not necessary that you analyze them in detail since you won’t be heavily editing these files. Instead, we are going to focus on the advantages that Android Studio 3.0 provides to work with them.
Build and Run the app on an emulator or device. You should see this:
The screen of our activity contains a button and some text. Don’t press the button just yet. First, you will need to obtain an API Key.
Obtaining the NY Times API Key
For this tutorial you will use the NY Times Open API, a popular web service for retrieving movie and book reviews.
Fortunately, getting an API Key is as easy as going to https://developer.nytimes.com/signup
Note: You will be asked to select an API. Choose Movie Reviews API.
Once you have acquired your API key, open the NYTimesApi.kt file under the models folder and replace the part that says <key> with your own.
@GET("svc/movies/v2/reviews/search.json?api-key=<key>")
fun getReviews(): Call<MovieResponse>
Build and Run:
Press the New Movie button to get an awesome movie suggestion:
Now we are ready to try all the new features in Android Studio 3! :]
Development
Kotlin
The newest and most anticipated feature is app development in Kotlin. One of the best parts of Kotlin is that this language is 100% interoperable with Java. Therefore, the most popular libraries that you know and love will work without any issue with the help of Gradle.
This project uses Retrofit, one of the most popular Android Networking libraries written in Java.
To see how libraries are implemented in Android Studio 3, open the build.gradle file of the app:
Android Studio 3 Gradle configuration has changed since the last version, due to changes in the Android Studio Gradle plugin version 3.0.0+. Among other changes, we now typically use implementation instead of compile:
dependencies {
implementation fileTree(dir: 'libs', include: ['*.jar'])
implementation"org.jetbrains.kotlin:kotlin-stdlib-jre7:$kotlin_version"
implementation 'com.android.support:appcompat-v7:26.1.0'
implementation 'com.android.support.constraint:constraint-layout:1.0.2'
implementation 'com.squareup.retrofit2:converter-moshi:2.3.0'
implementation "com.android.support:design:$supportVersion"
testImplementation 'junit:junit:4.12'
androidTestImplementation 'com.android.support.test:runner:1.0.1'
androidTestImplementation
}
Also, you no longer need to specify the Android build tools version in build.gradle. The plugin will use the minimum required version by default. So, you can now omit the android.buildToolsVersion
property.
Note: We are not going to cover all the changes in the Gradle plugin because that would be beyond the scope of this tutorial. If you want more information, you can check out the official documentation or our Gradle Tutorial for Android. :]
Navigate to the models package and open the Link.kt file.
This class consists of a single statement thanks to the power of the data classes in Kotlin:
data class Link(val type: String,
val url: String,
val suggested_link_text: String)
To give you an idea of how much code you were saved, this would be the Java counterpart:
public class Link {
private String type;
private String url;
private String suggested_link_text;
public Link(String type, String url, String suggested_link_text) {
this.type = type;
this.url = url;
this.suggested_link_text = suggested_link_text;
}
public String getType() {
return type;
}
public String getUrl() {
return url;
}
public String getSuggested_link_text() {
return suggested_link_text;
}
}
Cool right?
You are not going to learn all ins and outs of Android Development with Kotlin in this project. I invite you to explore our Kotlin for Android tutorial if you want to learn more.
Custom and Downloadable Fonts
Beginning with Android Studio 3, we can let the system request fonts from a provider application instead of bundling them into our APKs, or let our APK download fonts. Custom font support in your app is provided on older Android devices via support library 26 and above.
Custom and downloadable fonts have several benefits including:
- Android Studio 3 design editor support
- Increased app installation success rate
- Reduced APK size
- Less memory and data usage since they are only fetched over the network when needed.
To try this new feature you are going to modify the Color Movies app to use a custom font from Google Fonts.
Open activity_main.xml in the res/layout folder.
In the Android Studio design editor preview, you will notice that the font is the usual sans serif:
Select the TextView that displays the movie review:
Go to the fontFamily dropdown menu, scroll down and select More Fonts…
A menu will show up that lets you select between Android’s native fonts or custom Downloadable fonts from Google Fonts:
Look for the Aldrich font either by scrolling down or by using the search field, and select it:
To use the custom font we have two options: Create downloadable font or Add font to the project.
Downloadable fonts are usually the best choice since they let Android download it only when necessary, saving memory and mobile data usage.
Make sure that Create downloadable font is selected and click OK.
Your layout preview should now look like this:
There is also a new file under your resfolder:
The aldrich.xml file contains all the information needed by Android devices to download your font when needed.
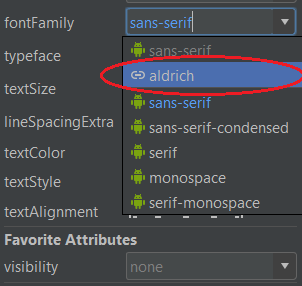
Now you need to add the same font to the remaining TextViews. Fortunately, now that you have added it to your res folder all you have to do is select it in the fontFamily dropdown menu:

The little clip-shaped icon indicates that it is a downloadable font instead of a native font.
After you have finished changing the font for both TextViews your layout should look like this:
Build and Run the app:
Now your app has a nice custom font that Android will automatically download when needed!
Click on New Movie to see your new font in action:
Wow, Maze Runner has a great review! We should head to the movies right now! :]
There is a lot more to learn about custom fonts in Android. If you want to learn more, please make sure to check out our Custom and Downloadable Fonts tutorial.
Adaptive Icons
A long time ago, smartphones were the only devices running Android. But as Android’s popularity grew, so did the variety of devices using the operating system. Nowadays, there are gadgets ranging from small watches to huge Ultra HD wide screen TV’s.
This is changing the way we approach our app designs, including our app icons.
Android Studio 3 and Android 8.0 (API level 26) introduce the possibility to create Adaptive icons, which can display a variety of shapes and sizes across different devices.
Adaptive icons consist of 2 fundamental pieces:
- Foreground Layer: The image or logo that represents your app.
- Background Layer: Your background color or gradient.
In Android 7.1 and earlier, icons measured 48 x 48 dp. Now you must size your icon according to the following guidelines:
- Both layers must measure 108 x 108 dp.
- The inner 72 x 72 dp of the icon appears within the masked viewport.
- The system reserves the outer 18 dp on each of the 4 sides to create interesting visual effects, such as parallax or pulsing.
In the next section I will show you how to create adaptive icons using the new and improved Asset Studio in Android Studio 3.
Note: It is highly recommended that you get a custom icon created by a professional designer if you plan to release your app in Google’s Play Store.
Asset Studio
Go back to your emulator’s home screen and look for your app’s icon. You will notice that it is the default one provided by Android Studio:
Back in Android Studio 3, right click on your res folder and select New/Image Asset
The Asset Studio will pop up, which allows you to create all kinds of icons and assets for your app.
In Icon Type you can choose between Launcher Icons (Adaptive and Legacy), Launcher Icons (Legacy only), Action Bar and Tab Icons and Notification Icons. Leave the default option Launcher Icons (Adaptive and Legacy) selected and leave the name as ic_launcher.
Below you have 3 tabs: Foreground Layer, Background Layer and Legacy.
In Foreground Layer you will choose the image that best represents your app. This could be any image that your trusted designer provides you. But for the moment you will use the material icons included with Android.
In Asset Type select Clip Art. Note how the preview is automatically updated:
Click on Clip Art
A dialog will appear with a large variety of icons to choose from:
Type moviein the search field and select the one named movie filter:
Click OK. Your icon should look like this:
Now let’s change the color. Click on the hexadecimal code in front of Color:
You can choose a color for your image, either with the Eyedropper, RGB Code, hexadecimal or the color palette.
Choose white by typing FFFFFF in the hexadecimal field:
Click Choose. Your design should look like this:
The foreground is completed, now you are going to work on the background.
In the tabs, select Background Layer:
We can choose a background image or a solid color. In our case we are going to select Color:
Click on the color’s hexadecimal code. A dialog will show up just like the one you used to modify the clip art image:
Here you can choose the background color for your app’s icon. I’m going to select purple (4E00A6) because it is my favorite color, but you can choose the one you like the most:
Click Choose. Your icon should look like this:
Finally, select the Legacy tab:
Here you can specify if you are going to generate an icon for APIs lower than 25 and what it will look like. Leave the default settings and click Next.
A dialog will ask you to confirm the output directory for your resources. It will also warn you that some files will be overwritten:
Do not worry about the warning. We want the previous files to be overwritten. Click Finish.
Your res/mipmap folder now contains your own design:
Build and Run and check out your brand-new icon:
You just created your first adaptive icon using the Asset Studio in Android Studio 3!
Android Emulator
Google Play System Images in Android Oreo
Just like for previous API levels, the Android Oreo system image now contains Play Store services. This is very useful to test your apps that make use of several Google APIs like maps and localization.
To create an AVD with Play Store services installed just make sure that you have Google APIs in the device’s target:
Quick Boot
In the early days of Android development, the emulator could take more than an hour to load. Therefore, you had to resort to several hacks or third-party emulators to speed up your development process.
But things are changing. If you have a modern computer, an Android emulator created using Android Studio 3 should take less than a minute to first load. And it should run fast thanks to virtualization technology such as HAXM from Intel on macOS and Windows and KVM on Linux.
The developers at Google have decided to go even further and introduced a new and powerful feature called Quick Boot. Once enabled, when you initiate an AVD for the first time, a cold boot will occur (like powering on a device), but all other times the previous state will be restored (like waking your phone), unless you manually ask for a cold boot.
You’ll need Android Emulator 27.0.2 or greater to use Quick Boot.
New AVD’s you create will use Quick Boot by default. To use this feature on an existing AVD, go to your AVD’s configuration (the pencil icon):
Click Show Advanced Settings:
Scroll down to Emulated Performance and make sure that Quick Boot is checked.
Start your virtual device and select More in the left menu:
Go to the Settings menu and select Yes on Save quick-boot state on exit:
And that’s it!
Every time you close your emulator the state will be saved.
And when you start your emulator again, the previous session will be restored:
Android Profiler
A very important aspect of an app’s development process is testing. In Android Studio 3, the Android Profiler replaces the old Android Monitor.
You can use the new the Android Profiler to measure CPU usage, Memory and Data usage, and even certain parts of your code execution thanks to the Event Timeline.
In this tutorial you will explore the Network Profiler and the Event Timeline since they are the easiest to understand if you have previous experience with web services.
Network Profiler
Build and Run your app and go to the View/Tool Windows menu and click on Android Profiler.
You can also access it from the toolbar at the bottom of Android Studio 3:
The Android Profiler will appear at the bottom, where Logcat was showing:
The Android Profiler has 3 main sections:
- (1) CPU Profiler: Helps you to monitor your device’s CPU usage by triggering a sample or instrumented CPU trace.
- (2) Memory Profiler: Helps you to measure your app’s current memory usage by identifying memory leaks that can lead to freezes or app crashes.
- (3) Network Profiler: Allows you to monitor the network activity of your app such as web requests or mobile data usage
Select your current emulator in the device dropdown:
Click on Network to open the Network Profiler:
In your app, click on the New Movie button and see what happens in the Network Profiler:
We are going to analyze in detail what happened when you made a request to the NY Times API.
Stop live monitoring by pressing the Live button:
Use the lower scrolling bar to make the request’s graph easier to see in your network profiler:
Select the graph by clicking and dragging:
A panel will appear with the request’s Name, Size, Type, Status code, Time and its respective Timeline details.
Select the request. Another panel will appear with detailed information about the request sent and the data received:
Thanks to the Network Profiler you can analyze very deeply what happens when you make a web request. You don’t even need to use external applications to analyze the JSON response.
Take a moment to explore the response data such as the status code, size, json, url, etc.
Isn’t it wonderful how easy it is to analyze web requests with the network profiler?
Press the Live button and click on the back arrow to return to the the Android Profiler:
Timeline
The top part of the Android Profiler is the Event Timeline:
As the name suggests, it helps you to monitor the events that happen during the execution of your app such as touches, rotations, activity states, etc.
Rotate your emulator’s screen using the side controls or by pressing Ctrl + L to rotate left or Ctrl + R to rotate to right. You will notice how your profiler immediately begins to display several changes:
First, you will see the lifecycle states of your MainActivity: saved – stopped – destroyed:
Then, the name of the new activity that is currently in the foreground, along with an icon indicating the type of event that triggered its creation(rotation):
Thanks to the Event Timeline it is very easy to know what’s going on behind the scenes. But you are not only limited to rotation events, let’s try a couple more:
Press the New Movie button to trigger a touch event:
Change the emultor’s volume to trigger a sound event:
Exploring all the different events would take way too much time, but I invite you to play around with the emulator to get familiar with them.
If you want to learn more about the Android Profiler, Google has a great article about the subject.
I don’t know about you, but I want to watch a movie before diving into this new Android Development with Kotlin world! :]
Build and Run your app one last time to get a movie suggestion:
24 Frames? Sounds like fun!
Let me know which movie you got in the comments below : ]
Where to go from Here
You can download the completed project using the download button at the top or bottom of this tutorial.
If you want to learn more about all the changes in Android Studio 3, I encourage you to read Google’s Official Documentation about the release. It has all you need to know about the new Android development tools at your disposal.
There are many topics that we covered on a high-level like Custom and Downloadable Fonts, Gradle Changes and Adaptive Icons, in order to keep things short and sweet. But remember that you can always refer to our Android Development Tutorials to dig deeper into those subjects
I hope you enjoyed this tutorial, and if you have any questions or comments, please join the forum discussion below!
All videos. All books.
One low price.
A Kodeco subscription is the best way to learn and master mobile development — plans start at just $19.99/month! Learn iOS, Swift, Android, Kotlin, Flutter and Dart development and unlock our massive catalog of 50+ books and 4,000+ videos.
Learn more