Collection Views in OS X Tutorial
In this collection views in OS X tutorial, you’ll discover the joy of arranging things in beautiful, flowing interfaces for the desktop. By Gabriel Miro.
Sign up/Sign in
With a free Kodeco account you can download source code, track your progress, bookmark, personalise your learner profile and more!
Create accountAlready a member of Kodeco? Sign in
Sign up/Sign in
With a free Kodeco account you can download source code, track your progress, bookmark, personalise your learner profile and more!
Create accountAlready a member of Kodeco? Sign in
Contents
Collection Views in OS X Tutorial
30 mins
- Behind the Scenes of Collection Views
- Layouts
- The Collection View Items
- Supplementary Views
- The Collection View Data Source and Delegates
- Introducing SlidesMagic
- Overview of the Starter Project code
- Model
- Controllers
- Creating the Collection View
- Configure the Collection View Layout
- Loading Items in the Collection View
- Creating a Collection View Item
- Add Controls to the View
- Add a Top Level CollectionViewItem to the Nib
- Populate the Collection View
- Set the Data Source
- Troubleshooting
- Going Multi-Section
- Add Section Headers
- Implement the Data Source and Delegate Methods
- Selection in Collection Views
- What Happens During Selection Stays in Selection
- Where to go From Here
A collection view is a powerful mechanism for laying out an ordered set of data items visually. It sounds boring when explained in technical terms, so think of apps that do this: Finder and Photos; these apps let you tab through files in a gallery (visual) layout.
When released with OS X 10.5, NSCollectionView
offered a handy means of arranging a group of objects in a grid of identically sized items displayed in a scrollable view.
OS X 10.11, aka El Capitan, gave NSCollectionView
a major overhaul inspired by UICollectionView
from iOS.
Among other things, the new NSCollectionView
API adds support for:
- Sections with optional headers/footers
- Variable-size items
- Customizable layouts
- Cell reuse
In this collection views in OS X tutorial, you’ll discover the joy of arranging things in beautiful, flowing interfaces for the desktop. You’ll close the gap on UX between mobile and desktop and enjoy greater control over your apps by building SlidesMagic — your own grid-based image browsing app.
This tutorial assumes that you know the basics of writing OS X apps. If you’re new to OS X you should take a look at the OS X tutorials available here, and then come back to learn about collection views.
The show is about to start, so have a seat and get ready for your own personal magic show by NSCollectionView
.
Behind the Scenes of Collection Views
The NSCollectionView
is the main view — the stage, if you will — where the magic show happens. It displays visual items and contains these key components:
Layouts
NSCollectionViewLayout
– New to this version, this lets you specify a layout by setting the collection view’s collectionViewLayout
. It’s an abstract class from which all concrete layout classes inherit.
NSCollectionViewFlowLayout
– Provides a flexible grid-like layout, and you can achieve your desired results for most apps with it.
NSCollectionViewGridLayout
– Matches NSCollectionView
‘s simple grid layout behavior pre OS X 10.11 but doesn’t support sections and all the goodies that come with the new API.
Sections and NSIndexPath
– Allows for grouping of items into sections. The items form an ordered list of sections, each containing an ordered list of items. Each item is associated with an index that comprises of a pair of integers (section, item) encapsulated in an NSIndexPath
instance. When grouping of items into sections isn’t required, you still have at least one section (by default).
The Collection View Items
Like many other Cocoa frameworks, items in the collection view follow the MVC design pattern.
The Model and the View – The items’ content comes from your model’s data objects. Each individual object that becomes visible gets its own view in the larger collection view. The structure of these individual views are defined in a separate nib (file extension “.xib”).
The Controller – The nib mentioned above is owned by an instance of NSCollectionViewItem, which is is a descendant of NSViewController
, or a subclass. It mediates the flow of information between the items’ views and model objects. Generally, you subclass NSCollectionViewItem
. When items are not of the same kind, you define a different subclass and nib for each variant.
Supplementary Views
To display extra information in the collection view that’s not part of an individual item, you’d use supplementary views; some common implementations of these are section headers and footers.
The Collection View Data Source and Delegates
-
NSCollectionViewDataSource
– Introduced with the new API in OS X 10.11, the populates the collection view with items and supplementary views. -
NSCollectionViewDelegate
– Handles events related to drag-and-drop, selection and highlighting. -
NSCollectionViewDelegateFlowLayout
– Lets you customize a flow layout.
Introducing SlidesMagic
SlidesMagic the app you’re going to build is a simple image browser. It’s pretty cool, but don’t get all excited and delete Photos from your Mac just yet.
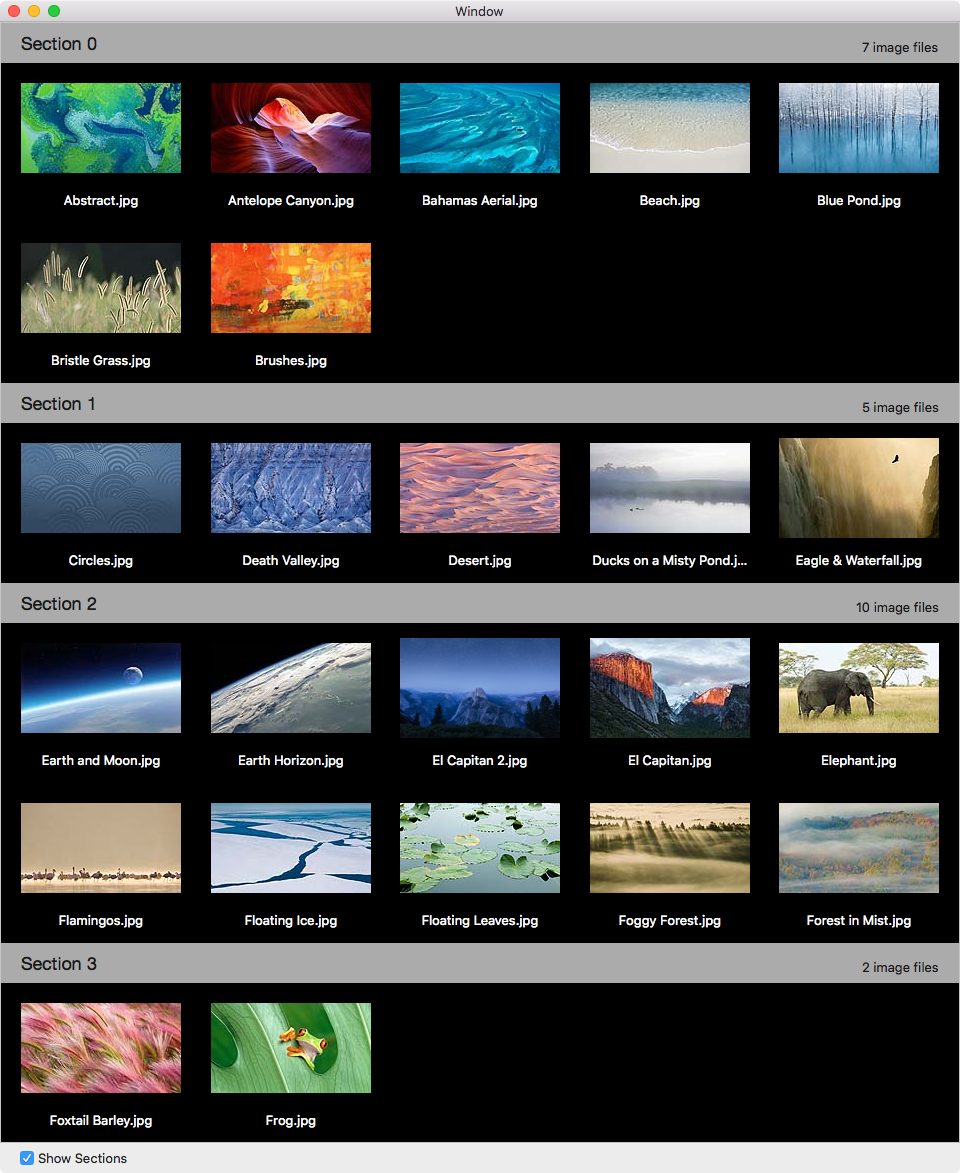
It retrieves all image files from a folder on the file system and displays them and their names in an elegant collection view. It’s actually kind of magical when you think about it! The finished app will look like this:
Download the starter project here and open it in Xcode. Build and run:
At this point, it appears to be an empty window, but it has hidden features that will become the foundation of an image browser.
When SlidesMagic launches, it automatically loads all the images from the system’s Desktop Pictures folder. From Xcode‘s console log, you can see the file names.
That list in the console is an indicator that the model-loading logic is in place. You can choose another folder by selecting the File \ Open Another Folder… menu.
Overview of the Starter Project code
The starter project provides functionality that is not directly related to collection views but specific to SlidesMagic.
Model
- ImageFile.swift: Encapsulates a single image file
- ImageDirectoryLoader.swift: Helper class that loads image files from the disk
Controllers
The application has two main controllers:
-
WindowController.swift –
windowDidLoad()
is responsible for the initial sizing of the window on the left half of the screen. TheopenAnotherFolder
method is invoked by File \ Open Another Folder… menu item, and it presents a standard open dialog to choose a different folder. -
ViewController.swift –
viewDidLoad()
opens the Desktop Pictures folder as the initial folder to browse, andloadDataForNewFolderWithUrl()
is used byopenAnotherFolder
fromWindowController
.
Creating the Collection View
Open Main.storyboard. Go to the Object Library, and drag a Collection View into the view of the View Controller Scene.
If you build now you’ll see an error:
Main.storyboard: Unknown segue relationship: Prototype
Along with the collection view, Xcode also added an NSCollectionViewItem
, connected with a Prototype segue.
Therein you have the cause of your build error — it’s this type of segue that’s causing the trouble. This is a vestige (or bug if you like…) of the OS X 10.10 and earlier API model that prevents you from using collection view items in storyboards.
The fix is to delete it and reincarnate it in a separate xib file.
Select the Collection View Item and press Delete to, well, delete it.
Now the build error is gone.
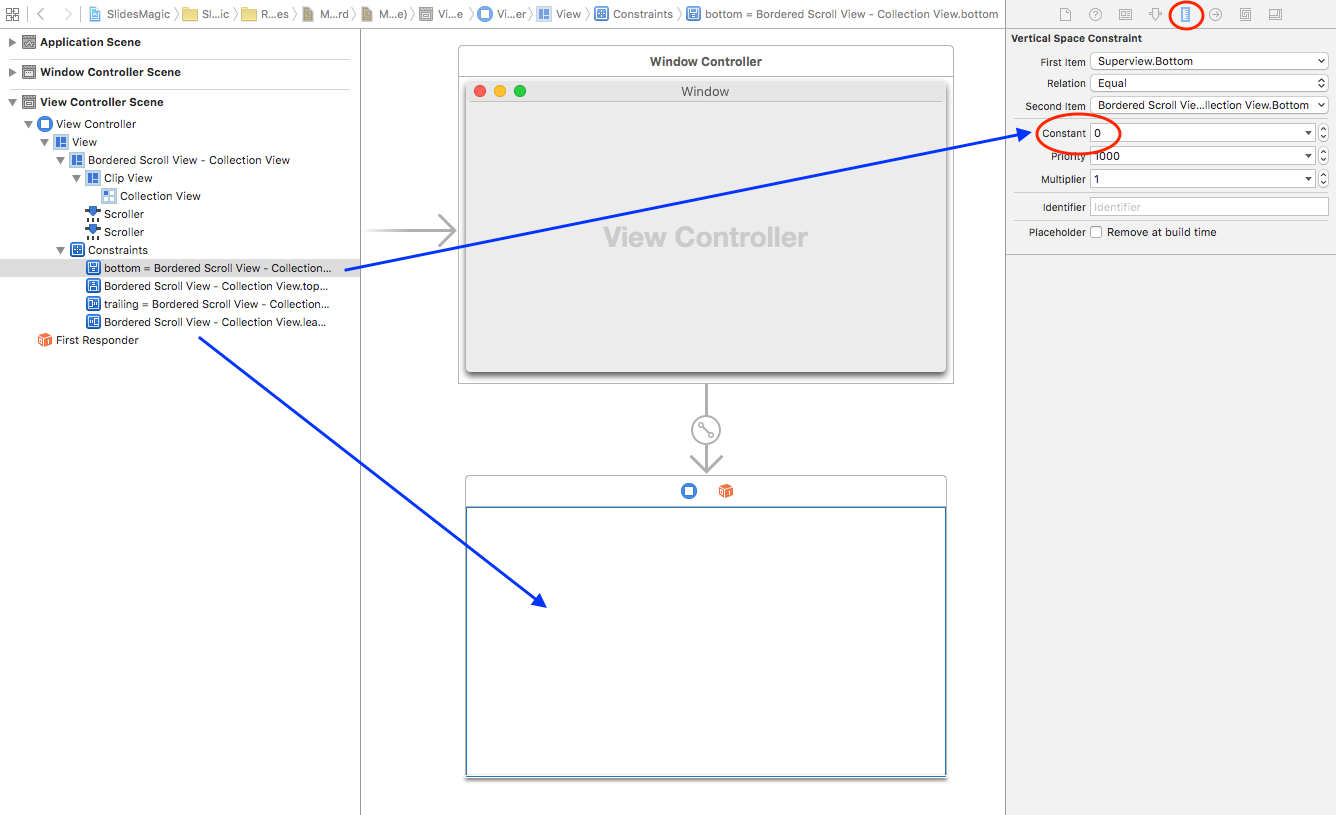
Resize the Bordered Scroll View so it takes up the whole area of the parent view. Then, select Editor \ Resolve Auto Layout Issues \ Add Missing Constraints to add the Auto Layout constraints.
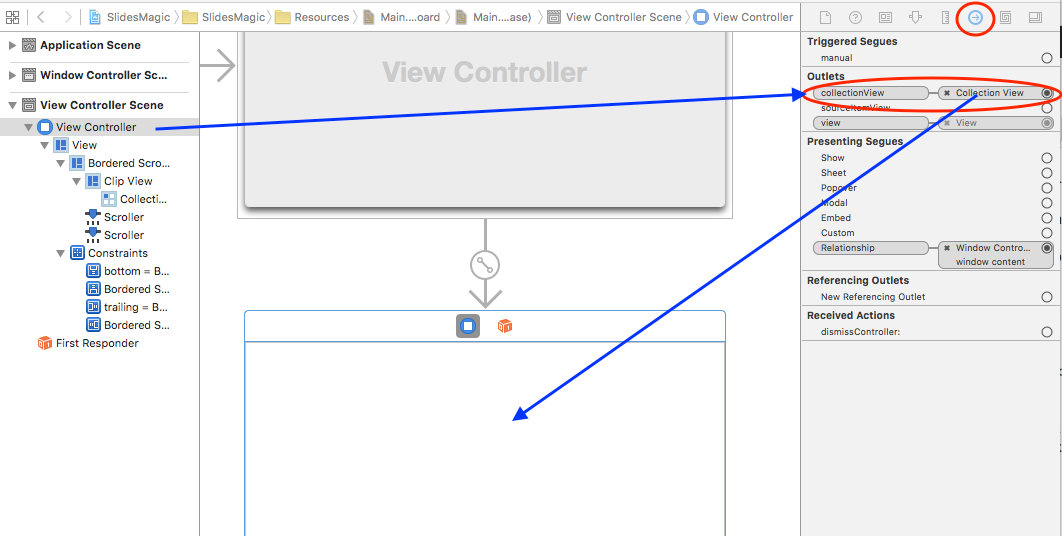
You need to add an outlet in ViewController to access the collection view. Open ViewController.swift and add the following inside the ViewController
class definition:
@IBOutlet weak var collectionView: NSCollectionView!
Open Main.storyboard, and select the View Controller inside the View Controller Scene.
Open the Connections Inspector and find the collectionView element within the Outlets section. Connect it to the collection view by dragging from the button next to it to the collection view control in the canvas.
Configure the Collection View Layout
You’ve got options: You can set the initial layout and some of its attributes in Interface Builder, or you can set them programmatically.
For SlidesMagic, you’ll take the programmatic approach.
Open ViewController.swift and add the following method to ViewController
:
private func configureCollectionView() {
// 1
let flowLayout = NSCollectionViewFlowLayout()
flowLayout.itemSize = NSSize(width: 160.0, height: 140.0)
flowLayout.sectionInset = NSEdgeInsets(top: 10.0, left: 20.0, bottom: 10.0, right: 20.0)
flowLayout.minimumInteritemSpacing = 20.0
flowLayout.minimumLineSpacing = 20.0
collectionView.collectionViewLayout = flowLayout
// 2
view.wantsLayer = true
// 3
collectionView.layer?.backgroundColor = NSColor.blackColor().CGColor
}
Here’s what you’re doing in this method:
- Creating an
NSCollectionViewFlowLayout
and setting its attributes and thecollectionViewLayout
property of theNSCollectionView
. - For optimal performance,
NSCollectionView
is designed to be layer-backed. So, you’re setting an ancestor’swantsLayer
property totrue
. - Making an addition related to the layer that’s specific to SlidesMagic, setting the collection view’s background color to black.
You need to call this method when the view is created, so add this to the end of viewDidLoad()
:
configureCollectionView()
Build and run:
At this point, you have a black background and a layout. You’ve set the stage for your magic show!
Loading Items in the Collection View
To load items, you need to call its reloadData()
method, which causes the collection view to discard and redisplay any currently visible items.
You’d typically call this method when the model changes.
Open ViewController.swift and add this code at the end of loadDataForNewFolderWithUrl(_:)
:
collectionView.reloadData()
This makes it so that selecting File \ Open Another Folder… calls this method. it loads a new model then calls reloadData()
.
Creating a Collection View Item
Just because you removed NSCollectionViewItem
from the storyboard doesn’t mean you don’t need it. :] Here’s how to bring it back the right way.
Go to File \ New \ File…, select OS X \ Source \ Cocoa Class and click Next.
Set the Class field to CollectionViewItem, the Subclass of field to NSCollectionViewItem
, and check Also create XIB for user interface.
Click Next, and in the save dialog, select Controllers from Group and click Create.
Open CollectionViewItem.swift and replace the whole class with this:
class CollectionViewItem: NSCollectionViewItem {
// 1
var imageFile: ImageFile? {
didSet {
guard viewLoaded else { return }
if let imageFile = imageFile {
imageView?.image = imageFile.thumbnail
textField?.stringValue = imageFile.fileName
} else {
imageView?.image = nil
textField?.stringValue = ""
}
}
}
// 2
override func viewDidLoad() {
super.viewDidLoad()
view.wantsLayer = true
view.layer?.backgroundColor = NSColor.lightGrayColor().CGColor
}
}
In here, you:
- Define the
imageFile
property that holds the model object to be presented in this item. When set, itsdidSet
property observer sets the content of the item’s image and label. - Change the background color to the item’s view.
Add Controls to the View
The View in the nib is the root view for a subtree of controls to be displayed in the item. You’re going to add an image view and a label for the file name.
Open CollectionViewItem.xib.
Add an NSImageView
:
- From the Object Library, add an Image View to View.
- Select and click Pin from the Auto Layout toolbar to set its constraints.
- Set the top, leading and trailing constraints to 0, the bottom to 30 and click Add 4 Constraints.
- To fix the Auto Layout issues, select Editor \ Resolve Auto Layout Issues \ Update Frames.
Add a label:
- From the Object Library, add a Label below the Image View.
- Click the Pin button. Set the top, bottom, trailing and leading constraints to 0, and then click Add 4 Constraints.
- Select Editor \ Resolve Auto Layout Issues \ Update Frames to update its position.
Select the Label, and in the Attributes Inspector set the following attributes:
- Alignment to center
- Text Color to white
- Line Break to Truncate Tail
Now you need to connect the controls to the imageView
and the textField
outlets:
- Select File’s Owner and show the Connections Inspector.
- Next, drag from the button next imageView to the Image View control to connect them.
- In the same way, connect the
textField
outlet to Label.
Add a Top Level CollectionViewItem to the Nib
The File’s Owner in the nib — of type CollectionViewItem
— is just a placeholder. You still need to instantiate it.
CollectionView's
method makeItemWithIdentifier(_:forIndexPath:)
instantiates the collection view item, and it requires the nib to contain a single top-level instance of either NSCollectionViewItem
or a subclass thereof.
You need to make it appear.
Drag a Collection View Item from the Object Library and drop it into Document Outline. Select it, and in the Identity Inspector, set its Class to CollectionViewItem
.
Populate the Collection View
You need to implement the data source methods so the view knows the answers to these questions:
- How many sections are in the collection?
- How many items are in each section?
- Which item is associated with a specified index path?
Meet your data source method: NSCollectionViewDataSource
protocol.
Put it into action now — open ViewController.swift and add the following extension at the end of the file:
extension ViewController : NSCollectionViewDataSource {
// 1
func numberOfSectionsInCollectionView(collectionView: NSCollectionView) -> Int {
return imageDirectoryLoader.numberOfSections
}
// 2
func collectionView(collectionView: NSCollectionView, numberOfItemsInSection section: Int) -> Int {
return imageDirectoryLoader.numberOfItemsInSection(section)
}
// 3
func collectionView(collectionView: NSCollectionView, itemForRepresentedObjectAtIndexPath indexPath: NSIndexPath) -> NSCollectionViewItem {
// 4
let item = collectionView.makeItemWithIdentifier("CollectionViewItem", forIndexPath: indexPath)
guard let collectionViewItem = item as? CollectionViewItem else {return item}
// 5
let imageFile = imageDirectoryLoader.imageFileForIndexPath(indexPath)
collectionViewItem.imageFile = imageFile
return item
}
}
- This method provides the number of sections. When your app doesn’t support sections, you can omit this method because a single section will be assumed. When SlidesMagic launches, the model
imageDirectoryLoader
is set to return the value 1. - This is one of two required methods for
NSCollectionViewDataSource
. Here you return the number of items in the section specified by thesection
parameter. Upon launch, SlidesMagic has a single section, so you set the model to return the total number of images in the folder. - This is the second required method. It returns a collection view item for a given
indexPath
. - The collection view’s method
makeItemWithIdentifier(_:forIndexPath:)
instantiates an item from a nib where its name equals the value of theidentifier
parameter. In this case, it’s"CollectionViewItem"
. First, it attempts to reuse an unused item of the requested type, and if nothing is available it creates a new one. - This code gets the model object for the given
NSIndexPath
and sets the content of the image and the label.
Set the Data Source
A collection view without data is like a magic act with no slight of hand — pointless and uninspiring. So, your next step is to define the data source; in this case it’s the view controller.
Open Main.storyboard and select the collection view.
Open the Connections Inspector and locate dataSource in the Outlets section. Drag from the adjacent button to the View Controller in Document Outline View.
Voila! It was worth all that work! Your collection view displays images from the Desktop Pictures folder!
Troubleshooting
If you don’t see images, then something went wrong. You worked through several steps, so you probably just missed something small.
- Are all the connections in the Connections Inspector set as instructed?
- Did you set the
dataSource
outlet? - Did you use the right type for custom classes in the Identity Inspector.
- Did you add the top level
NSCollectionViewItem
object and change its type toCollectionViewItem
? - Is the value for the
identifier
parameter inmakeItemWithIdentifier
identical to the nib name?
Going Multi-Section
MagicSlides is doing some serious magic now. But you’re going to improve it by adding sections.
First, you need to add a check box at the bottom of the view so you can toggle between single and multi-section.
Open Main.storyboard, and in the Document Outline view, select the scroll view’s bottom constraint. Open the Size Inspector and change its Constant to 30.
This is how you move the collection view up to make room for the check box.
Now, drag a Check Box Button from the Object Library into the space below the collection view. Select it, and in the Attributes Inspector, set its Title to Show Sections, and its State to Off.
Then, set its Auto Layout constraints by selecting the Editor \ Resolve Auto Layout Issues \ Add Missing Constraints menu.
Build and run. It should look like this at the bottom:
Now for a little UI. When you click the box, the application needs to change the collection view’s appearance.
Open ViewController.swift and add the following method at the end of the ViewController
class:
// 1
@IBAction func showHideSections(sender: AnyObject) {
// 2
let show = (sender as! NSButton).state
imageDirectoryLoader.singleSectionMode = (show == NSOffState)
imageDirectoryLoader.setupDataForUrls(nil)
// 3
collectionView.reloadData()
}
Section by section, here’s what you’re doing:
- Calling this method by toggling the state of the checkbox.
- Accordingly, retrieving the state of the checkbox and setting data model mode
singleSelectionMode
, and then calling the model’ssetupDataForUrls(_:)
method to rearrange the sections structure. Thenil
value passed means you skip image loading — same images, different layout.
If you’re curious how images are distributed across sections, look up sectionLengthArray
in ImageDirectoryLoader
. The number of elements in this array sets the max number of sections, and the element values set the number of items in each section.
Now, open Main.storyboard. In the Document Outline, Control-Drag from the Show Sections control over the View Controller. In the black pop-up window click showHideSections: to connect it. You can check if the connection was set properly in the Connections Inspector.
Build and run.
Check Show Sections and watch the layout change.
Because of the “black tail” in the second row, you see section 0 has seven images, but section 1 has five and section 2 has 10 (look at sectionLengthArray
). It’s not clear because the sections are rather cozy.
To fix this, open ViewController.swift and modify the layout’s sectionInset
property in the configureCollectionView()
function.
Replace:
flowLayout.sectionInset = NSEdgeInsets(top: 10.0, left: 20.0, bottom: 10.0, right: 20.0)
With this:
flowLayout.sectionInset = NSEdgeInsets(top: 30.0, left: 20.0, bottom: 30.0, right: 20.0)
Here you set the bottom and top section insets to 30 to provide better visual separation between sections.
Build and run.
Check Show Sections, and note the additional spacing between sections.
Add Section Headers
The app is looking great so far, but more organization will make it even better.
Another way to see section boundaries is adding a header or footer view. To do this, you need a custom NSView
class and will need to implement a data source method to provide the header views to the table view.
To create the header view, select File \ New \ File…. Select OS X \ User Interface \ View and click Next.
Enter HeaderView.xib as the file name and for Group select Resources.
Click Create.
Open HeaderView.xib and select the Custom View. Open the Size Inspector and change Width to 500 and Height to 40.
Drag a label from the Object Library to the left-hand side of Custom View. Open the Attributes Inspector and change Title to Section Number and Font Size to 16.
Drag a second label to the right-hand side of Custom View and change Title to Images Count and Text Alignment to Right.
Now, select the Editor \ Resolve Auto Layout Issues \ Add Missing Constraints menu to add its Auto Layout constraints.
The header view should look like this:
With the interface ready for show time, the next task is to create a custom view subclass for the header view.
Select File \ New \ File… to create a new file.
Choose OS X \ Source \ Cocoa Class and name the class HeaderView
, and then make it a subclass of NSView
. Click next, and for Group select Views. Click Create.
Open HeaderView.swift and replace the contents of the class with the following:
// 1
@IBOutlet weak var sectionTitle: NSTextField!
@IBOutlet weak var imageCount: NSTextField!
// 2
override func drawRect(dirtyRect: NSRect) {
super.drawRect(dirtyRect)
NSColor(calibratedWhite: 0.8 , alpha: 0.8).set()
NSRectFillUsingOperation(dirtyRect, NSCompositingOperation.CompositeSourceOver)
}
In here, you’re:
- Setting up outlets you’ll use to connect to the labels in the nib.
- Drawing a gray background.
With the framework in place, the next task is changing the nib file to use this new class and connecting the outlets to the labels.
Open HeaderView.xib and select the Custom View. Open the Identity Inspector. Change the Class to HeaderView.
In the Document Outline view, Control-Click on the Header View. In the black pop-up window, drag from imageCount to the Images Count label on the canvas to connect the outlet.
Repeat the operation for the second label, dragging from sectionTitle to the Section Number label in the canvas.
Implement the Data Source and Delegate Methods
Your header view is in place and ready to go, and you need to pass the header views to the collection view to implement the collectionView(_:viewForSupplementaryElementOfKind:atIndexPath:)
method.
Open ViewController.swift and add the following method to the NSCollectionViewDataSource
extension:
func collectionView(collectionView: NSCollectionView, viewForSupplementaryElementOfKind kind: String, atIndexPath indexPath: NSIndexPath) -> NSView {
// 1
let view = collectionView.makeSupplementaryViewOfKind(NSCollectionElementKindSectionHeader, withIdentifier: "HeaderView", forIndexPath: indexPath) as! HeaderView
// 2
view.sectionTitle.stringValue = "Section \(indexPath.section)"
let numberOfItemsInSection = imageDirectoryLoader.numberOfItemsInSection(indexPath.section)
view.imageCount.stringValue = "\(numberOfItemsInSection) image files"
return view
}
The collection view calls this method when it needs the data source to provide a header for a section. The method:
- Calls
makeSupplementaryViewOfKind(_:withIdentifier:forIndexPath:)
to instantiate aHeaderView
object using the nib with a name equal towithIdentifier
. - Sets the values for the labels.
At the end of ViewController.swift, add this NSCollectionViewDelegateFlowLayout
extension.
extension ViewController : NSCollectionViewDelegateFlowLayout {
func collectionView(collectionView: NSCollectionView, layout collectionViewLayout: NSCollectionViewLayout, referenceSizeForHeaderInSection section: Int) -> NSSize {
return imageDirectoryLoader.singleSectionMode ? NSZeroSize : NSSize(width: 1000, height: 40)
}
}
The above method, although technically optional, is a must when you use headers because the flow layout delegate needs to provide the size of the header for every section.
When not implemented, the header won’t show because zero size is assumed. Additionally, it ignores the specified width, effectively setting it to the collection view’s width.
In this case, the method returns a size of zero when the collection view is in single section mode, and it returns 40 when in multiple sections mode.
For the collection view to use NSCollectionViewDelegateFlowLayout
, you must connect ViewController
to the delegate
outlet of NSCollectionView
.
Open Main.storyboard and select the collection view. Open the Connections Inspector, and locate the delegate in the Outlets section. Drag from the button next to it to the view controller in the Document Outline.
Build and run.
Check Show Sections and watch your header neatly define sections.
Selection in Collection Views
Collection views support both single and multiple selections. To show an item as selected, you must highlight it.
Before you can do that, you need to make the collection view selectable. Open the Main.storyboard. Then, select the Collection View and in the Attributes Inspector, check Selectable.
Checking Selectable enables single selection, meaning you can click an item to select it. And when you choose a different item, it deselects the previous item and selects item you just picked.
To show an item as selected, you’ll set a white border with borderWith
set to 5.0. Non-selected items will get no special treatment.
Open CollectionViewItem.swift. Add the following at the end of viewDidLoad()
:
// 1
view.layer?.borderWidth = 0.0
// 2
view.layer?.borderColor = NSColor.whiteColor().CGColor
- Setting
borderWidth
to0.0
initializes the item to show not selected - Sets white for the color when selected
Add the following method at the end of CollectionViewItem
class:
func setHighlight(selected: Bool) {
view.layer?.borderWidth = selected ? 5.0 : 0.0
}
This method is called to add or remove highlighting.
When the user selects an item in the collection view, you find out via delegate methods. You’ll need to implement those methods, so open ViewController.swift and add this extension at the end of the file:
extension ViewController : NSCollectionViewDelegate {
// 1
func collectionView(collectionView: NSCollectionView, didSelectItemsAtIndexPaths indexPaths: Set<NSIndexPath>) {
// 2
guard let indexPath = indexPaths.first else {
return
}
// 3
guard let item = collectionView.itemAtIndexPath(indexPath) else {
return
}
(item as! CollectionViewItem).setHighlight(true)
}
// 4
func collectionView(collectionView: NSCollectionView, didDeselectItemsAtIndexPaths indexPaths: Set<NSIndexPath>) {
guard let indexPath = indexPaths.first else {
return
}
guard let item = collectionView.itemAtIndexPath(indexPath) else {
return
}
(item as! CollectionViewItem).setHighlight(false)
}
}
This implements the necessary NSCollectionViewDelegate
methods. Further detail:
- When you select an item,
NSCollectionView
calls this method. - Here you get the selected item — since multiple selection is disabled, it is always the first.
- This retrieves an item by its index and highlights it.
- The same as the previous method, but it’s called when an item is deselected.
What Happens During Selection Stays in Selection
When selected, an item is set in:
- The
selectionIndexPaths
property ofNSCollectionView
. - The
selected
property ofNSCollectionViewItem
.
It’s critical to understand that when an NSCollectionViewItem
instance is recycled, the data set must be refreshed with the data from the new object. Your selected
property of NSCollectionViewItem
is where you ensure this happens.
Accordingly, in the NSCollectionViewDataSource
extension you need to add the following inside collectionView(_:itemForRepresentedObjectAtIndexPath:)
method, just before the return
statement:
if let selectedIndexPath = collectionView.selectionIndexPaths.first where selectedIndexPath == indexPath {
collectionViewItem.setHighlight(true)
} else {
collectionViewItem.setHighlight(false)
}
This guarantees that selection and highlighting are in sync.
Build and run.
Click an item and you’ll see highlighting. Choose a different image and you’ll see fully functional highlighting. Poof! Magic!
Where to go From Here
Download the final version of SlidesMagic here.
In this collection views in OS X tutorial you went all the way from creating your first ever collection view, through discovering the intricacies of the data source API with sections, to handling selection with the delegate protocol. However, although you covered a lot of ground, you’ve barely explored the capabilities of collection views. For instance, you didn’t look into any of these:
- “Data Source-less” collection views using Cocoa Bindings
- Different kind of items
- Adding and removing items
- Custom layouts
- Drag and drop
- Animations
- Tweaking
NSCollectionViewFlowLayout
(sticky headers, for example)
We will be covering some of these topics in upcoming OS X tutorials here on raywenderlich.com, so be sure to check back over the coming months.
Unfortunately, the documentation for collection views from Apple and other sources is limited, but here are my suggestions:
- WWDC 2015 – Session 225 – What’s New in NSCollectionView
- OS X 10.11 El Capitan Release Notes for Cocoa Application Framework
- CocoaSlideCollection – Sample code of WWDC Session 225 above. Written in Objective-C
-
Exhibition – Sample code from Apple, written in Swift using
NSCollectionViewGridLayout
I wish you a pleasant journey with Collection View in your apps. I look forward to hearing your ideas, experiences and any questions you have in the forums below!
All videos. All books.
One low price.
A Kodeco subscription is the best way to learn and master mobile development — plans start at just $19.99/month! Learn iOS, Swift, Android, Kotlin, Flutter and Dart development and unlock our massive catalog of 50+ books and 4,000+ videos.
Learn more